Overview
TempWorks Enterprise™ and Beyond™ both integrate with Rapid! PayCard to activate/register paycard information and instant fund PayCards for your employees.
*Note* Rapid! PayCard requires an existing relationship with Rapid! and additional licensing.
Please contact your TempWorks Account Manager for more information.
*Note* For more information on the Rapid! Portal via video support, please navigate here.
This article covers the following:
- Enabling Rapid! PayCard Instant Funding
- Enrolling Employee's in Rapid! PayCard
- Funding Rapid! PayCards
Enabling Rapid! PayCard Instant Funding
To begin the setup process, navigate to B Menu > System Setting > External Service > Rapid! Instant Funding:
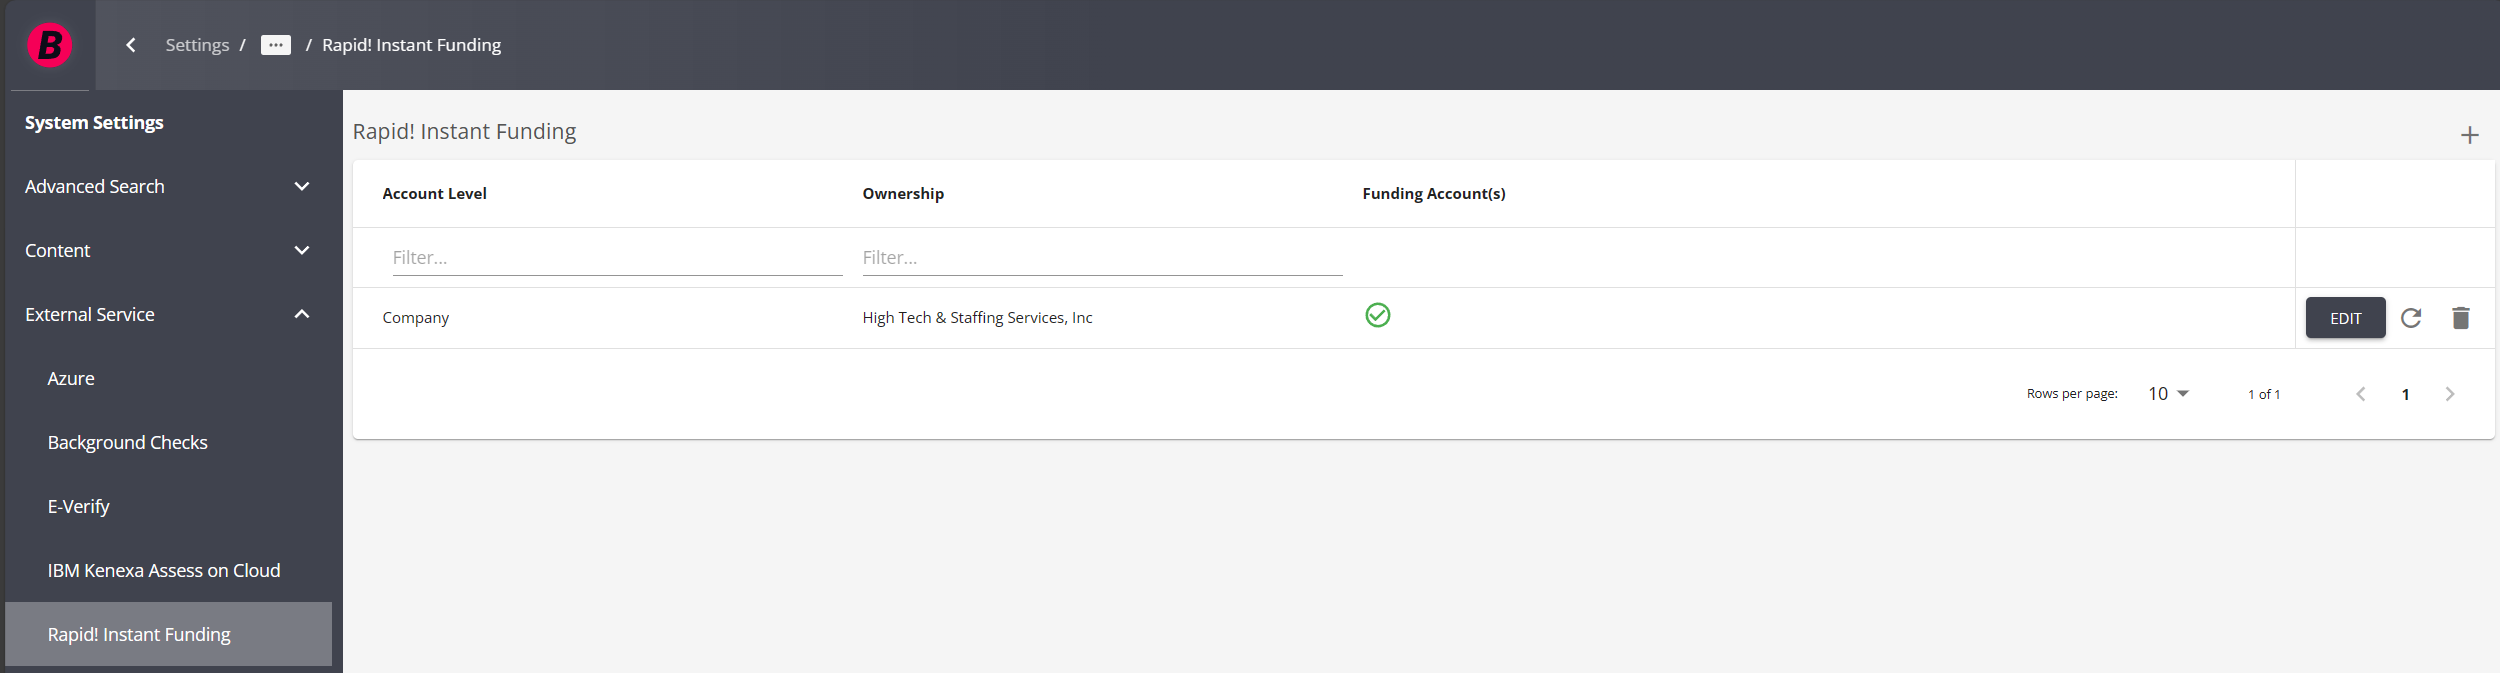
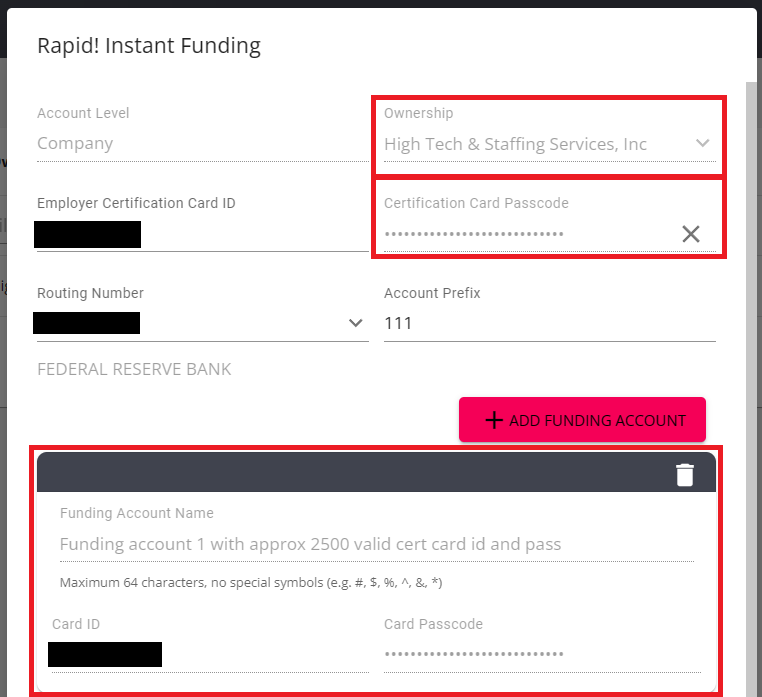
Select the "+" at the top right to open the Rapid! window to add a new account.
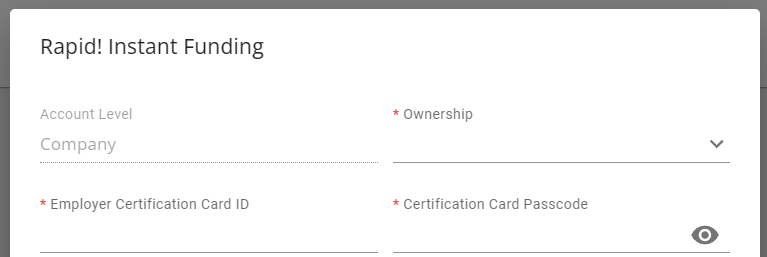
*Note* Besides the "Ownership" field, all other required field information will be provided by Rapid!.
Enter the following information:
- Ownership
- This is the Company based on the "Account Level".
- Employer Certification Card ID
- Certification Card Passcode
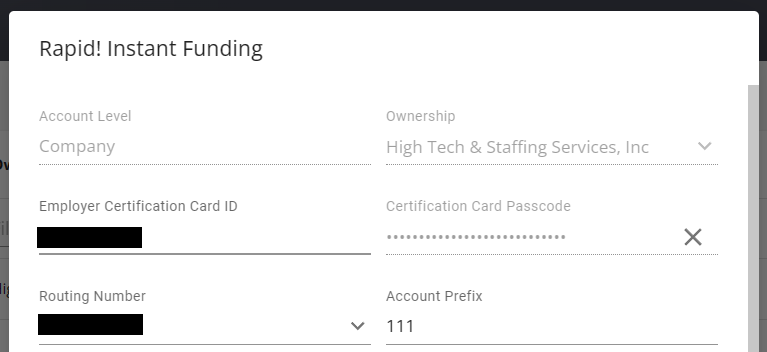
*Note* If you have the proper configuration enabled from TempWorks that allows for automatic PayCard to ACH conversion, you will be able to add a "Routing Number" and "Account Prefix" to the account credentials:
*Note* In the event you have multiple companies that require the utilization of Rapid! PayCards, you will need to create a separate account for each. The same credentials can be used for more than one company.
Once the information has been entered within the required fields, you will have the ability to select "+ Add Funding Account":

Upon selecting "+ Add Funding Account", you will need to enter the following information (provided by Rapid!):
- Funding Account Name
- Card ID
- Card Passcode

Once all the required fields have been completed, select "Submit" to finish the setup process.
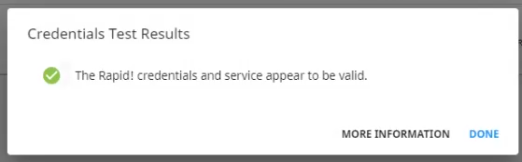
*Note* Once the Funding Account has been setup, you can test the credentials at any time via the  option to the right of the account.
If the test was successful, you will receive the following prompt:
*Note* In the event you need to edit the Rapid! account information, select the "Edit" option to the right of the account and please note the following:
- The “Ownership” is unable to be changed.
- The “Certification Card Passcode” is unable to be edited,
- If a new passcode is required, select the "X" and enter the new passcode.
- The "Funding Accounts" are unable to be edited.
- If the Funding Account information was entered incorrectly, please delete the Funding Account and add a new one with the correct information.
Once the setup is complete, you will be able to enroll employees with Rapid! PayCards.
Enrolling Employee's in Rapid! PayCard
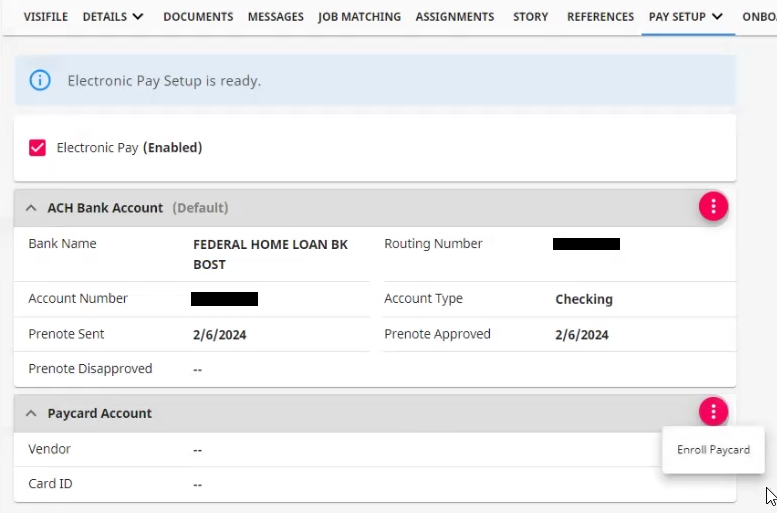
Begin by navigating to Beyond > Employee Record > Pay Setup > Electronic Pay.
Within the Electronic Pay window, select the  to the right of the "Paycard Account" card and select "Enroll Paycard":
*Note* Before being able to enroll an employee with a Rapid! PayCard, the respective employee record must have the following:
- SSN
- Date of Birth
- Address
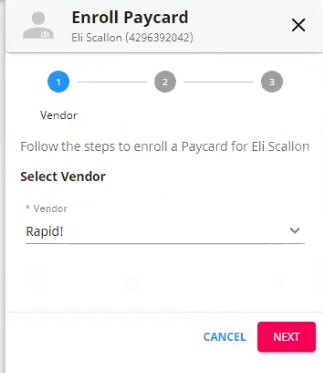
Within the "Select Vendor" field, make sure Rapid! is chosen and select "Next":
When entering the card information, you will be presented with two card options:
- Instant Issue Card
- A pre-activated card will be associated with the employee's account, but it won't have the employee's name embossed on it. The employee can request an upgrade to a personalized card by calling Rapid! Customer Support.
- Personalized Card
- The name of the employee (cardholder) is printed on the card and both the Card and the PIN will arrive at the employee's address in 7-10 business days. The Instant Issue card remains fully usable until the new personalized card is activated. There is no additional cost associated with Personalized cards.
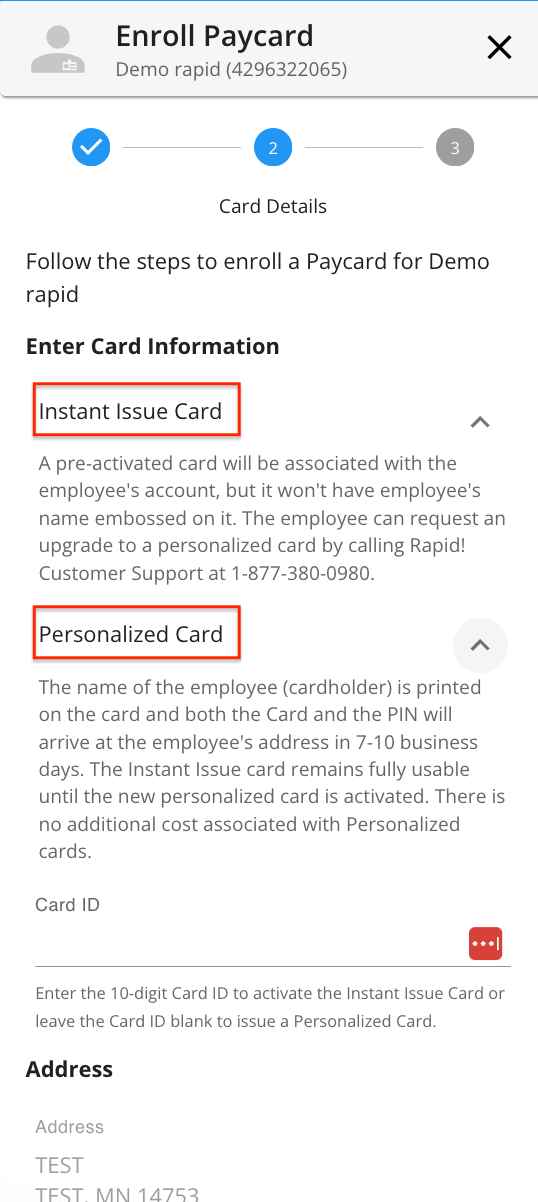
Based on your selected card option, complete one of the following:
- For Instant Issue Cards, you will need to enter the "Card ID".
- For Personalized Cards, you will not enter the "Card ID".
Once the appropriate option has been chosen, select "Next".
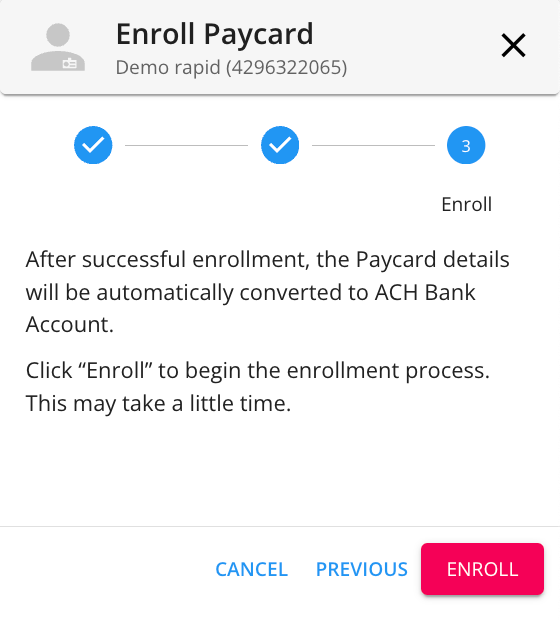
Within the final step of the enrollment process, the Rapid! PayCard details will be automatically converted to an ACH Bank Account in order to be successfully funded via payroll in Enterprise:
*Note* If an employee has both a standard ACH bank account setup along with a Rapid! PayCard enrolled, you can select whether to replace the existing ACH Bank Account with the Rapid! Bank Account:
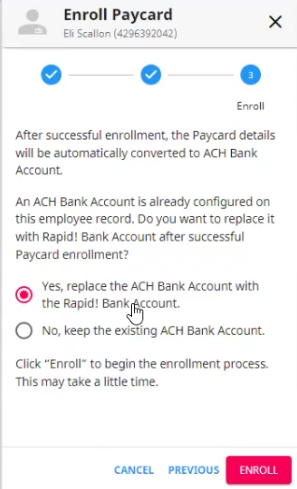
Once the appropriate option is chosen, select "Enroll" to complete the enrollment process.
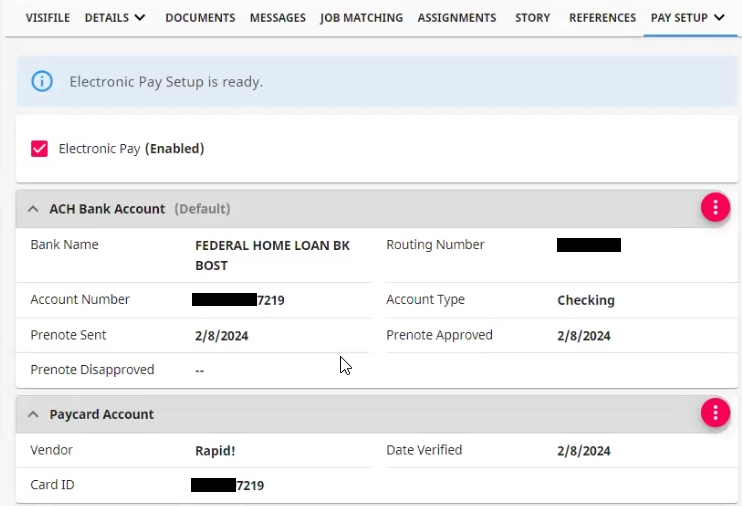
*Note* If an employee has both a standard ACH bank account setup along with a Rapid! PayCard, you can choose the default payment method by selecting the  to the right of the payment method and selecting "Set as Default":
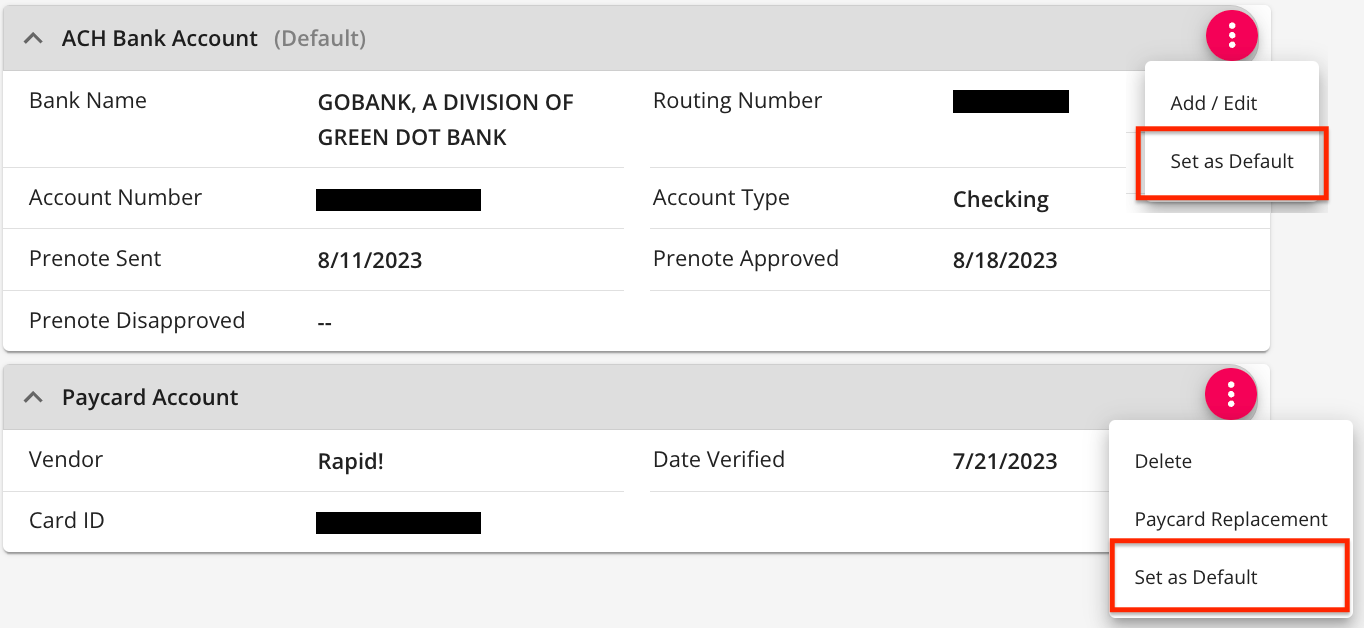
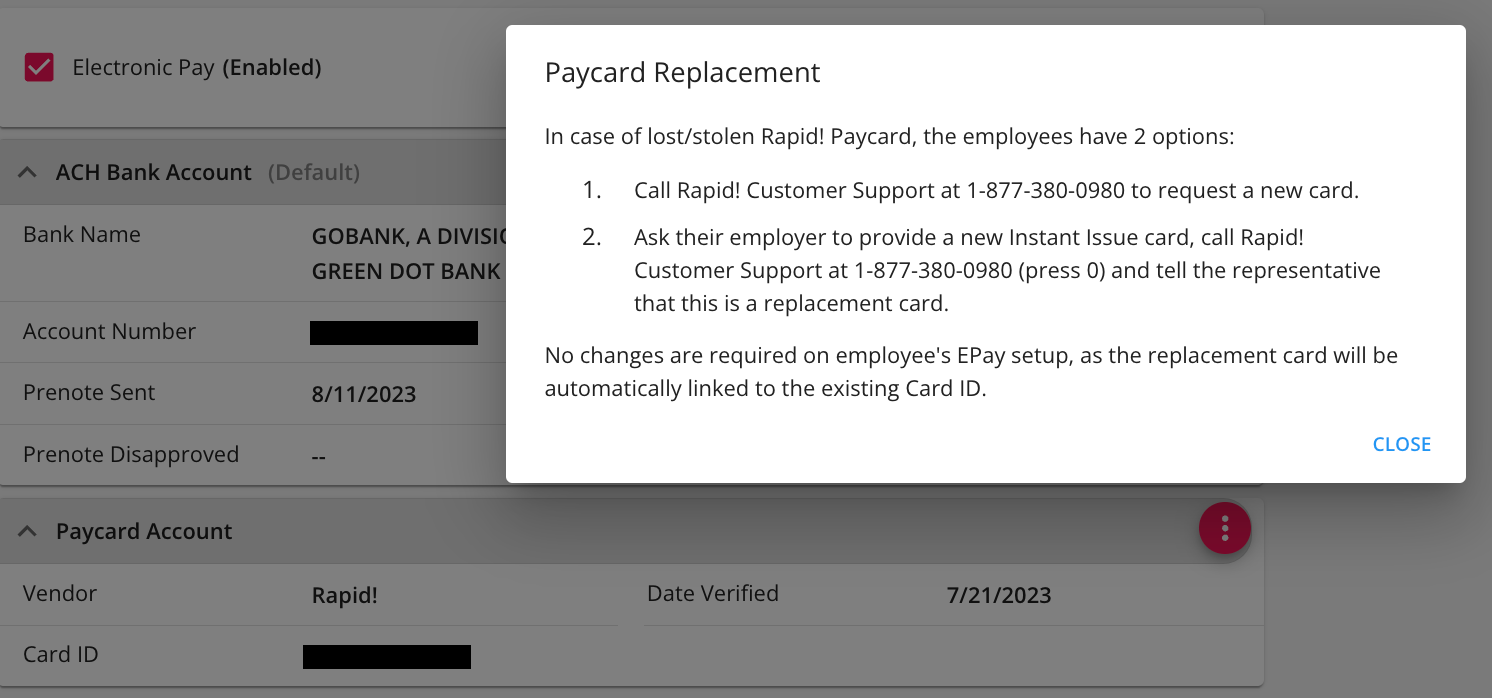
*Note* In the event an employee's Rapid! PayCard needs to be replaced, you can select the  to the right of the account and select "Paycard Replacement" for more information:

Funding Rapid! PayCards
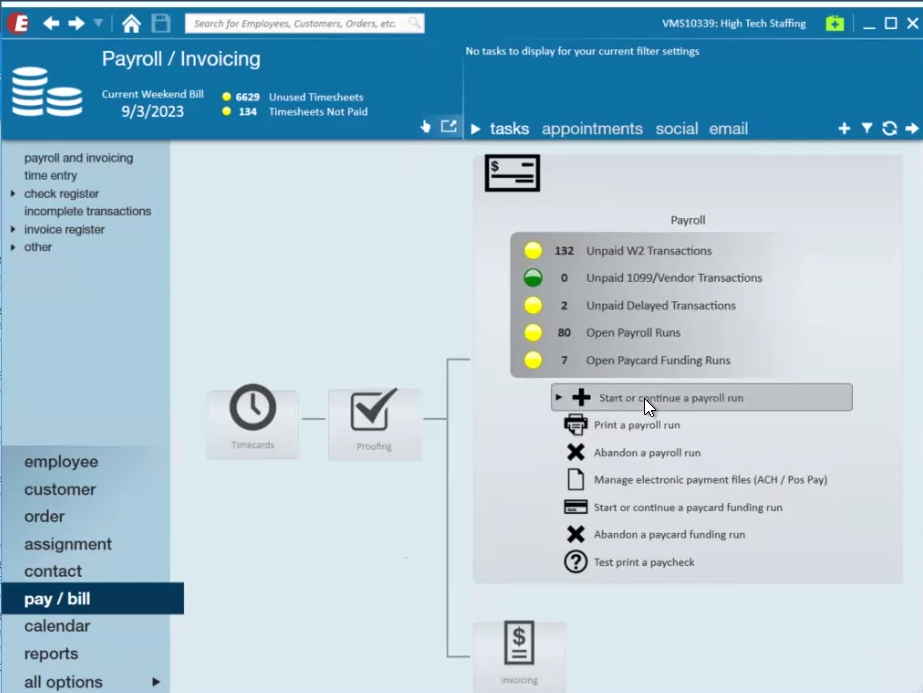
Funding Rapid! PayCards is completed within Enterprise via the standard payroll process.
Once timecards have been created and proofed, the transactions must be processed through a traditional payroll run and then Rapid! PayCards are able to be funded through a paycard funding run.
- Standard Payroll Run
- Paycard Funding Run
Standard Payroll Run
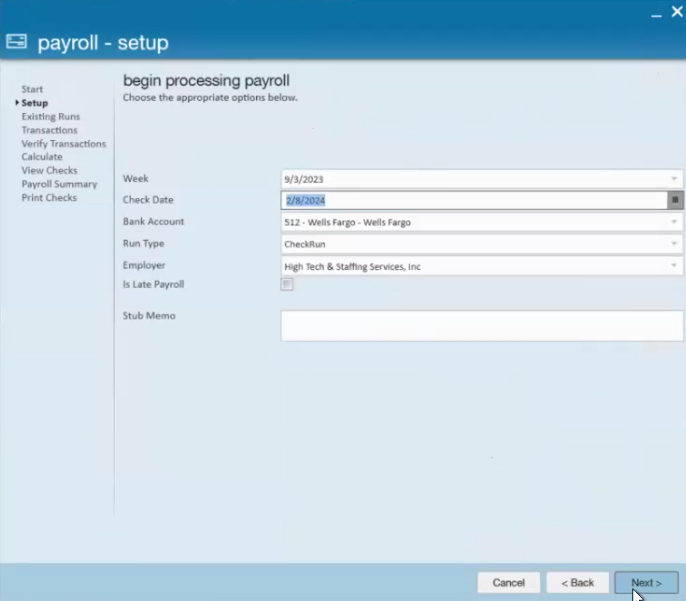
Navigate to Enterprise > Pay/Bill > Payroll > Start or continue a payroll run:
Create the payroll run via the normal process and select "Next":
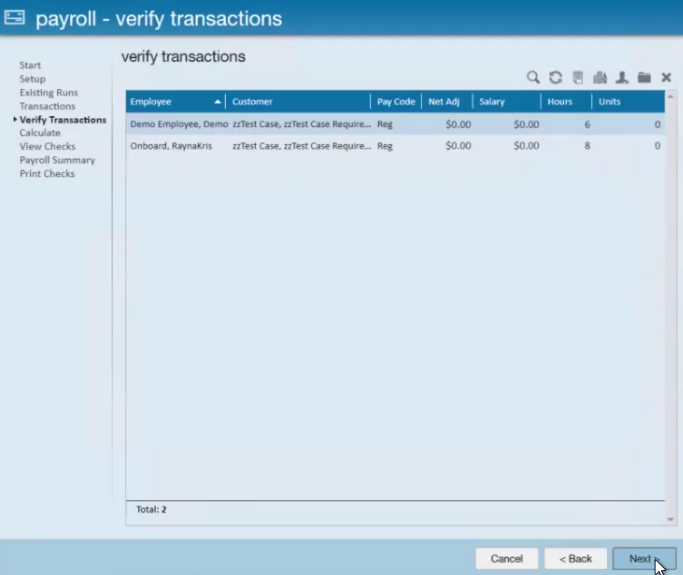
Select the appropriate transactions to include within the payroll run and select "Next":

Verify the transactions included and select "Next":
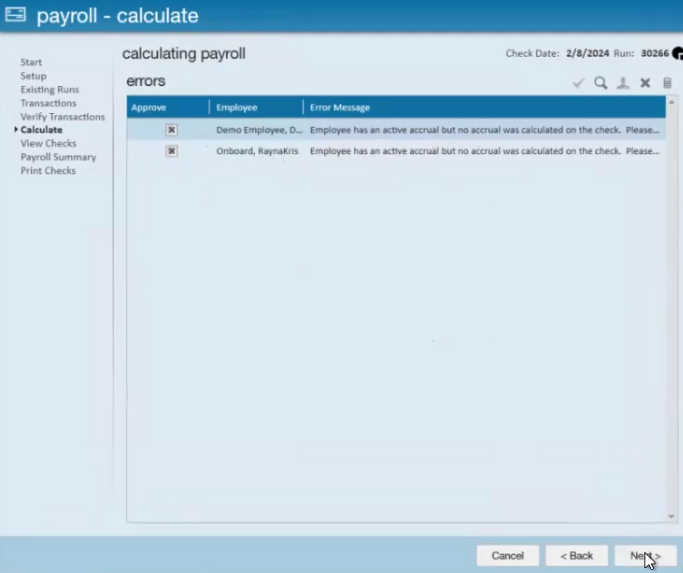
Correct or approve any errors that appear and select "Next":
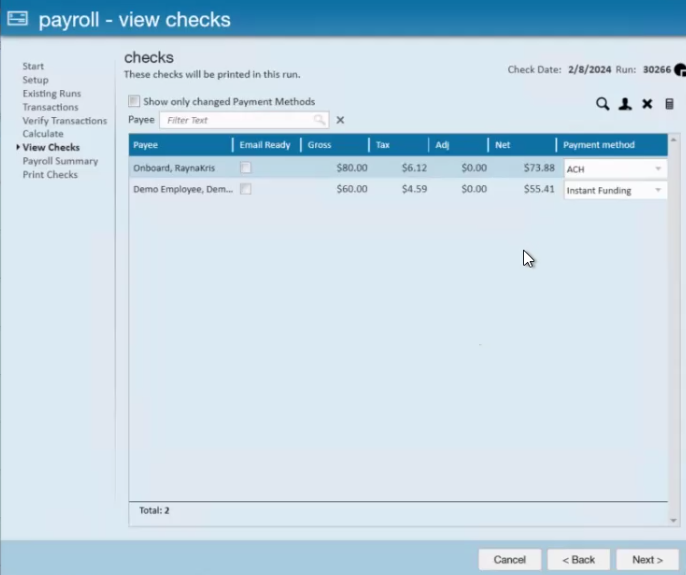
Within the "View Checks" window, you will be able to select the "Payment Method" to the right of the transaction:
- With the Flexible Payment Method functionality, the payroll clerk can temporarily overwrite the employee's default payment method for each check in a given payroll run.
*Note* For more information on Flexible Payment Methods, please see the article titled Enterprise - Flexible Payment Methods.
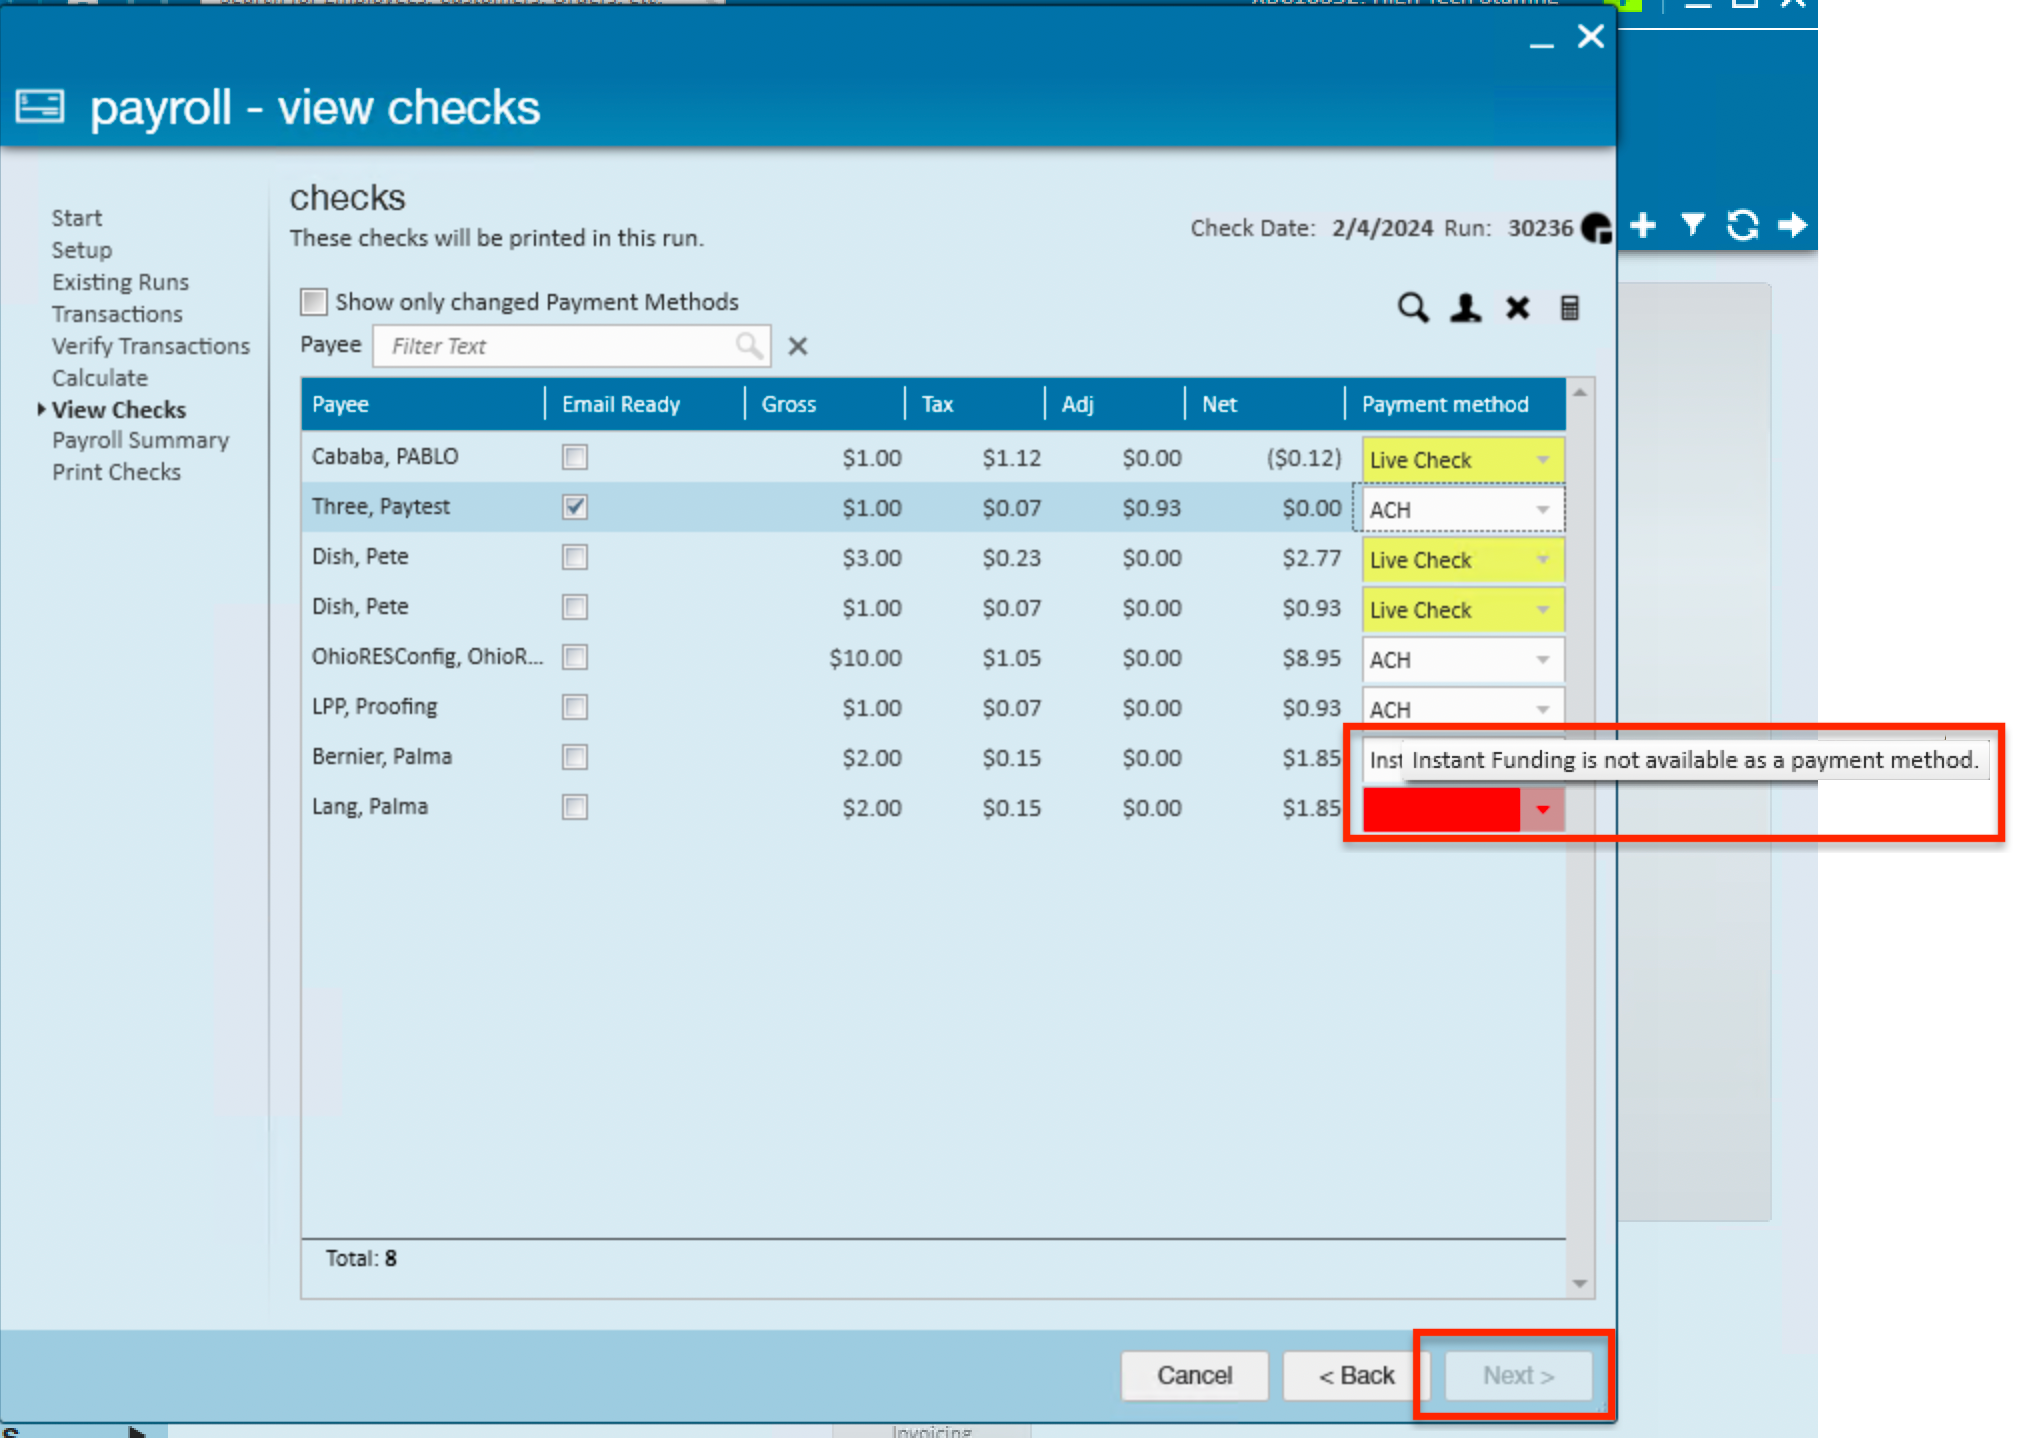
*Note* If the default payment method is unavailable, you will be unable to continue through the payroll process.
Lang’s payment method is marked as not valid (red), because the Rapid! license is not enabled.

Once the appropriate payment methods have been chosen, select "Next".
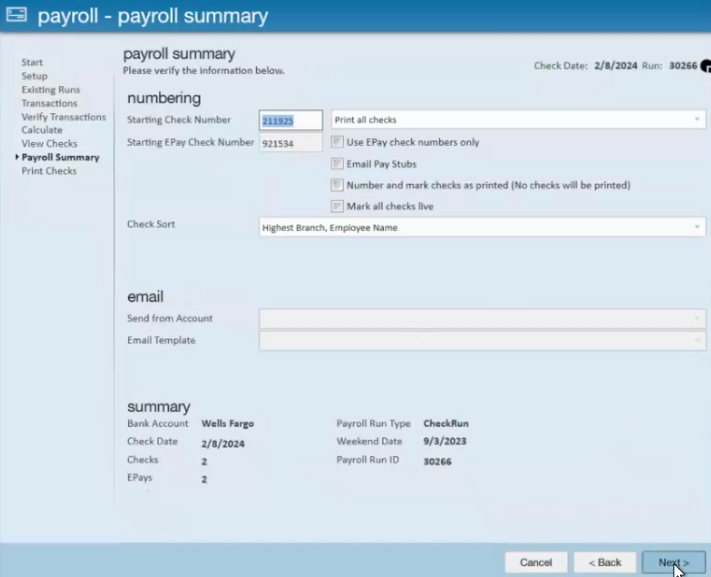
Verify the information within the "Payroll Summary" window and select "Next":
Finalize the payroll run via the "Print Checks" window and select "Finish".
Once the payroll run is complete, the Rapid! PayCard are able to be funded via a paycard funding run.
Paycard Funding Run
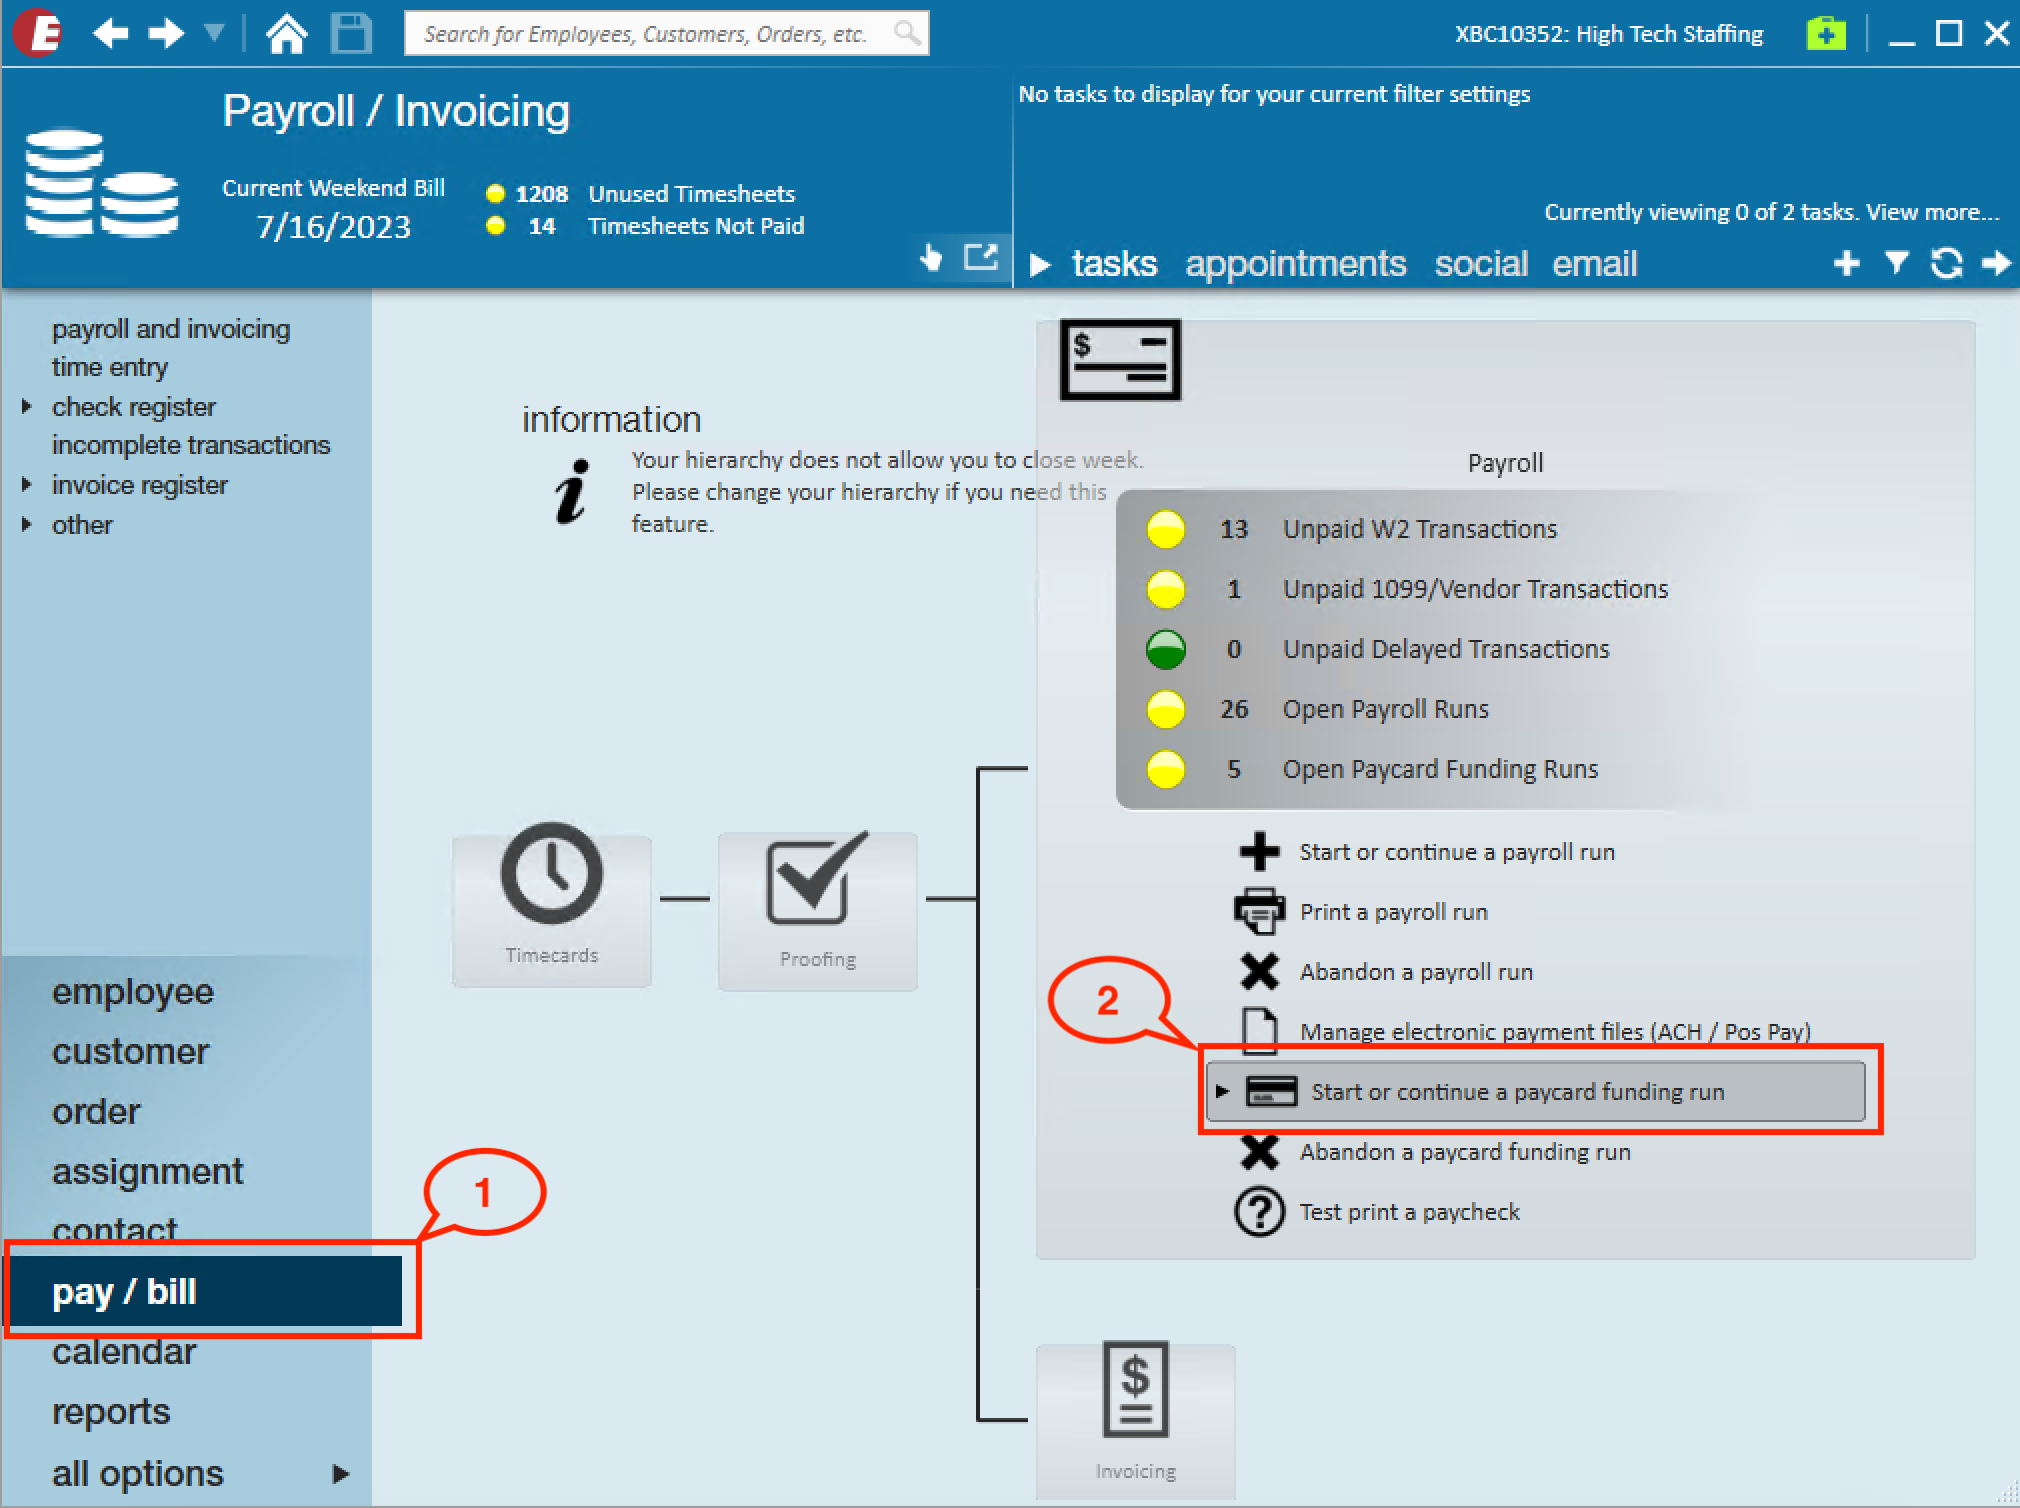
Navigate to Enterprise > Pay/Bill > Payroll > Start or continue a paycard funding run:
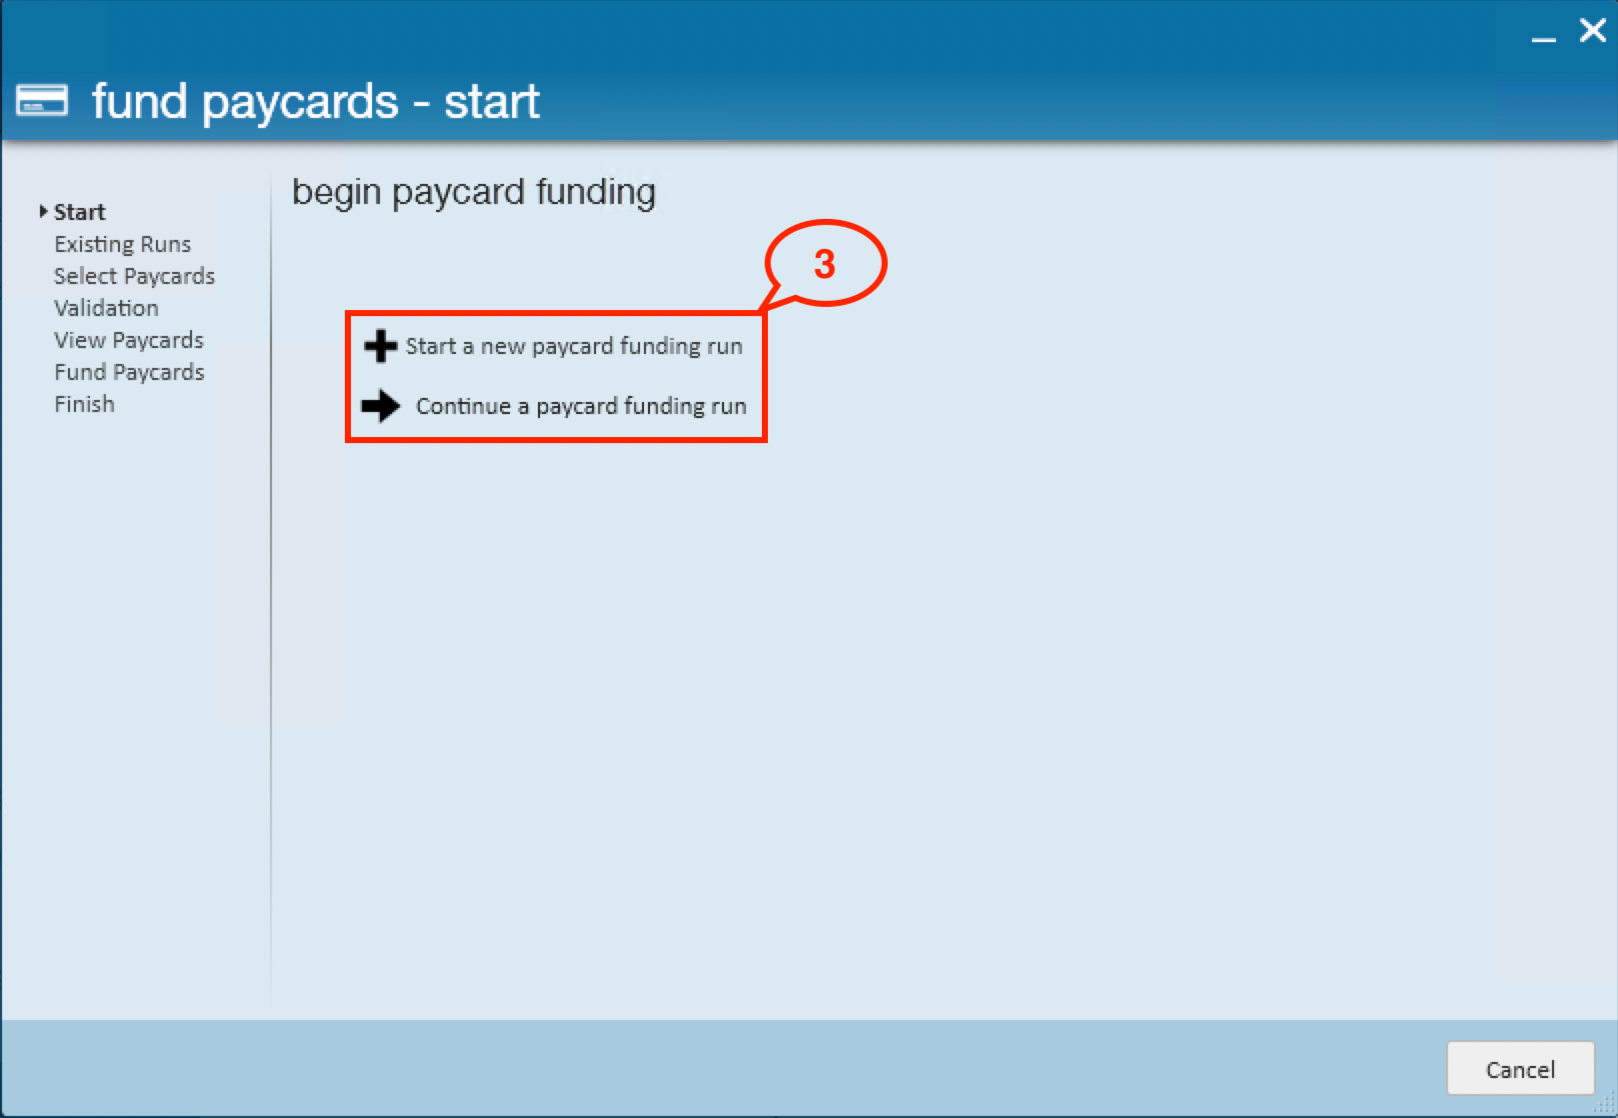
Select to start a new paycard funding run or continue a previously unfinished paycard funding run:
Select "Rapid!" from the "Paycard Vendors" dropdown:
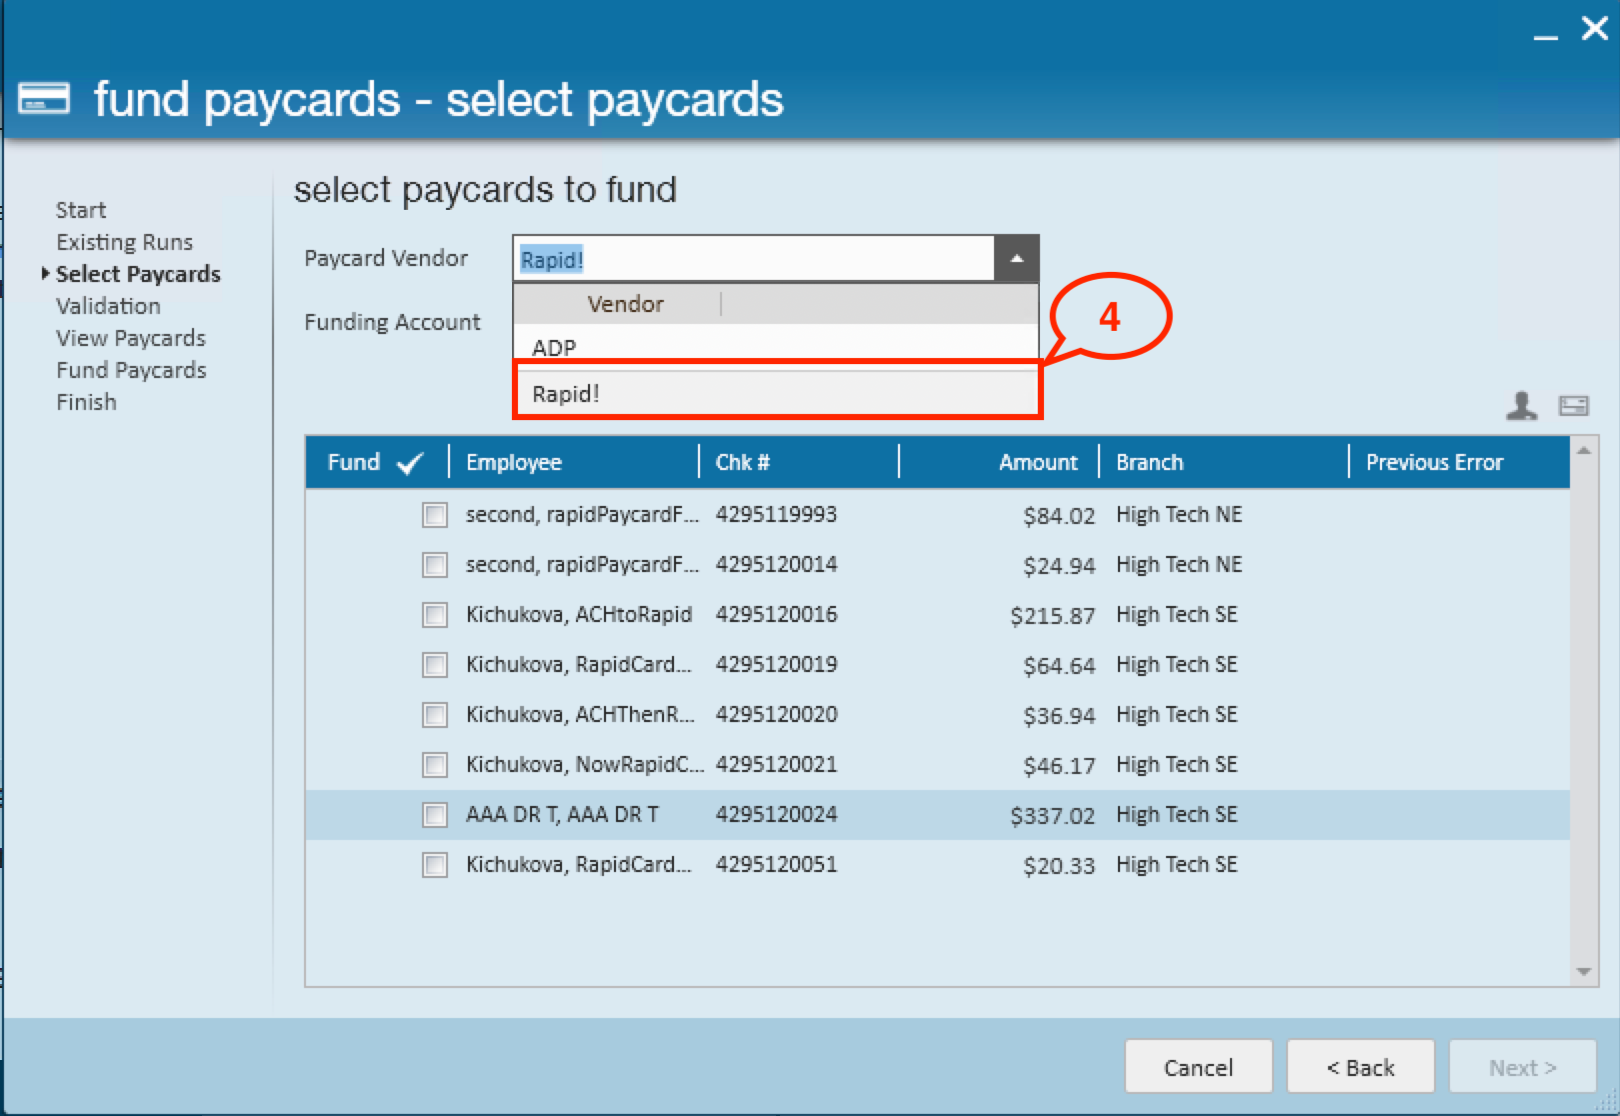
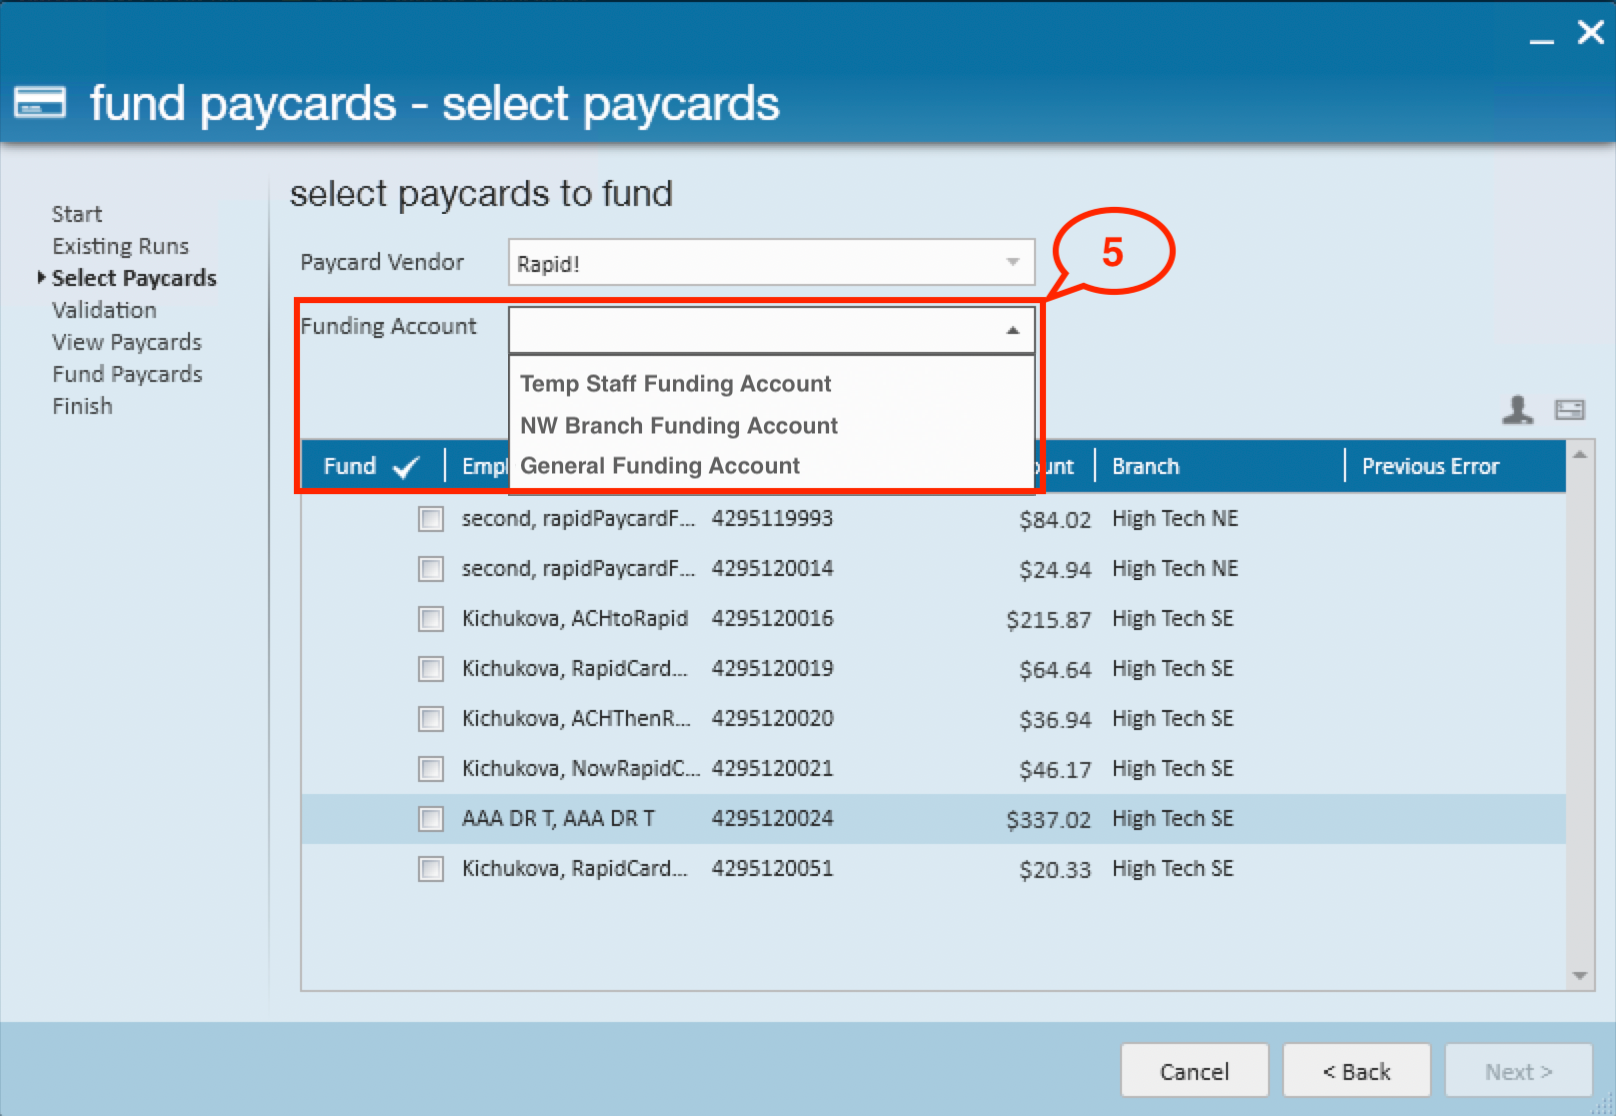
From the "Funding Account" dropdown, select a Funding Account(s) that was previously configured in Beyond External Services:
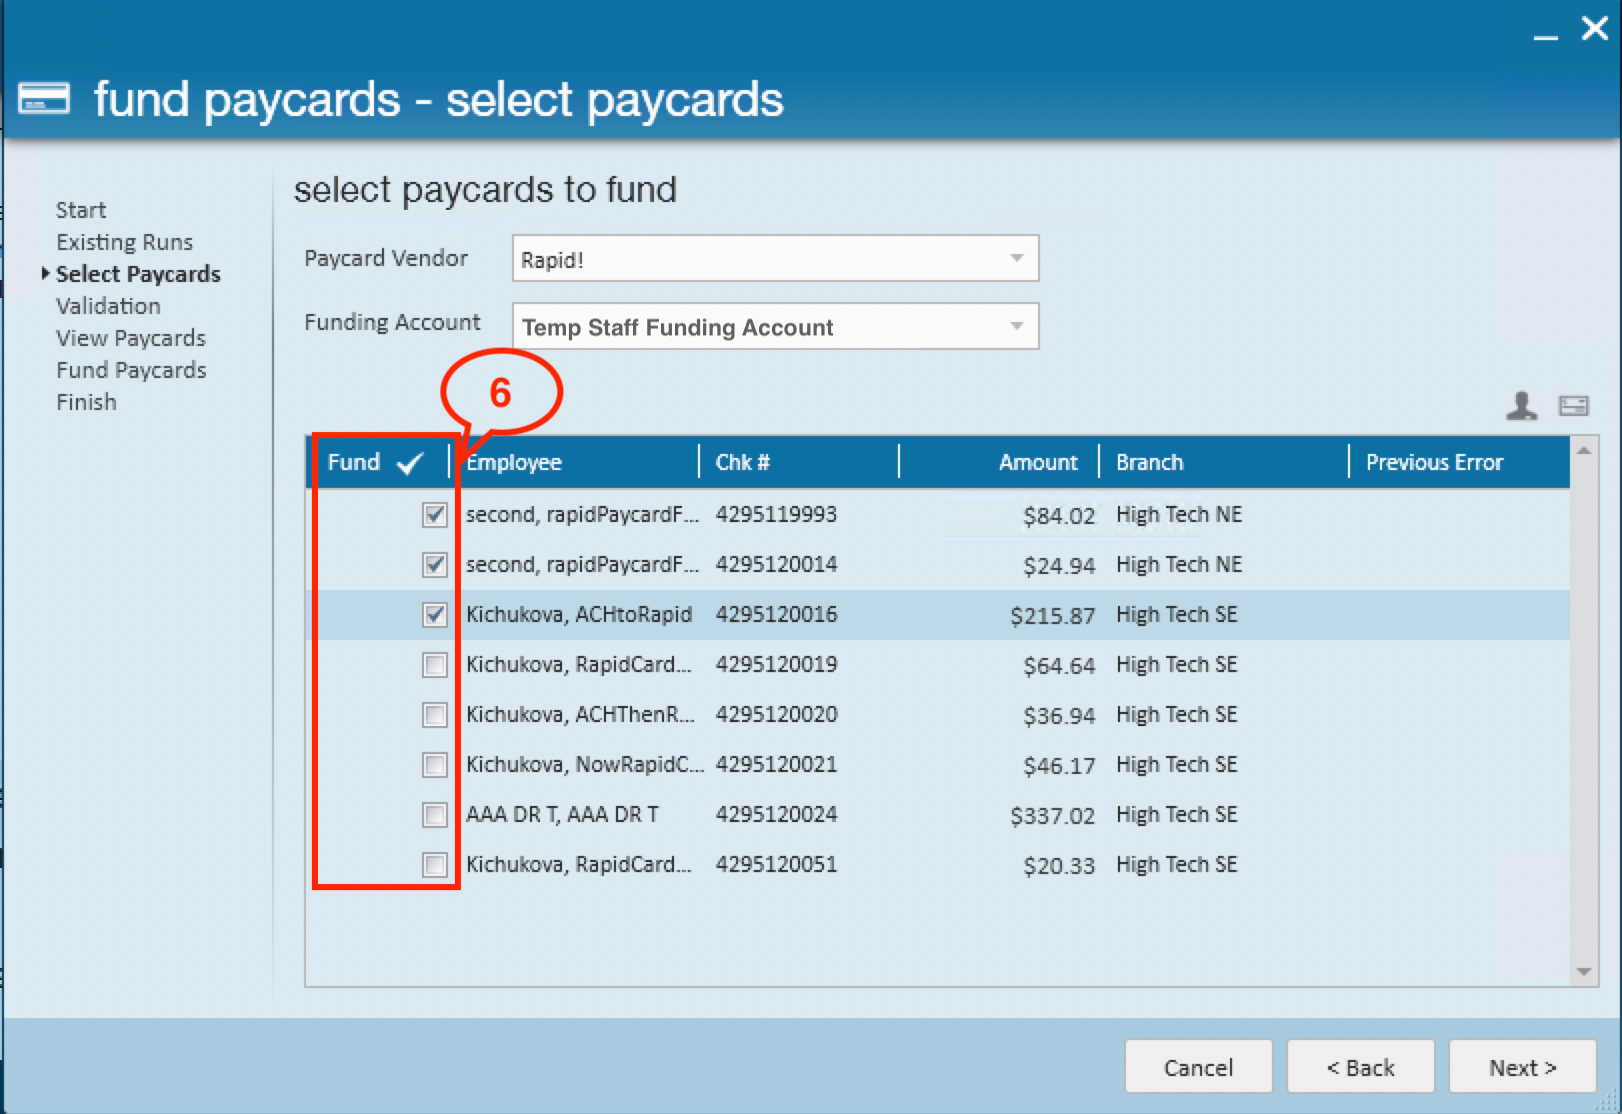
Select the employee(s) that should be instantly funded with Rapid!:
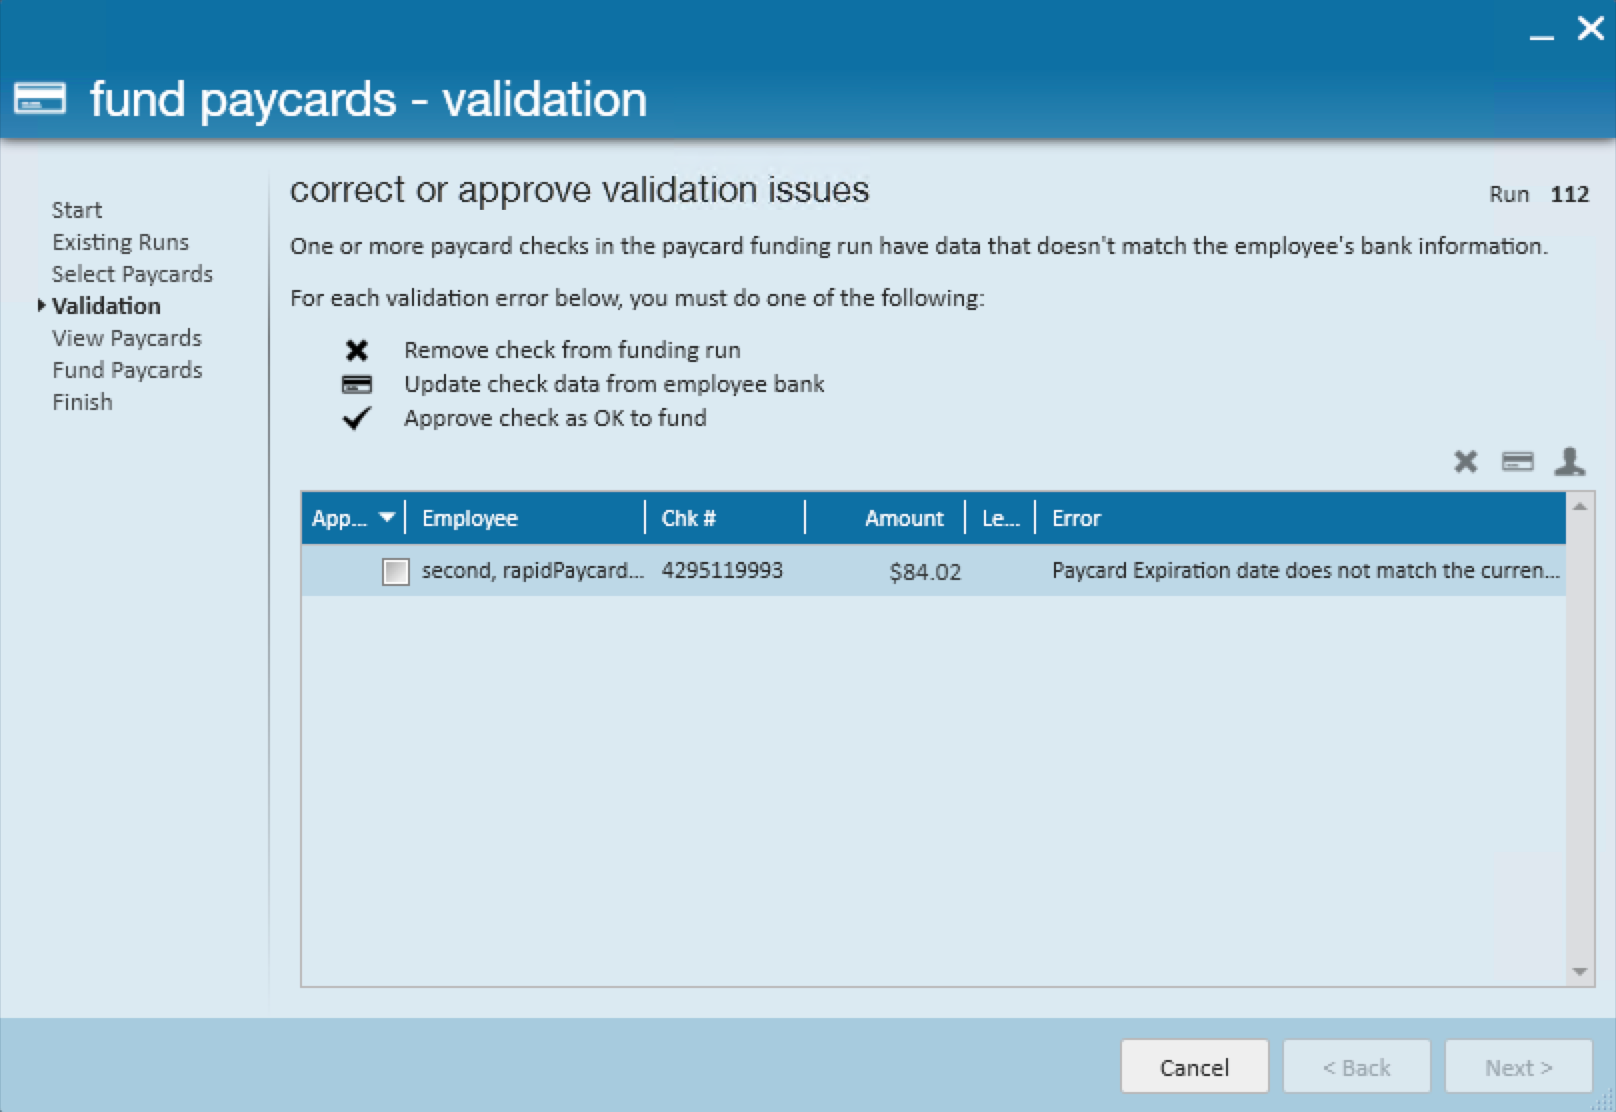
Correct or approve if there are any validation issues or remove the employee from the funding run:
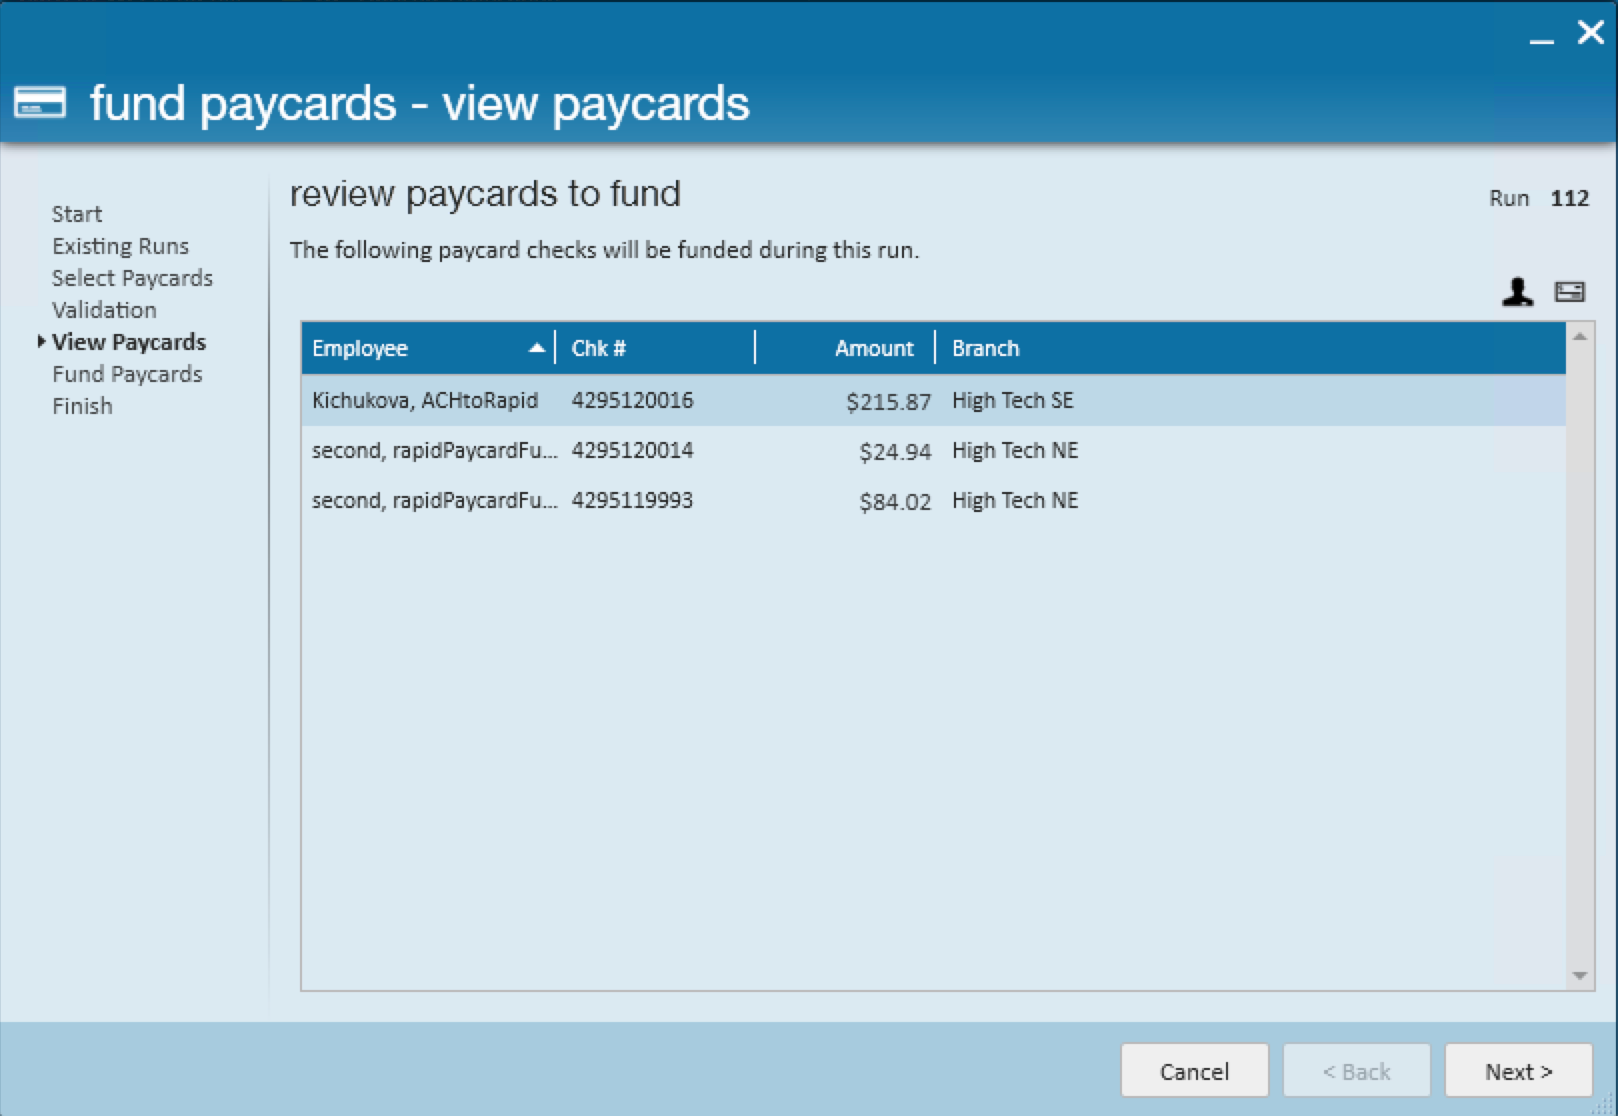
Select "Next" within the "View Paycards" window:
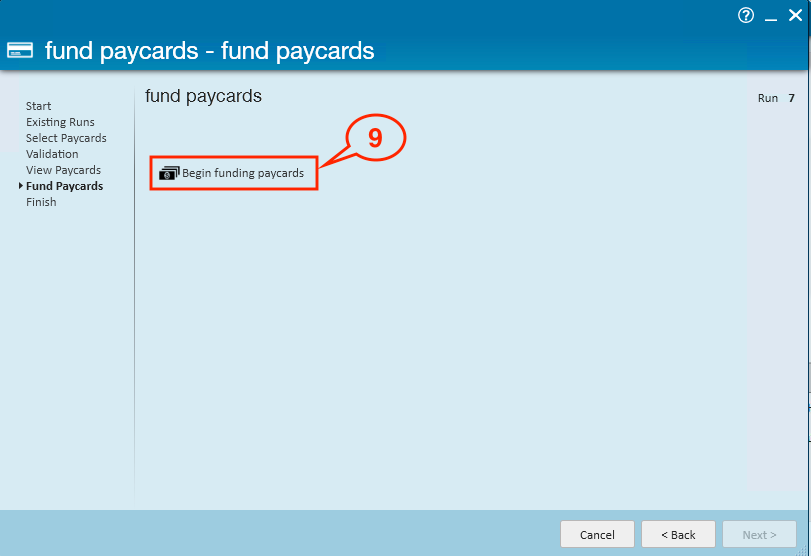
To finish the run, select "Begin funding paycards":
*Note* In the event the Paycard Funding run is cancelled during the funding process, paycards that have not been funded yet will need to be pulled into a new Paycard Funding run via the outlined steps above.
Paycards that have been funded during the cancelled run will remain funded.
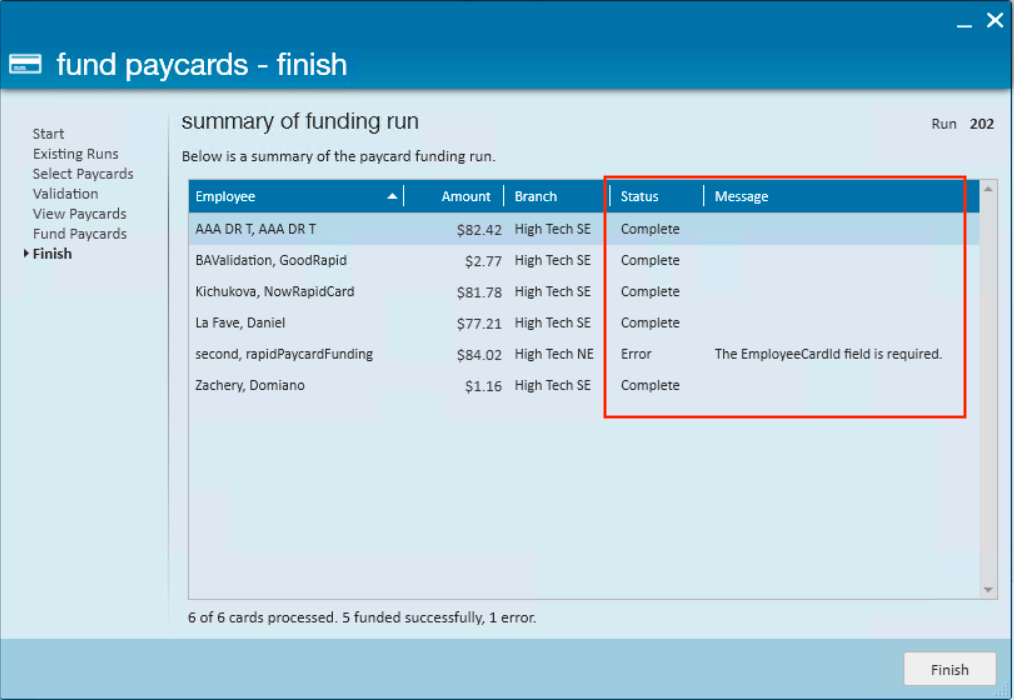
Once finished, you can review the detailed summary of the funding run with employee(s) which paycards were successfully funded (Completed) and those where funding of the paycard failed (Error) and the message explaining the reason:
*Note* The Account Reconciliation report within the Rapid! Admin Portal can be used to balance accounts.
Related Articles
- None