Time Entry allows you to manually enter timecards or review timecards that have been already saved in your system. This article will cover a few tips and tricks to getting the most out of the Time Entry section.
Begin by selecting the timecards box to expand options and click "navigate to time entry" to access the time entry dashboard.
Don't forget to also check out our TempWorks University Video: Time Entry Part 1: The Basics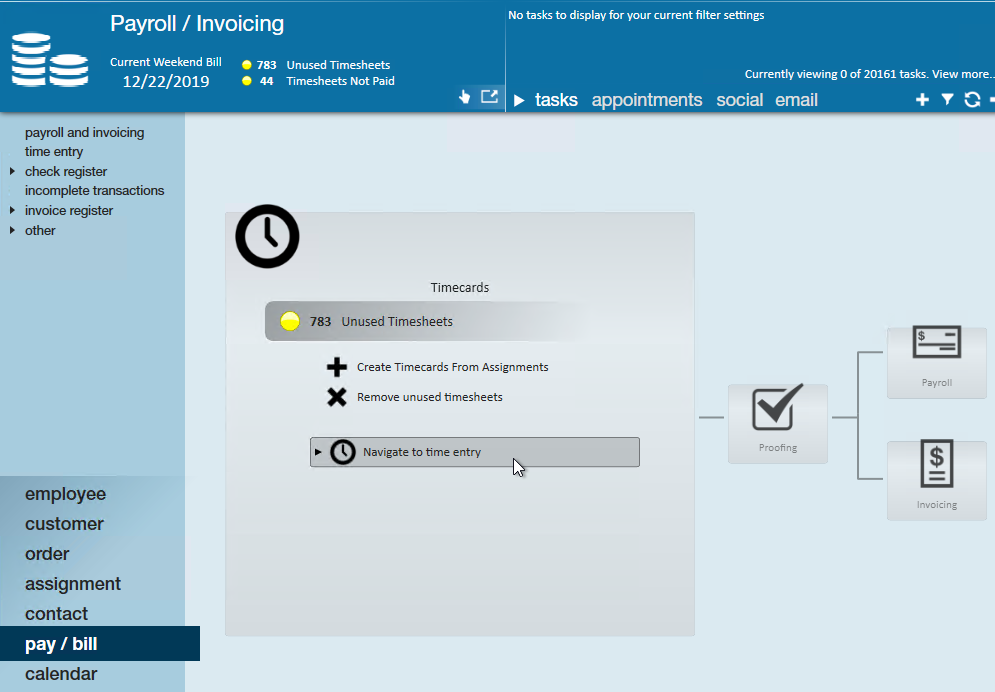
*Note* Save clicks by using the hot key combination of Alt+I to access the time entry dashboard.
Organizing Your Space
Every company and every payroll processor is going to have different needs in the time entry section. To make it easier, we have a lot of different options to help you organize the time entry section to work best for your processes.
Adding & Removing Columns
Need to see what shift this employee is working on? Don't want to see what department every timecard is tied to? You have options for that!
Right click anywhere on the column headers to see a full list of every option available. Click on a check-marked item to remove the column and click on any item without a checkmark to add the column. 
We recommend you only have the columns you need to see most or all of the time up here. More information can always be found on the detailed timecard by double clicking on a single transaction.
Looking for Recommendations?
We always recommend you keep:
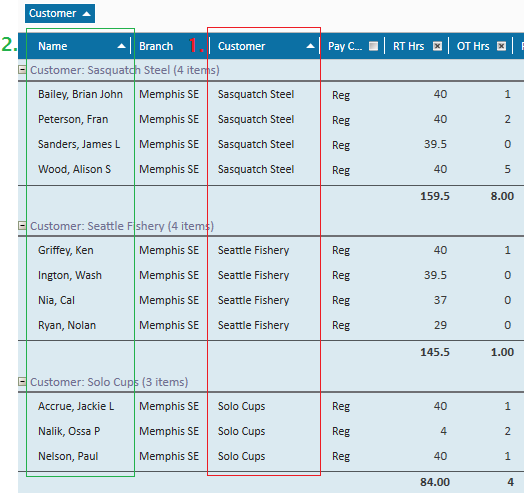
- Name & Customer to identify and sort transactions
- RT & OT or Days 1-7 depending on if you entering each day or just total hours
- Bill & Pay rates to triple check you aren't paying someone $1500 an hour instead of $15.00
- WE Date for denoting the week those late timecards belong to
Moving Around Columns
Want customer before employee name? need pay rates before bill rates? Drag and drop the columns to reorganize. 
Grouping
Drag a Column to the white area above the column headers to group. This creates visual separation and sub totals. 
Filtering
Use the filter options at the top to change which timecards you are viewing. This can be helpful if you are looking for one employee or all the timecards for one customer.

Tab Stops
Utilize tab stops to key in time efficiently and effectively. A tab stop is where your cursor will stop when you hit the tab key on your keyboard. This makes entering time faster and more accurate when you only need to stop at the columns you are entering time for.
Tab stops are columns in your time entry dashboard that are selected with a check box:
 By default, all users have "RT Hrs" and "OT Hrs" marked as tab stops.
To key in time using tab stops, select your mouse into the first RT Hrs field you are ready to key in time for, enter the hours and hit tab. In the picture above, you will stop at RT hours first and then OT hours before moving to the next lines.
Tab stops are just one tool for keying in time efficiently in Enterprise.
Keyboard Shortcuts in Time Entry
Below is a listing of popular time saving tricks that can be applied specifically in the time entry dashboard.
| Keyboard Key(s) | What it Does |
Key Combination: Alt + 1 | Brings users directly to the time entry dashboard. |
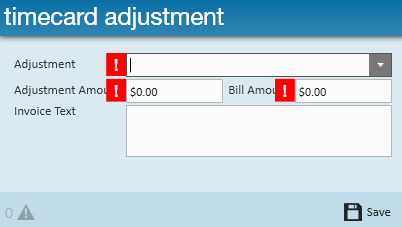
Key Combination: Alt + A | Opens a new "timecard adjustment" window (for the transaction that is highlighted):
|
Key Combination: Alt + C | Creates a new duplicate timesheet (for the transaction that is highlighted). |
| 10 Key Pad: + | Changes the filter dropdown to "Employee Name" and jumps users to the "filter text" field:
|
| 10 Key Pad: * | Changes the filter dropdown to "Customer Name" and jumps users to the "filter text" field:
|
| 10 Key Pad: / | Opens the detailed timecard. Selecting / a second time will close the detailed timecard. |
| Shift Key | Holding down the shift key and selecting a column header will sort that column in an ascending or descending order.
*Note* The customer column is also currently dropped into the column header bar, so results are being grouped by this column as well. |


For a full list of keyboard shortcuts in Enterprise, check out Keyboard Shortcuts.