What is an Employee Adjustment/Garnishment?
Adjustments on the employee record are typically reoccurring garnishments that will deduct money from each paycheck regardless of where the employee is working. There are many different kinds of adjustments you may want to add here.
This article walks through a generic garnishment example. 
A generic garnishment is used when an employee's wages should be deducted a defined amount on a recurring basis (e.g. every time the employee is paid). For example, perhaps an employee owes you $1,000 for damaged equipment. Instead of paying the full $1,000 on the next paycheck, they agree to pay $50 back every paycheck until they have repaid the full $1,000.
Other Common Examples of Employee Adjustments: (click the links for specific instructions on each type of adjustment)
Looking for a video? Check out Payroll Part 2: Employee Adjustments
How to Add an Employee Adjustment
*Note* Adjustment types must first be set up by your Administrator before you can add it to an employee's record. Check out How to Set Up Adjustments in Administration for more information.
- Navigate to the Employee Record that requires the adjustment and expand the pay setup section and select adjustments
- Select the + icon to add a new adjustment
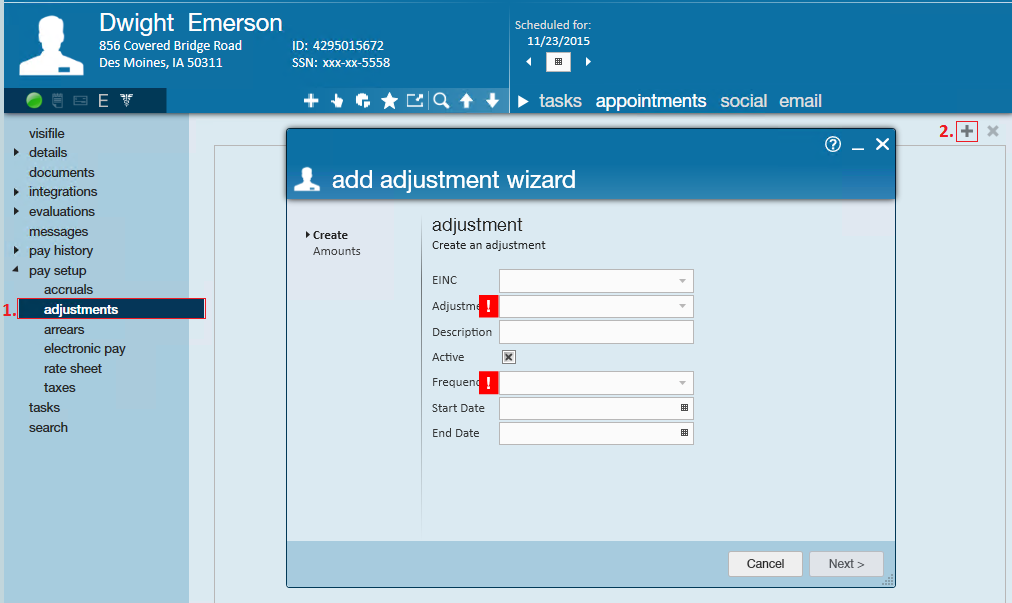
- Enter the following information:
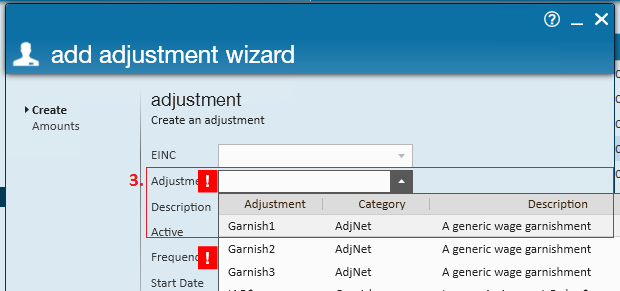
- Select the adjustment type from the Adjustment dropdown (this should reflect the kind of adjustment you are adding, ex. child support, levy, etc.) Always ask your administrator if you are unsure which adjustment type to use.
- Optionally, add a description (a note for any other payroll processors, etc.)
- Under Frequency, use the drop down to select the frequency that the employee is paid (daily, weekly, etc.)
- Optionally, add a start/end date. If the start date is later than today's date, enter a date. Otherwise, leave blank to start the adjustment immediately.

- Select the adjustment type from the Adjustment dropdown (this should reflect the kind of adjustment you are adding, ex. child support, levy, etc.) Always ask your administrator if you are unsure which adjustment type to use.
- Once you have completed filling out the basic adjustment information, select Next to continue
- Enter the adjustment rule (either amount or % of paycheck)
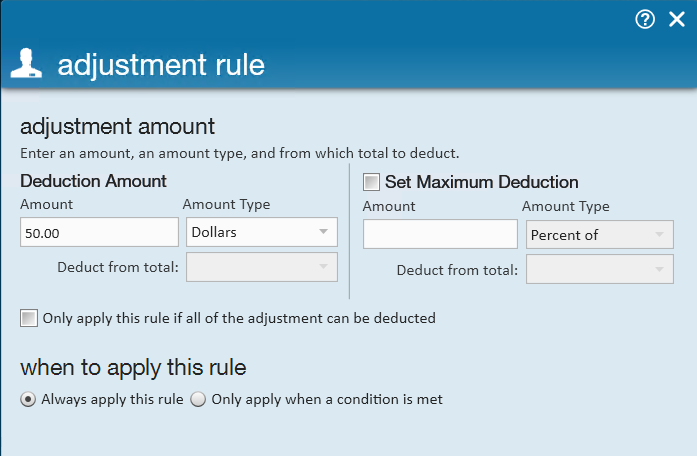
- Select the + in the upper right
- Following our example, we are going to be deducting $50 every week until the balance is repaid
- Consider setting a max deduction, especially if you are taking a % of every check to ensure you do not take more than X amount
- Select Save & Select Finish


Once you have entered your employee adjustment, you should select it again and ask yourself the following questions:
- How Important is this Adjustment? (Sequence)
- What is the Max that Can Be Deducted? (Period, Lifetime, etc. Max)
- Where is the Money Going? (Authority or electronic pay)
How Important is this Adjustment?
When an employee has multiple adjustments setup on their record, how does Enterprise know which adjustment to garnish first and which to garnish last? Sequence!
The sequence determines the priority of an employee's adjustments. 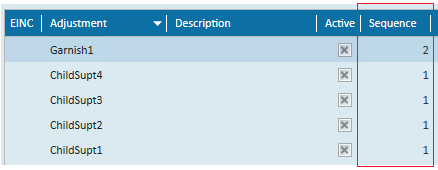
For example, the image below shows an employee that has multiple child support adjustments added in addition to our generic garnishment. Do the child support adjustments receive priority over the generic garnishment?
The answer to this is determined by each adjustments sequence. After sequence 1 adjustments are calculated if the employee has garnishable wages remaining Enterprise will then move on to any adjustments with a sequence of 2.
This process will continue automatically until either the employee has no garnish-able wages left or all adjustments have been fulfilled. 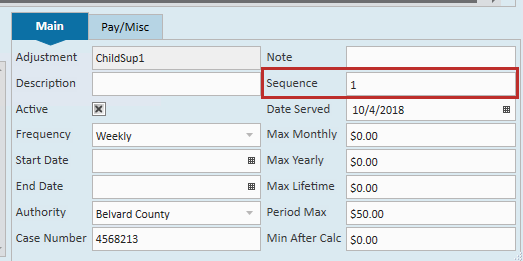
*Note* If there are multiple garnishments on the employee's record that should be taken out equally, set them to the same sequence number(for example, multiple child supports). The system will try to take all the adjustments out together and if it can't, then it will try to distribute the money as equally as possible.
What is the Maximum Amount that can be Deducted Per Pay Period?
Enterprise adjustments are tracked by weekend date. For example, let's say our employee turns in a timecard with 40 hours on it for the weekend date 12/6/2015. That timecard is processed by payroll and the full $50.00 is garnished. Now, imagine if the employee turned in an additional timecard for the weekend date 12/6/2015 with 8 hours of additional overtime.
Processing that second timecard without a period max would garnish the employee's wages a second time. 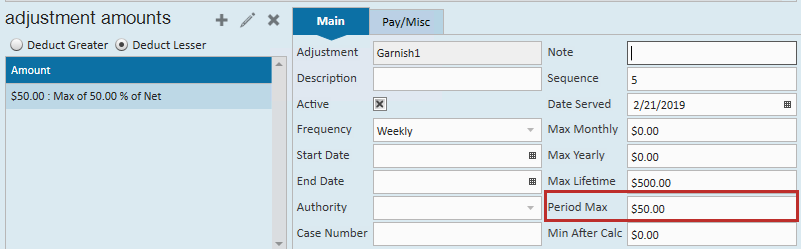
By adding a period max we prevent Enterprise from double dipping into the same period. This way, the employee will never be over garnished.
Similarly, you may want to consider adding a Max Lifetime:
Enterprise automatically tracks the amount garnished on every adjustment, so following our example when we have someone who owes a total fixed amount ($1,000), we enter that as the max lifetime and once that has been garnished the adjustment automatically deactivates.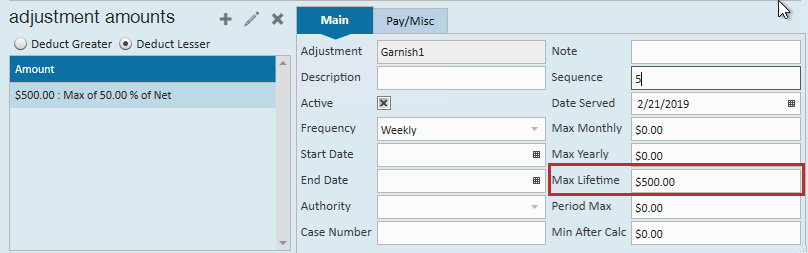
Where is this Money Going?
If you are deducting money from an employee's check, the money more than likely needs to be redirected to another source.
For example, a Levy would more than likely need to be sent to the IRS, a Child Support would need to be directed to the proper county, etc. You may want to have your own company as an authority for generic garnishments if you need to report or track these garnishments through Enterprise.
There are 2 sections that you can use to denote where this money is going:
Authority & Case Number
The authority field on any employee adjustment will help you determine where a child support, levy, or other adjustment is going. This will be used to create Authority Checks and for Authority Reporting. 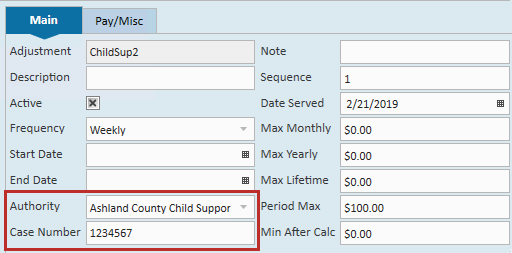
Along with Authority, we highly recommend utilizing the Case Number field. Most adjustments that require an authority will usually also have a case number. This can be extremely helpful for reporting purposes and for your records incase anything happens to the paper notice you received.
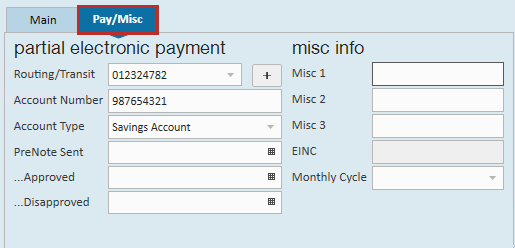
Routing & Account Number
If you are setting up Secondary Direct Deposit for an employee, this money is not going to another source but instead to another bank account. On the adjustment, navigate to the Pay/Misc tab to enter the proper routing and account number.
- If you are utilizing pre-notes than the dates underneath will work the same as they do for the primary direct deposit.
- If you are not using pre-notes, you do not need to worry about the date fields below the account number.
For more information, check out How to Set up a Secondary Direct Deposit
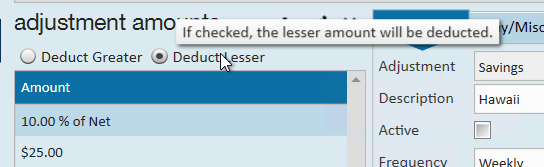
Deduct Greater or Deduct Lesser
You can have multiple adjustment rules for more complex adjustments.
For example, an adjustment that should take 10% of the total check or $25 - whichever is less.
To do this, after you create your first rule you'll be able to add a secondary rule in the lower left: 
Once you have the second rule you will be able to choose between deduct greater or deduct lesser above the rule amounts.