What are Tickets?
Tickets in Dispatcher are orders, or requests from a customer for employees. i.e. I need 4 warehouse workers today. In Dispatcher, these tickets are only for a single day of work.
Not sure what Dispatcher is? Check out Dispatcher Overview first.
Creating a ticket is Step 1 in the Dispatcher timeline:

To Create a Ticket
- Select the + icon in the upper right corner of the orders section of Dispatcher.
- Enter the following required information:
- Customer Name
- Worksite (worksite must first be set up on the customer record before it can be selected here)
- Job Title
- Number Required
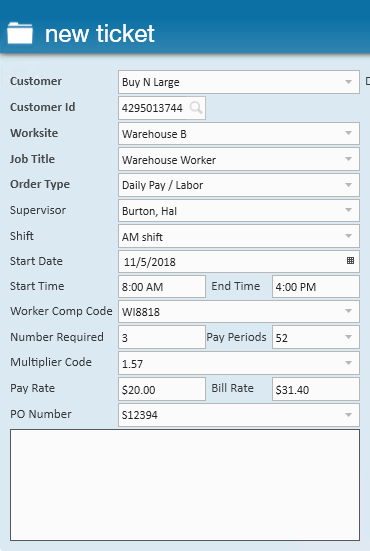
- Optionally, enter the following details:
- Shift or start and end time.
- Start date if other than today.
- Pay information
- Utilize multiplier code to calculate bill rate from the pay rate.
- Or use rate sheets to set up default pay and bill rates for customers or job titles.
- Select a PO Number.
- Enter any additional information in the bottom notes box.
- Select 'Save.'

*Note* Want more information to auto-fill for you? Check out How to Set Up Customer Defaults to begin setting up your default information by customer.
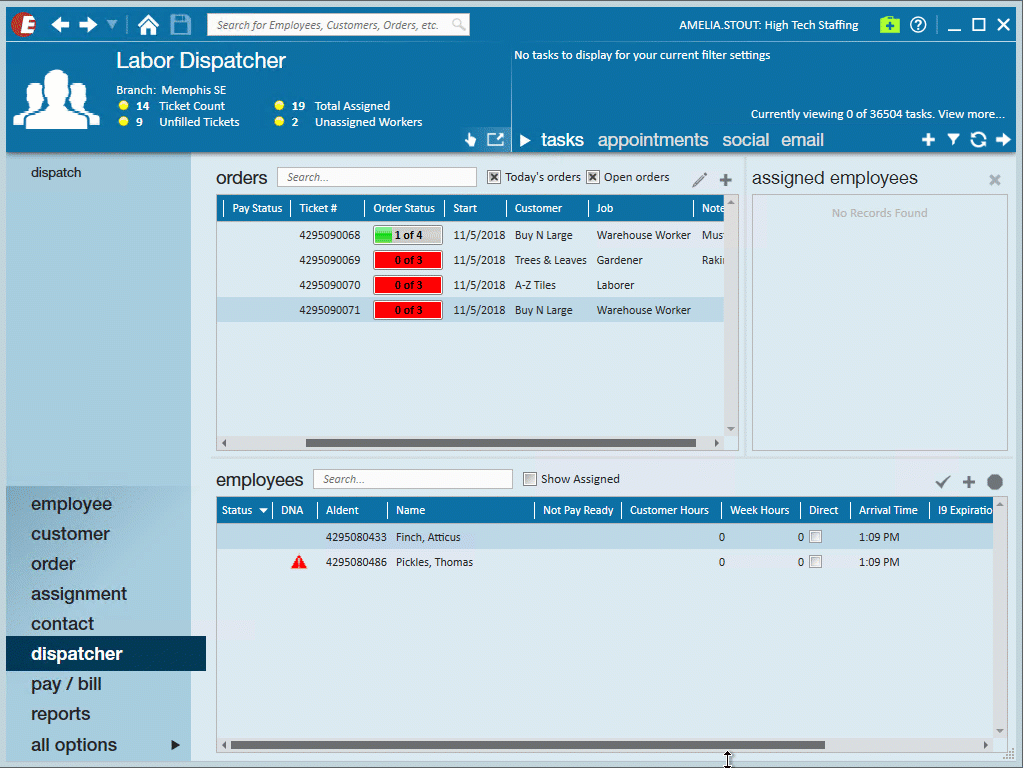
Managing Tickets
Once a ticket is created, there are a lot of different options you can utilize.
This section covers:
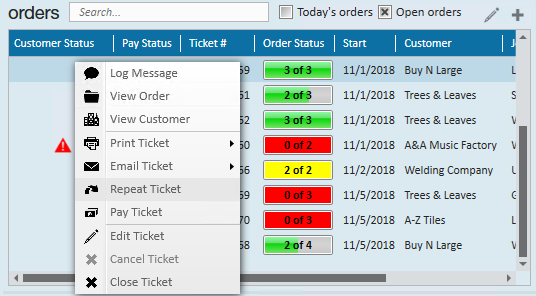
Edit a TickMake a mistake or need to add some more details?
- Double click on the ticket OR right click on a ticket and select 'Edit Ticket' to open the ticket.
- Make your edits before selecting 'Save.'

*Note* Customer Name can not be changed once an order is created. If the wrong customer was selected, cancel the ticket and create a new ticket under the correct customer.
*Note* Worksite can not be changed from Dispatcher. Right click on the order and select view order to update the worksite information on the full order record.
Cancel a Ticket
Made a ticket by mistake? Did the customer change their mind?
You can cancel a ticket to remove it from the Dispatcher queue.
- Right click on the ticket you wish to cancel.
- Select 'Cancel Ticket.'
- A new window will open, select 'Yes' to confirm the cancellation.
*Note* Editing or cancelling tickets once an order has been printed/emailed will generate a warning that the ticket has already been printed/emailed if any changes to the order or assigned employees are attempted. Any changes that have been made to the order will result in the status bar reverting back to the proper status once changes have been made.
Repeat a Ticket
When your customer asks for workers to come back or want a similar order, you can save time by repeating the existing ticket.
To repeat a ticket:
- Right click on the ticket you wish to repeat.
- Select 'Repeat Ticket.'
- A new window will open. Enter the following information:
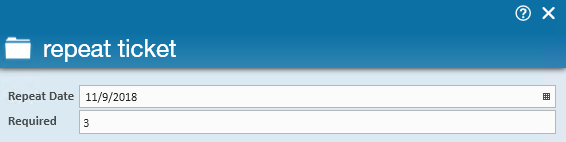
- Select the date you want this ticket repeated on.
- Optionally, change the number of people required for the new ticket.
- If the original ticket had employees assigned, you will have 3 check boxes next to each employee:
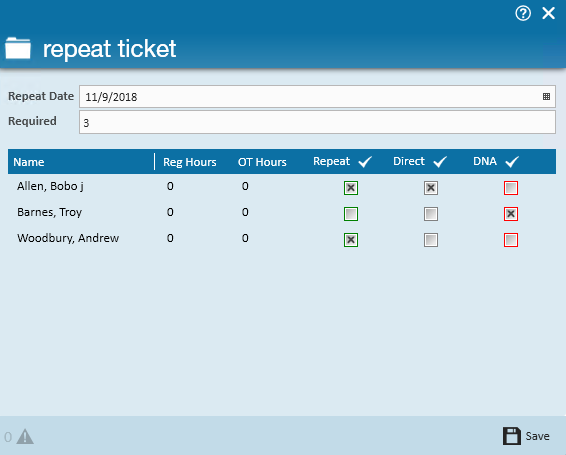
- By default, these employees will be assigned to the new ticket. Uncheck the repeat box if you do not want to have the employee assigned to the repeated ticket
- Check the direct checkbox if the employee will be going directly to the worksite without coming back to check-in first.
- Check the DNA box when the customer asks that the employee not return or if the employee does not want to work for that customer again.
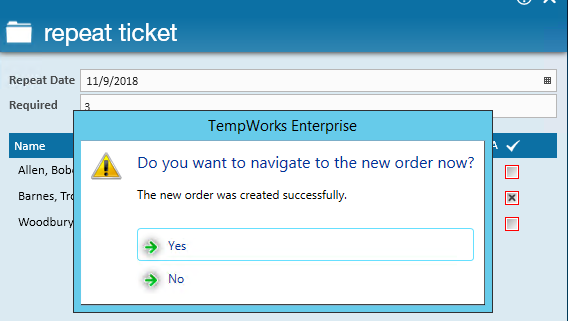
- Select 'Save' to create the new ticket.
- A new window will open. Select 'Yes' to be navigated to the full order record or 'No' to return to the screen you were previously on.


*Note* Repeat tickets will be displayed in the orders (ticket) area with a full yellow order status bar. Employees who have been asked to be repeated will automatically be "attached" to the order.
Navigate to Related Records
Want to see more details of an order or need to check out customer information?
Right click on a ticket and select 'View Order' to jump to the full order record or 'View Customer' to jump to the Customer record tied to the ticket.

Logging a Message
When new information arises about this ticket, you may want to utilize the message option to log a new message for everything from a change in supervisors to an employee showing up late.
To log a message:
- Right click on the ticket you want to log a message for:
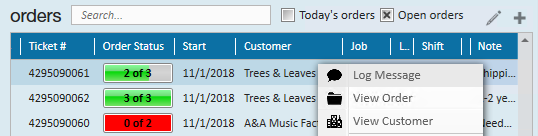
- Select 'Log Message.'
- Select a message action code that best represents the message you are logging.
- Write out the details of the message in the main section:

- Select 'Post' to log the message to the customer and order records.


For more tips on logging messages: Tips for Message Logging.