What are Mobile Friendly Forms?
Mobile Friendly Forms take your form pages to the next level making it easier for applicants and employees to fill out forms on mobile devices.
*Note* To access this functionality, you will need to be an HRCenterTM admin. If you are unsure of whether you are an HRCenter admin consult your Bridge admin, if you are unaware of your HRCenter admin URL reach out to your TempWorks Account Manager.
If you are trying to create a mobile friendly version of a form created by a TempWorks rep, you may need to contact TempWorks support for assistance. Any form that can not be found under the forms section of HRCenter Admin has been custom made and will need the help from a TempWorks Rep to link the fields.
Traditional HRCenter Forms
Our traditional forms work great on large computer screens but can be a difficult experience for employees on smaller devices where they have to scroll vertically and horizontally to see the full form.

Mobile Friendly Forms
To help optimize the experience for your mobile users, you can create a mobile friendly version of your form. Here, the employees will answer questions to fill out the form and then they will be able to review and sign the form. 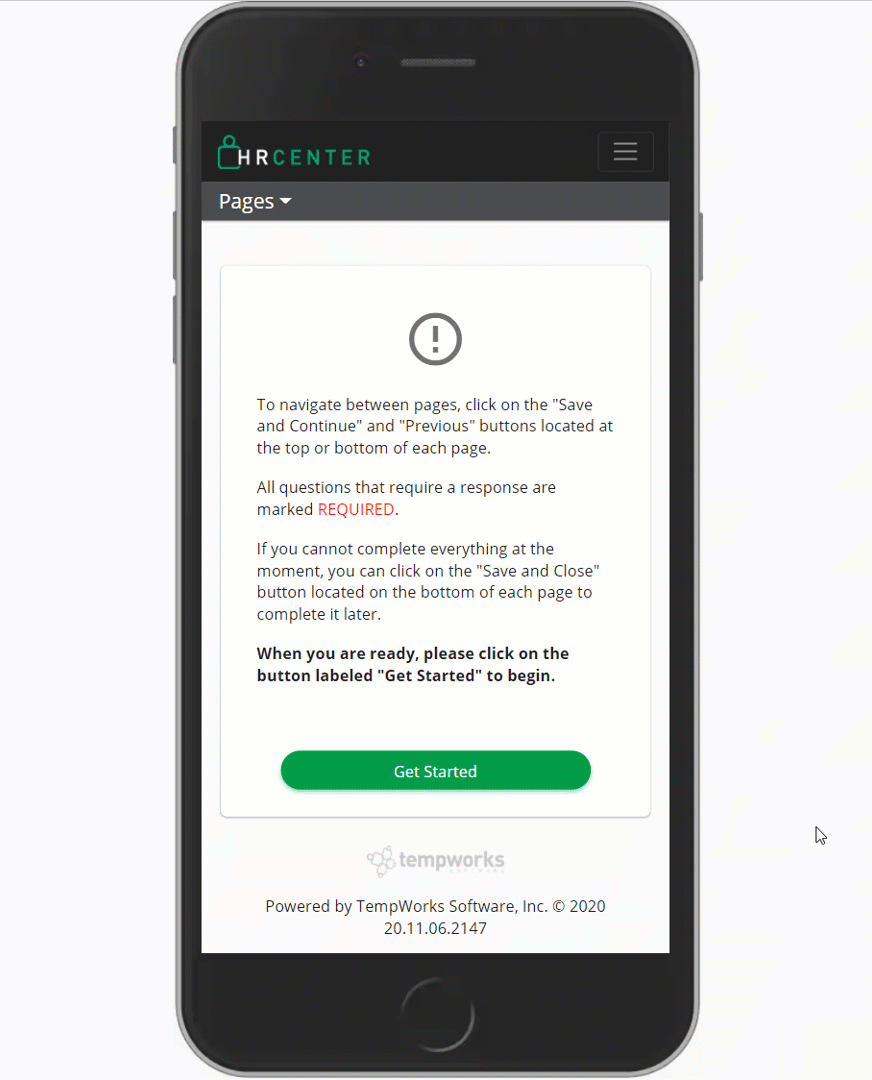
This eliminates the need for extra scrolling and can make the experience faster and easier for your applicants and employees.
This article covers the following:
*Note* If you've never create a survey or a form in HRCenter admin, you may want to check out HRCenter Admin videos and articles first.
Creating the Survey
In order for the process to be started, a survey will need to be created. Check out the video and instructions below.
If you want to follow along with the same form that's in the video, save a copy of these:
If you've never created a survey, check out the following links for more information
- Video: HRCenter Admin: Surveys
- Article: How to Create Surveys
Planning out your survey
Before you create your survey, take a look at your form to plan out how you want your survey to look. We recommend that you keep a copy of your form to write on so you can mock up what your survey will look like.
Check out this mark up example: Hillview Electronic Communication Agreement Marked Up.png
Group your questions
Surveys allow you group questions which can help break up longer forms that have lots of information for the employee to fill out. Consider grouping like questions or create groups based on different sections of your form. Each survey must have at least one group.
Example: 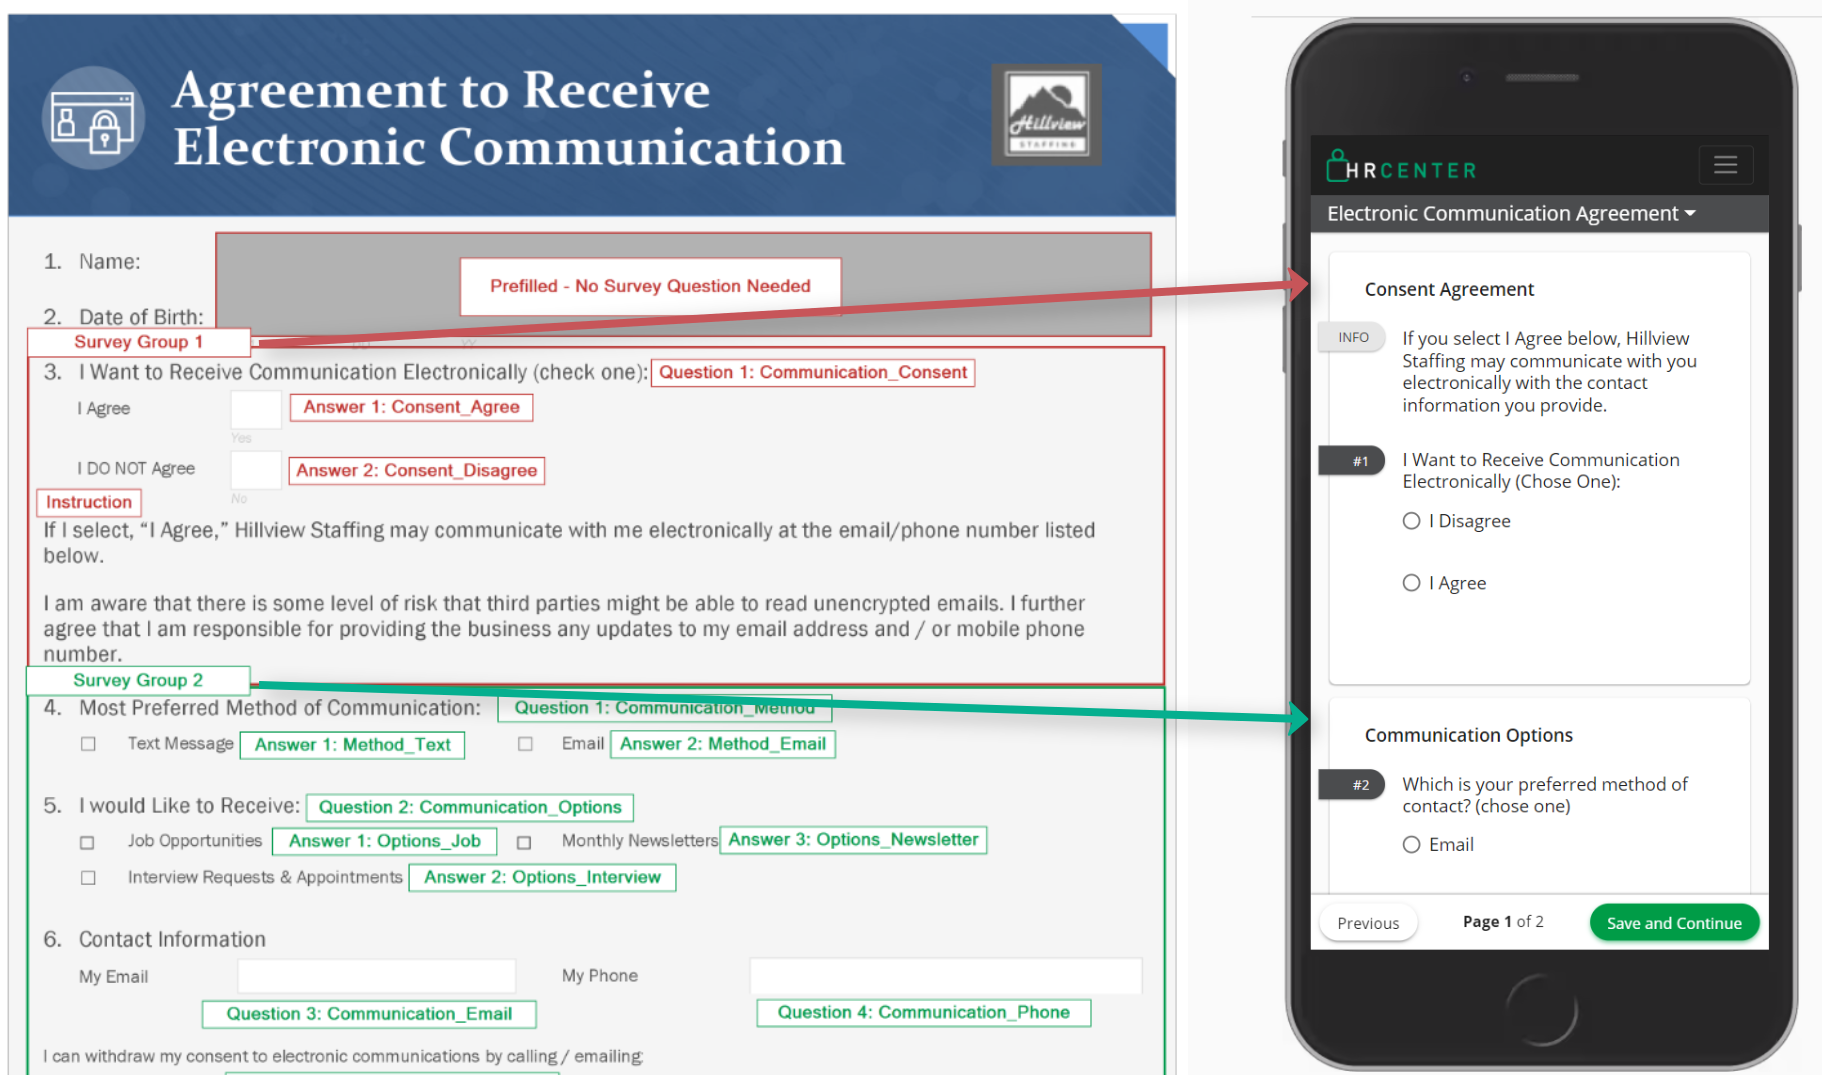
Consider Prefilled Information
If you have fields on your form that you already have in your system, such as first and last name, you can prefill that information on the form. If it's prefilled on the form, you don't need to add it as a survey question. This can make it easier for employees so they don't have to type their name in for every form they have to fill out.
If you have some information that you may or may not have gathered from the employee yet, there is a way to prefill information on the survey. Check out Prefilling and Postfilling Survey Answers.
Decide on Your Question Options
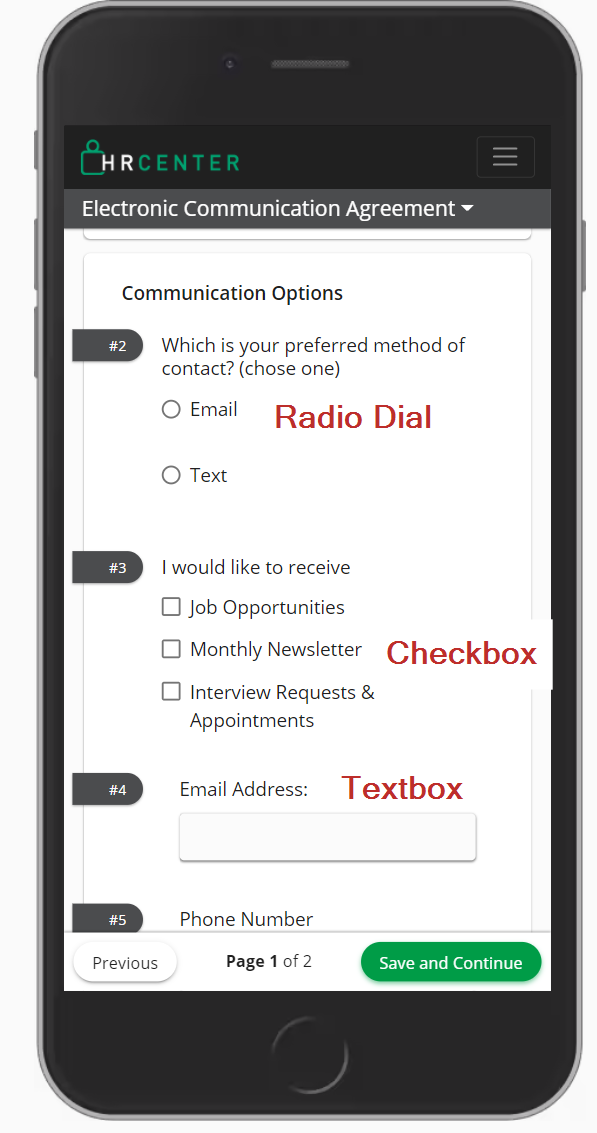
Survey questions can have an answer type of radio, checkbox, textbox, textarea, or date. For each question you identify from your form, consider which answer type it will need to be. If you are choosing radio or checkbox, take a look at what answer options will need to be added.
Creating Your Survey
- Create a new survey
- Create the survey groups for your form
- Enter questions based on fields you need to fill out on your form
- Name the questions and answers you create so that you can link them to the fields on the form later
Two fields to keep in mind while creating your survey:
Choose Custom Name (for Field Mapping):
For each question you enter on your survey, you will need to enter a custom name. Custom names will allow you to match the questions to fields on your form as needed.
Remember that names can have capital or lower case letters and underscores but no spaces.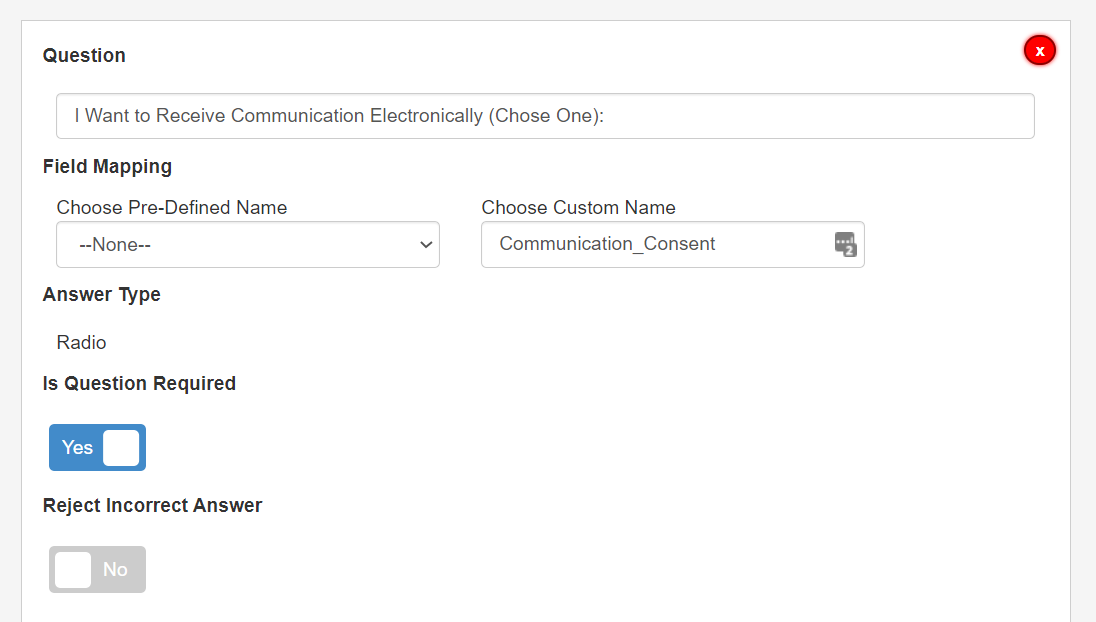
Write down the custom name on your marked up copy of your form so you can easily refer back to it when you are linking the form.
Value Of Answer (for Answers):
If you are utilizing radio or checkbox questions, when you enter the possible answers you will need to also enter a value. This is similar to naming the question and it will allow you to link it to a specific field on your form.
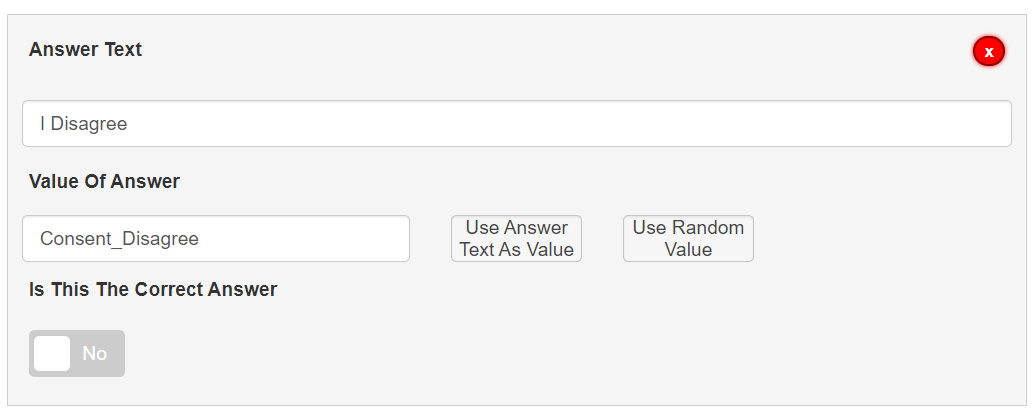
Values can have capital or lower case letters and underscores but no spaces.
Write down the answer value on your marked up copy of your form so you can easily refer back to it when you are linking the form fields. Make sure your answers are clear enough for you to pick out later when linking your form.
*Note* In order for the survey to link correctly to the form, you will need to make sure that every 'Choose Custom Name' and 'Value Of Answer' is specific to their respective question and answer.
Ex. if you have multiple questions they could agree or disagree to, do no enter I_agree as an answer because you will not know which statement you are agreeing or disagreeing with.
*Note* When setting up the survey, make sure all dependencies are labeled per question and answer. This includes whether or not a question is required, whether or not an answer is the correct one, etc. With the dependencies labeled within the survey, extra work will not need to be done when creating the form.
Creating the Form
With the survey completed, it is time to create the form in which the survey will be linked to. Check out the video below to walk through the second half of our process.
If you've never created a form before, check out the following links for more information:
- Video: HRCenter Admin: Form Builder
- Article: HRCenter Form Builder
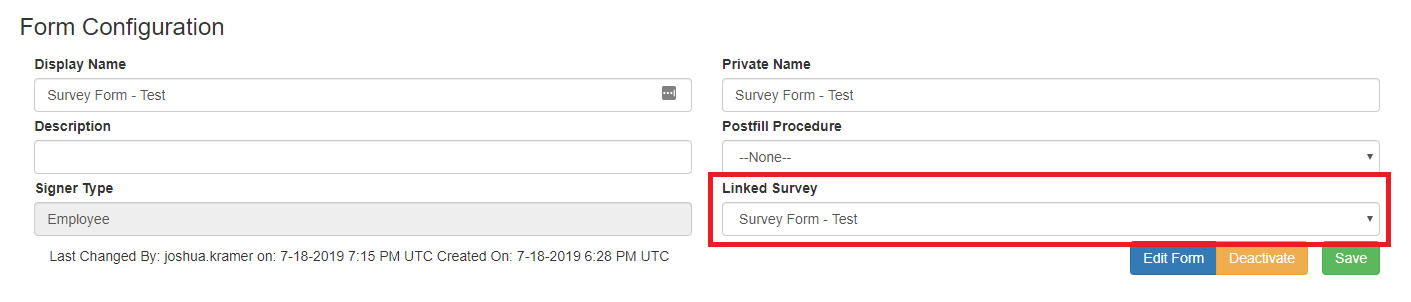
Linking a Form to a Survey
When initially creating the form, you will see an option for 'Linked Survey'. As long as the survey has been built, it should appear within this drop down. Before editing the form and adding fields, you will want to choose the survey from the dropdown that will be linked to the form:
With the survey linked, select 'Edit Form', add your form image, and drag the intended fields over to the image like with any form. With the fields added within the form image, you will now need to link the survey answers to the form fields. This is done by updating the 'Name' within the 'Properties' window on the right hand side of the Form Builder. In order to update the 'Name', do the following:

To Link a Survey Answer to a Form Field:
- Select the Form Builder field that needs to be updated
- Within the 'Properties' window on the right hand side of the Form Builder, select the 'Name' field
- Select the option for 'Name from linked survey'
- Within the 'Field' dropdown, select the corresponding name of the field within the survey
- Select 'OK' to finish linking the fields
*Note* As long as the survey has been configured correctly, requirements and dependencies on fields within the Form Builder do not need to be set. When the applicant is filling out the form within HRCenter, the requirements and dependencies of the fields will pull from the survey that is linked to the form.
Once all of the fields have been linked to their respective names, finish building the form and select 'Save' once completed.
Creating the Page
With the survey created and the form linked, you now need to create the page so that it can be assigned or added to workflows for employees to fill out.
For more information, please view the instructions within the How to Create Form Pages article.
Once you've created the form page, you will be able to preview the mobile friendly form.
Applicant Example
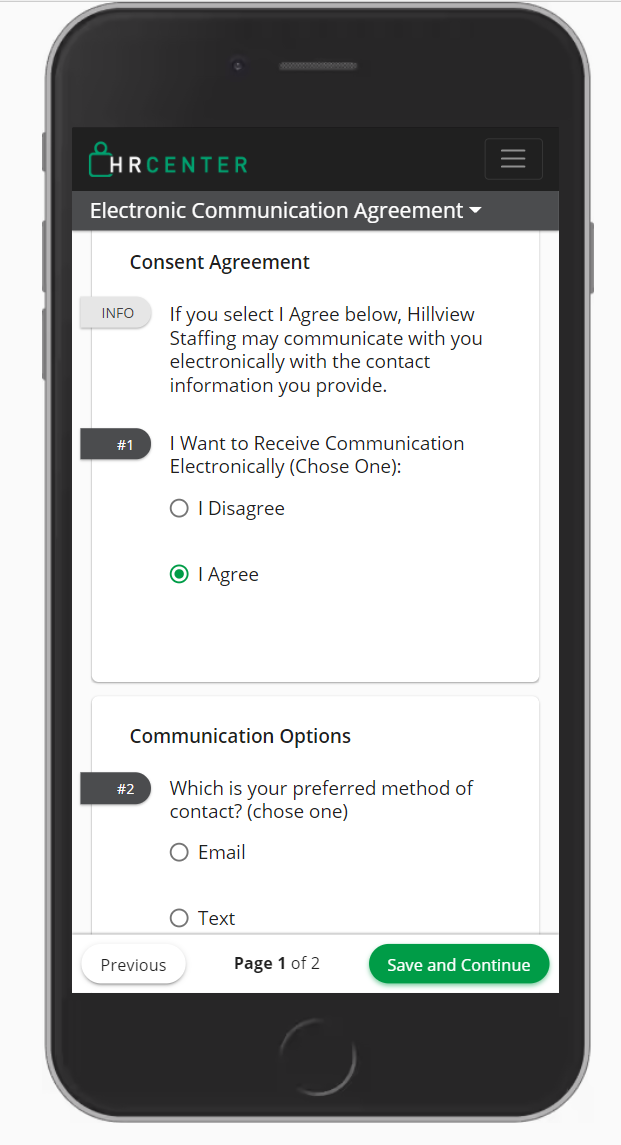
With the Mobile Friendly Form page created, it is time to assign the page and have the applicant fill it out. Below is an example of what the form will look like when being filled out via the applicant on a mobile device.
- When the applicant logs into HRCenter and selects the workflow with the Mobile Friendly Form to fill out, they will see the survey questionnaire first. The applicant answers the questions as necessary:
- With the questions answered, the applicant will select 'Save and Continue' to then see the answers populate within the form. These answers will be in a Read-Only format in which they cannot be edited unless the applicant selects the 'Previous' option to be brought back to the survey questionnaire:
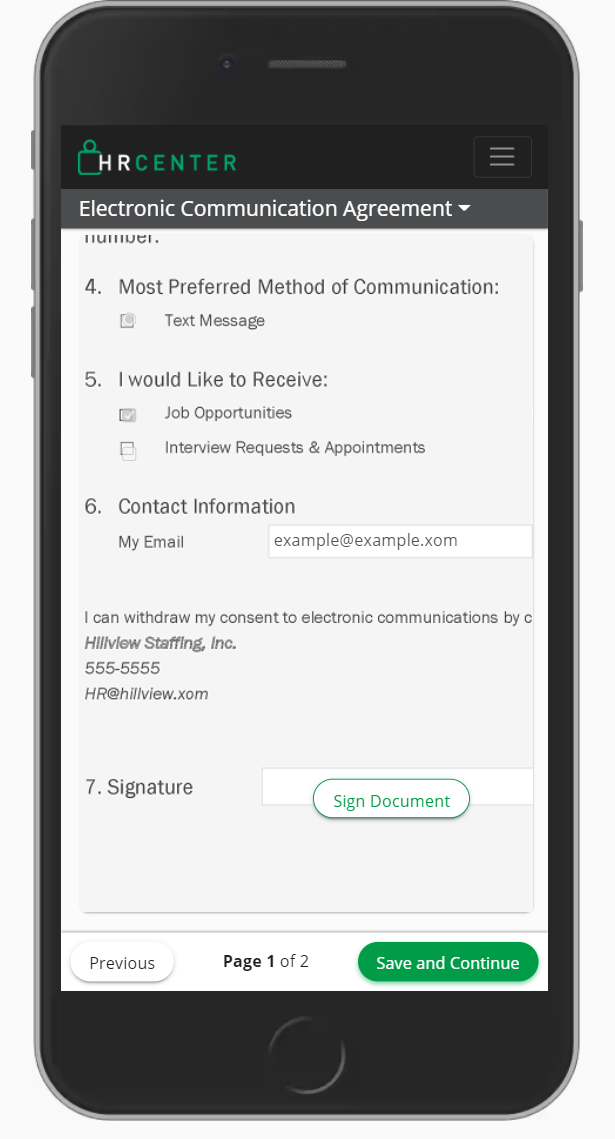

The applicant will then be able to sign the document and continue to submit the form.