*Note* TempWorks Software is no longer selling physical TimeClocks.
While physical TimeClocks are still in the Extended Support product life cycle, it is recommended that clients utilizing physical TimeClocks begin to research and plan for future TimeClock solutions.
Please contact TempWorks Account Management to discuss new solutions including the On-Site TimeClock that utilizes our Buzz application.
TimeClock Reports in WebCenter
You can give your customer contacts access to TimeClock reports in WebCenter to help them manager their employee's time punches. All of the reports listed here are related to the TempWorks TimeClock. If your customer is not using the software or hardware version of the TempWorks TimeClock, we do not recommend giving them access to these additional report options.
This article covers:
How to Setup WebCenter Report Access
There are a lot of report options available which might be overwhelming to your customer contacts. You can pick and choose what reports each customer contact can run in WebCenter to help customize their experience.
*Note* There are more than just TimeClock reports available for your customer contacts. Check out WebCenter Reports Manual for additional report options.
This section includes:
Setting up Access
In order for a customer contact to access any reports in WebCenter, they will need to be given access to the Reports tab and have permission for the reports you want them to see.
Giving Access to the Reports Tab
In order to see and run any reports in WebCenter, the customer contact must have a role that will give them access to the reports tab.
- In WebCenter Admin, Navigate to the Roles tab
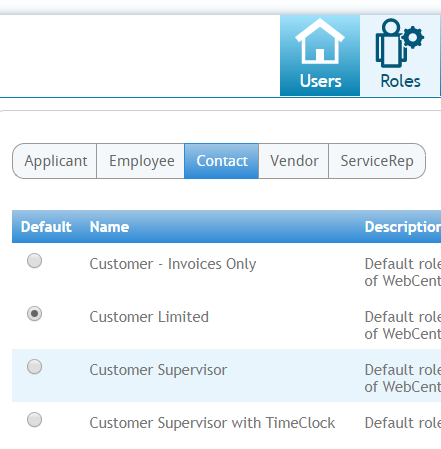
- Review the contact roles available and pick one that will have the reports option checked


If you only want to give some contacts access to reporting, consider having a role named Contact with Reports Access to make it clearer when assigning the contact a role that they will have reports access.
To learn more about contact roles, check out WebCenter Admin - Setting up WebCenter Roles.
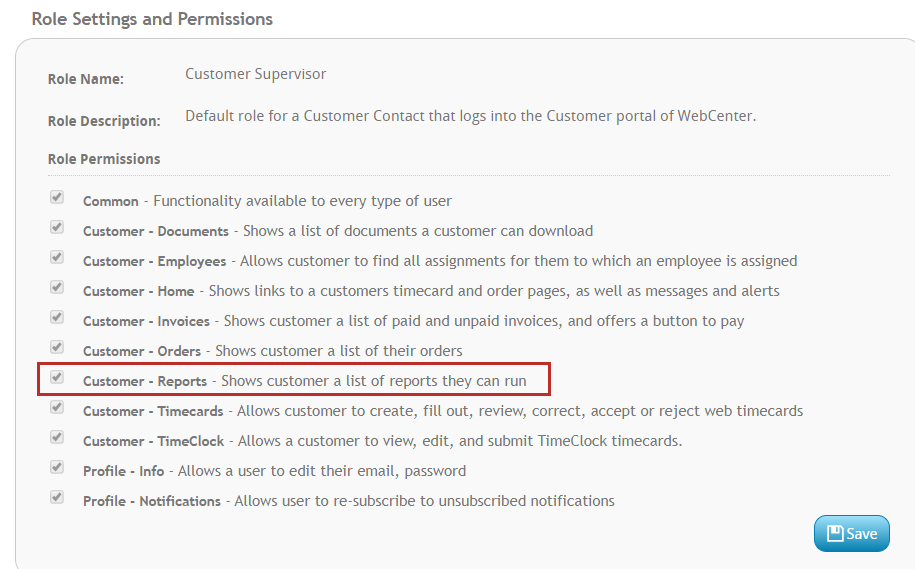
If you want to pick and choose the reports a contact can run, navigate to the Documents tab in WebCenter Administration.
Here you will be able to select the Reports tab and see a full list of all the reports available. You can create rules under each report to show or hide that report based on a contact role, customer, or contact name. 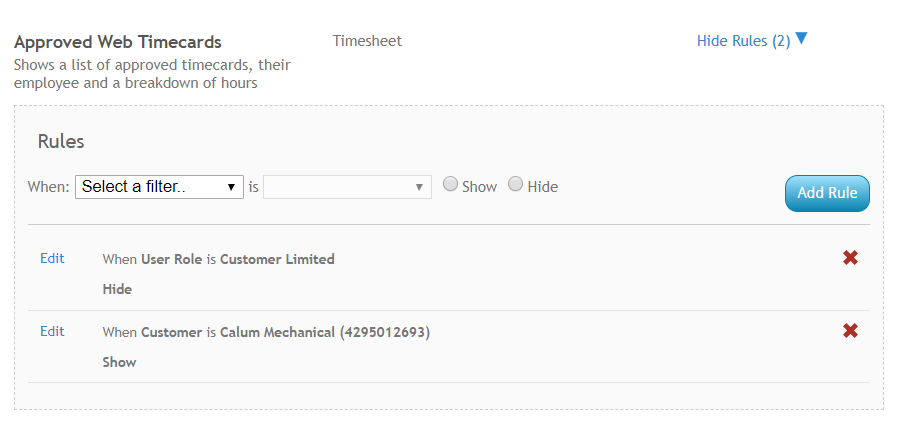
How Customers Run Reports
If you have given your customer contact access to reports they will be able to find them on the reports tab when they log into WebCenter.
"Run Report" option under each report will allow them to enter available parameters and run the report. 
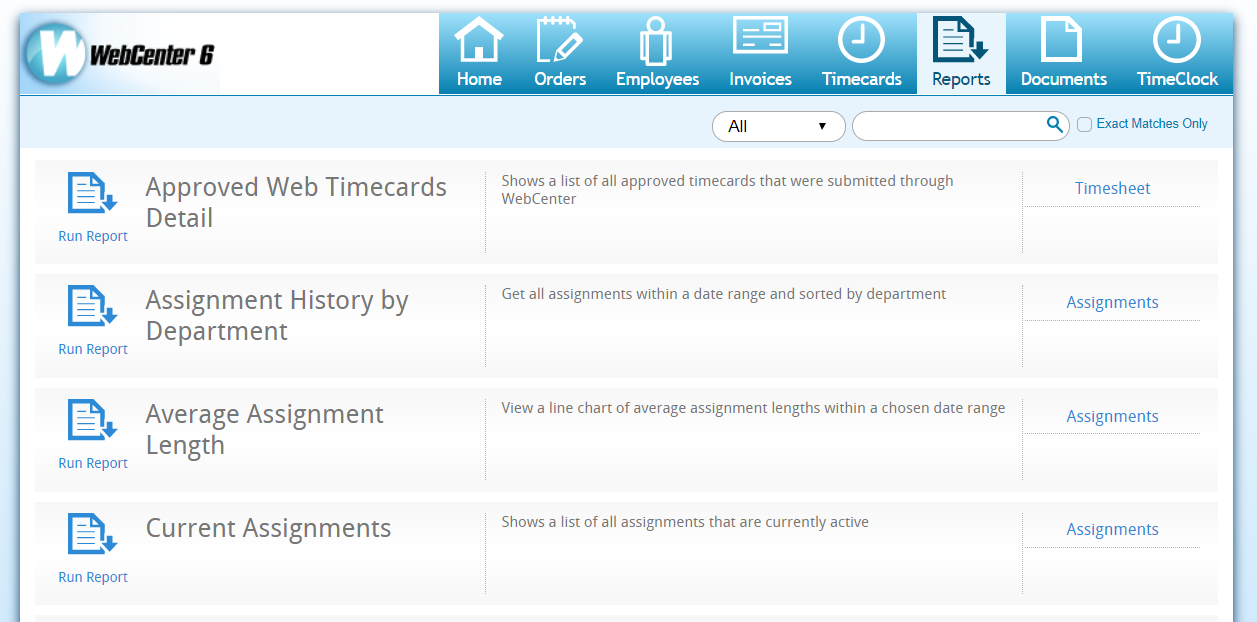
Overview of Reports Available
Below is a list of all the TimeClock related reports. Select one to be navigated to the details below.
- TimeClock Approved Web Timecard Detail
- TimeClock Approved Web Timecard
- TimeClock Attendance
- TimeClock Credentials
- TimeClock Daily Summary
- TimeClock Exceptions
- TimeClock Missing and Pending Timecards
- TimeClock Raw Punch Log
- TimeClock Timecards Advanced
- TimeClock Weekly Summary
- TimeClock Who Is Clocked In
TimeClock Approved Web Timecard Detail
Purpose: This report allows users to review TimeClock Approved Web Timecards with or without daily punch in and punch out times. The report organizes and displays employee TimeClock data by branch. Additionally, Daily Totals and Weekly Totals will be displayed for each employee—including regular hours, overtime hours, and double time hours worked in a week. 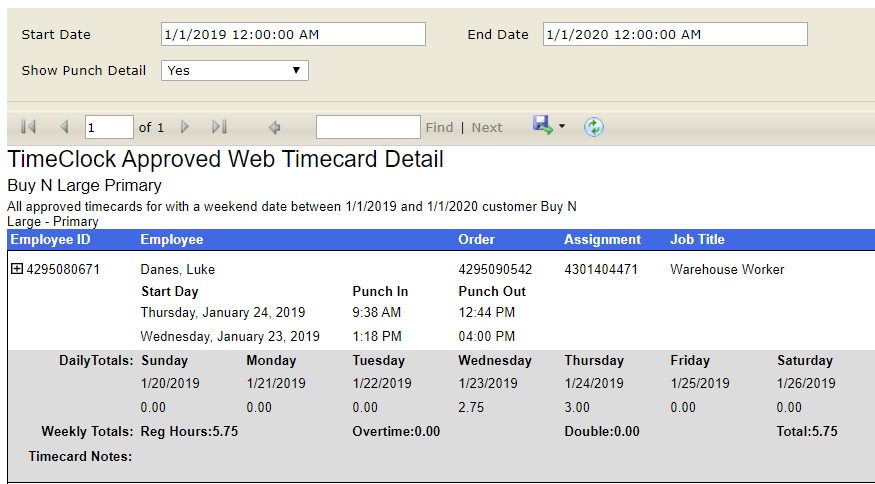
Parameters:
- Start Date: The starting date of your desired date range. At this date, approved timeclock timecards (with detail) will begin being displayed.
- End Date: The end date of your desired date range. At this date, approved timeclock timecards (with detail) will stop being displayed.
- Show Punch Detail:
- By selecting “Yes” you are stating that you would like daily “Punch In” and “Punch Out” data to be included in the report.
- By selecting “No” you are stating that only “DailyTotals” (hours worked per day) should be displayed in the report.
TimeClock Approved Web Timecards
Purpose: This report allows users to review data for approved timeclock timecards within a date range as determined by the user. Each assignment which has an approved timeclock timecard associated with it will be included in the report results. Additionally, the Weekend Date associated with the timeclock timecard will also be displayed in the corresponding column. 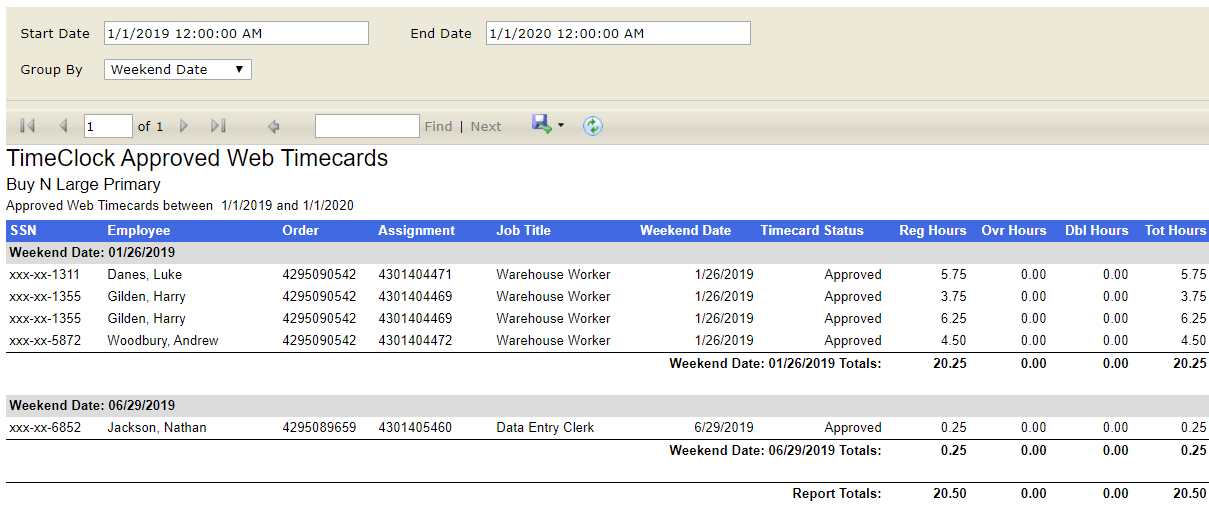
Parameters:
- Start Date: The starting date of your desired date range. At this date, approved timeclock timecards will begin being displayed.
- End Date: The end date of your desired date range. At this date, approved timeclock timecards will stop being displayed.
- Group By: Determines how the data will be organized in the report and the type of grouping is to be selected by the user before running the report. Whichever option the user chooses will be displayed with its Title (for example, “Department: DepartmentName”) in a grey column beneath the blue title column in the report. Grouping options are listed below:
- No Grouping: Will display all timecards in one list
- Weekend Date: End of week worked
- Employee: Separates timecards by employee
- Order: Separates timecards by order Id
- Department: Separates timecards by department
TimeClock Attendance
Purpose: This report displays Punch In and Punch Out times by Shift Date for employees by department. Additionally, the report allows users to compare actual punch times against expected start and end times. This information can be used in conjunction with data that exists in the Length (number of hours worked in a shift date) column and Alerts (warnings) column.
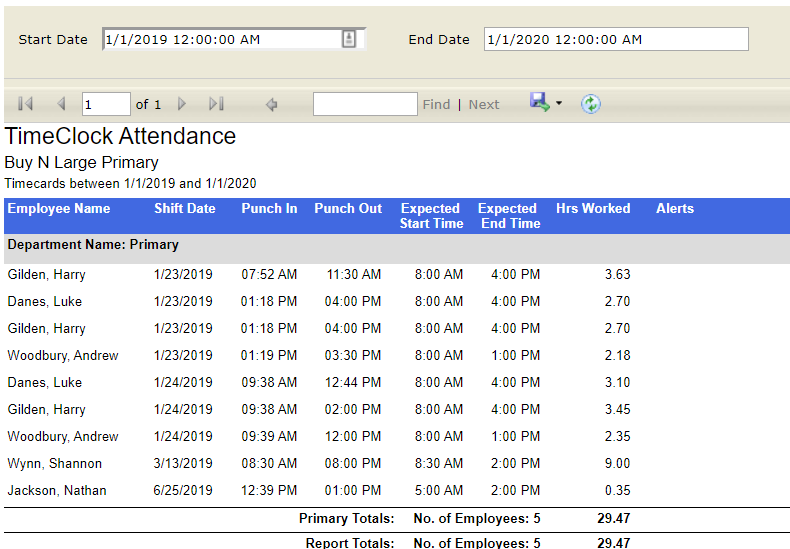
*Note* Alerts are configured using the warning configurations found in WebCenter Administration under Configs > TimeClock Rules. Check out TimeClock Overview for more information.
Parameters:
- Start Date: The starting date of your desired date range. At this date, TimeClock timecards with attendance will begin being displayed.
- End Date: The end date of your desired date range. At this date, TimeClock timecards with attendance will stop being displayed.
TimeClock Credentials
Purpose: This report displays employees that are utilizing (or have utilized) a TimeClock to record time, how they are recording time, as well as data specific to the punch method being used.
The report is organized alphabetically by employee name (last name, first name) and displays the EmployeeID which can be used in TempWorks for additional reference information. The TimeClock Credentials report can be especially helpful to look up QuickPins forgotten by employees.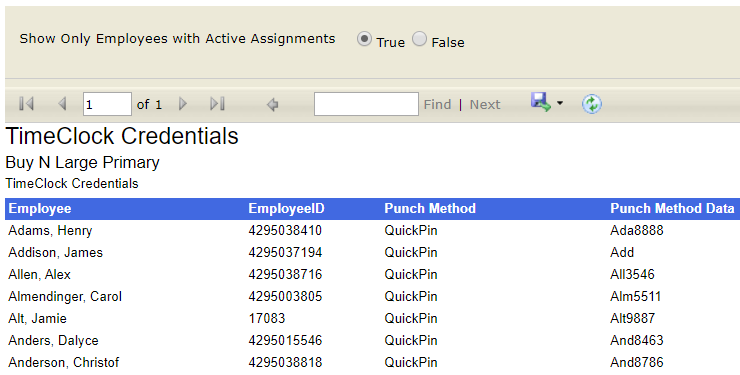
Parameters:
- Show Only Employees with Active Assignments
- By selecting “True” you are stating data should only be pulled for those employees that are currently on timeclock assignments with a status of “Open.”
- By selecting “False” you are stating that data should be pulled for all timeclock assignments, regardless of the assignment status.
TimeClock Daily Summary
Purpose: This report allows users to see which employees were clocked into a TimeClock for the given Attendance Date by Department. What is important to note is that the Attendance Date does not necessarily equal the date when the Employee physically clocked in. It simply means that the employee was clocked in at some point for the Attendance Date.
Employees are organized alphabetically (last name first) and Start Date (the date at which the Employee clocked in), Clock In time, Clock Out time, Warning List (such as early arrival/departure warnings, late arrival/departure warnings) and Hours Worked data is listed for user review.
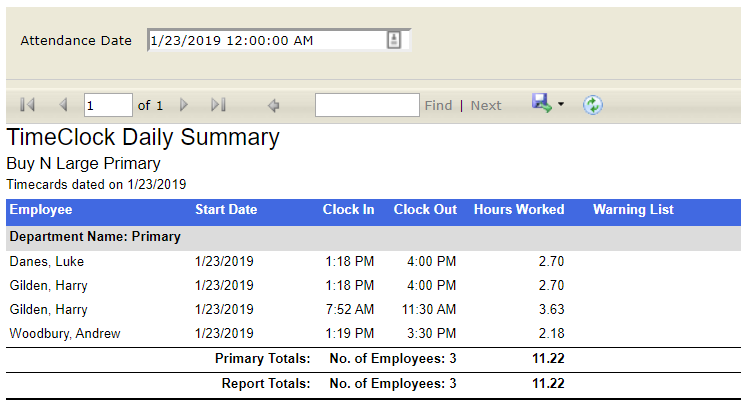
*Note* The Warning List items are configured using the warning configurations found in WebCenter Administration under Configs > TimeClock Rules. Check out TimeClock Overview for more information.
Parameters:
- Attendance Date: Determines what day to pull attendance information for. The date that is input pulls data related to all employees that were clocked in at some point during that date.
TimeClock Exceptions
Purpose: This report allows users to review data for all TimeClock Timecards which have missing and/or abnormal punches. This information equates to timecards flagged as “Incomplete” or flagged with “Warnings” in the TimeClock tab of WebCenter.
TimeClock Timecards are organized by Date (oldest listed first) with the missing punch/abnormal date singled out and associated punch in/punch out times included for review. Additionally, related notes, i.e. warnings are also listed.

TimeClock Missing and Pending Timecards:
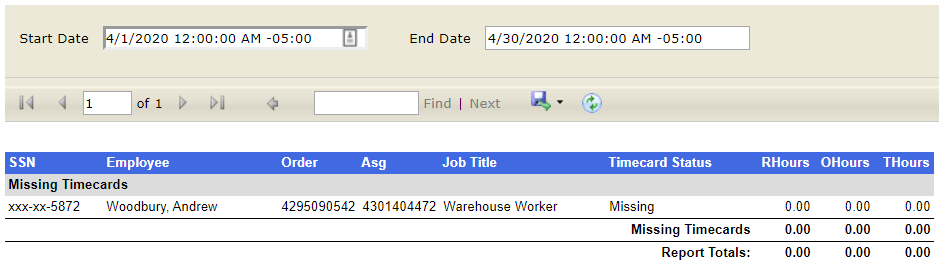
TimeClock Missing & Pending Timecards
Purpose: This report will display a list of all timecards with a status of missing or pending within a chosen date range. The report is organized alphabetically by employee name (last name, first name) and displays the last four of the listed employee’s social security number which can be used in TempWorks for additional reference information.
The timecard status will be either “Missing” or “Pending”. Those with a status of “Missing” will have zero listed in the RHours (Regular Hours), OHours (Overtime Hours), and THours (Total Hours) columns. Those with a status of “Pending” will have the hours recorded thus far for the date range displayed in the same columns as described above.
Parameters:
- Start Date: The starting date of your desired date range. At this date, missing and pending TimeClock timecards will begin being displayed.
- End Date: The end date of your desired date range. At this date, missing and pending TimeClock timecards will stop being displayed.
TimeClock Raw Punch Log
Purpose: This report allows you to see the Punch Times (both in and out) without any adjustments, such as snaps and rounding. The report will organize by employee name (last name, first name) and organize in ascending order. 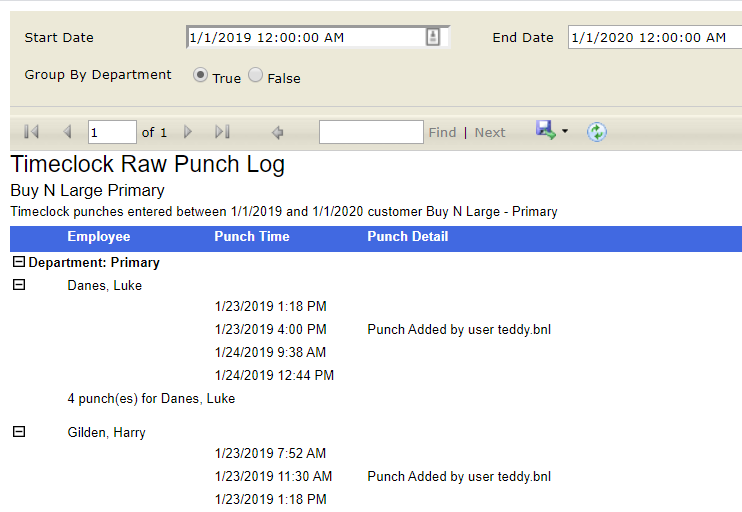
Parameters:
- Start Date: The starting date of your desired date range. At this date, raw punch log data will begin displaying
- End Date: The end date of your desired date range. At this date, raw punch log data will stop displaying.
- Group By Department:
- True: By selecting “True” employees will be organized and separated by Department. The Department Name will be listed at the top, before Employee names.
- False: By selecting “False” data will not be additionally organized by Customer Departments, it will simply be grouped as one Customer.
TimeClock Timecards Advanced
Purpose: Allows users to review TimeClock timecard data for a given date range. The report includes data related to “Punch In” and “Punch Out” times by date (Start Day), and the total number of hours worked for each day. Hours are additionally organized by regular pay (Reg), overtime pay (OT), double time pay (DT). The sum of those parts are displayed as the “Total”.
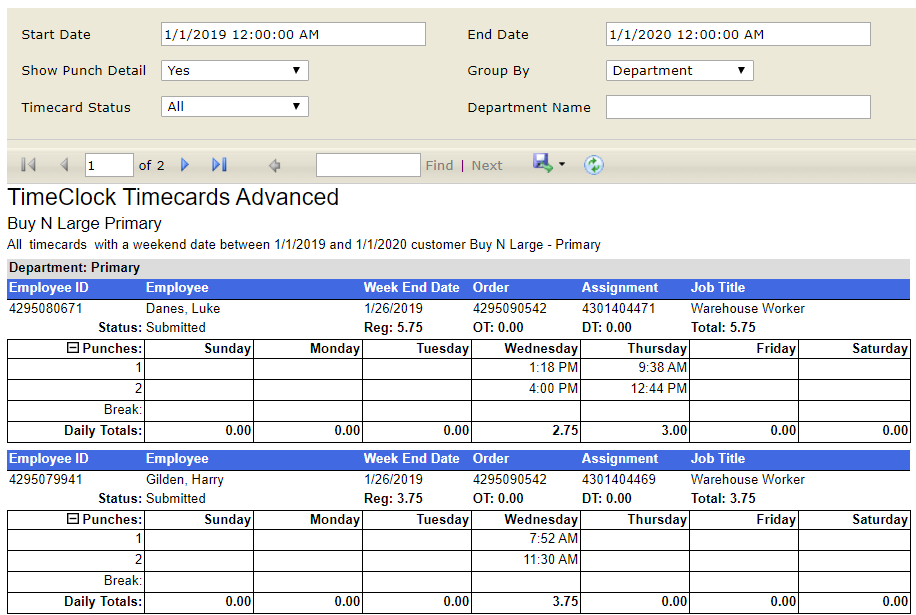
Parameters:
- Start Date: The starting date of your desired date range. At this date, advanced timeclock timecard data will begin displaying
- End Date: The end date of your desired date range. At this date, advanced timeclock timecard data will stop displaying
- Show Punch Detail:
- Yes: By selecting “Yes”, data for “Start Day”, “Punch In”, and “Punch Out” will be displayed in the report.
- No: By selecting “No”, simply the “Daily Totals” will be displayed for review in the report.
- Timecard Status
- All: When selected, the report will display data for all Timecards, despite their status, for review.
- Unsubmitted: When selected, the report will display data for Unsubmitted timecards only.
- Submitted: When selected, the report will display data for Submitted timecards only.
- Submitted by me: When selected, the report will display data for timecards Submitted by me (i.e. submitted by the service rep who is running the report) only.
- Group By: Determines how the data will be organized in the report and the type of grouping is to be selected by the user before running the report.
- No Grouping
- Department
- Job Title
- Weekend Date
- Employee
- Order
TimeClock Weekly Summary
Purpose: Allows users to review employee TimeClock timecard data for a given Weekend Date. Employees are organized alphabetically (by last name) and in addition to the employee name being displayed, the “Employee ID” and “Date of Hire” are also available to review. Within each grouping of employee data, the dates that were worked are displayed as well as punch in and punch out times.

*Note* The Warning List items are configured using the warning configurations found in WebCenter Administration under Configs > TimeClock Rules. Check out TimeClock Overview for more information.
Parameters:
- Weekend Date: Determines the week, and its related data, which will be pulled into the report.
TimeClock Who Is Clocked In
Purpose: This report allows users to determine which employees have clocked in and by what time. For instance, if users select an Attendance Date of 8/16/2012, and a time of 7:00 a.m., only employee’s that clocked in between midnight and 7:00:00 a.m. on 8/16/2012 will display in the report results.

Parameters:
- Attendance Date: Determines the date, and its related data, which will be pulled into the report
- Time: This value determines when to stop reporting additional “clock in” times for the attendance date selected.