For best viewing quality, expand the settings icon and select Quality of 720p or greater:

Index:
ACA Administration
Prior to using the Affordable Care Act (ACA) functionality there are several settings for which you will need to make selections. These settings are in the administration area of TempWorks Enterprise.
ACA System Settings
To access the ACA setup in administration, choose all options/administration/employers. Select the employer (FEIN) you are setting up by double clicking on it in the grid list. In the left menu click on the ACA setup option.
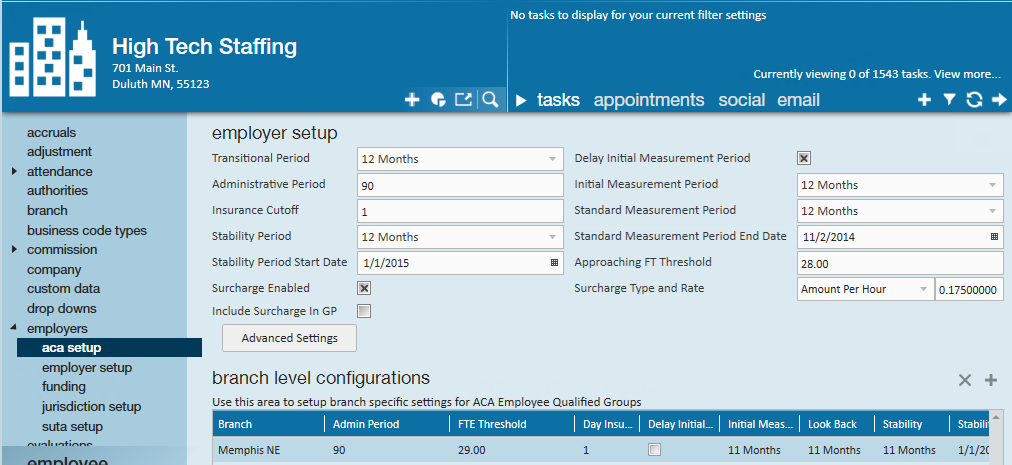
Following is a list of the fields and what their function/purpose is in regards to ACA behavior in the system: Transitional Period
Transitional Period: (Also known as the look back period.)
- Select a length, in months, from the drop down field.
- Transitional period is used only for the initial start of ACA tracking. The rules for ACA change after the transitional period (sometimes referred to as the look back measurement period)
- Things to take into consideration for your transitional period length are:
- the length of your selected administrative period in conjunction with your insurance plan year start date.
- After the initial transitional period the rules for the initial measurement period and stability period come into play.Administrative Peri
Administrative Period:
- Enter a number of days in this field.
- The administrative period is the period of time between when an employee is eligible for insurance and the time that you must have them enrolled in an insurance plan.
- The maximum length of an administrative period is 90 days, however when selecting your administrative period you will want to take into consideration insurance enrollment dates as they correlate to hire dates. In other words; if your insurance enrollment only allows for beginning of the month enrollments (vs weekly) you may want to consider a 60 day administrative period.
- *Note* Employees who are not being offered coverage will still be reflected in the administrative period.
- Enter a number in this field.
- The insurance cut off is the day of the month that your insurance enrollment is due. This field will be used to calculate approaching non-compliance of enrollment for eligible employees.
Stability Period:
- Select a length in months from the drop down field.
- The stability period is the period of time after the start of the insurance requirement that any eligible employee regardless of ongoing ACA status must have insurance available to them.
- Your stability period may not be less than your transitional period or measurement periods.Another way of looking at the stability period is it is the period of time between insurance open enrollment periods.
- So if your insurance enrollment period ends April 30th and reoccurs yearly, then your stability period would be 12 months long and start on May 1st.
- The significance of this period is if it has been determined that an employee should receive insurance, they may not have their insurance terminated until the end of the stability period unless their employment is terminated as well.
- E.g. John Doe worked 32 hours per week for the past year and we gave him insurance starting May 1st and have selected a 12-month stability period. On June 30th, John comes to us and lets us know that he is only able to work 20 hours per week due to family reasons. Due to the quality of John's work, we want to keep him around. Despite knowing that John is only going to be working 20 hours per week, we cannot revoke his insurance until May 1st of the following year without incurring penalties.
Stability Period Start DateStability Period Date:
- Select a date in this field.
- The stability period start date is the first date following the open enrollment deadline date, or you may look at it as the start date of your insurance plan coverage period.
Surcharge EnabledSurcharge Enabled:
- Click to put an X in the box if you would like to activate ACA surcharges for your customers.
- An ACA surcharge is a percentage of billings that will be added to the customer invoices to recoup some of your costs associated with ACA.
Surcharge Advanced Settings
If surcharges are going to be billed to help offset the cost of ACA insurance, you can also determine what hours, paycodes, adjustments, and offer statuses will be used to determine the surcharge amount.
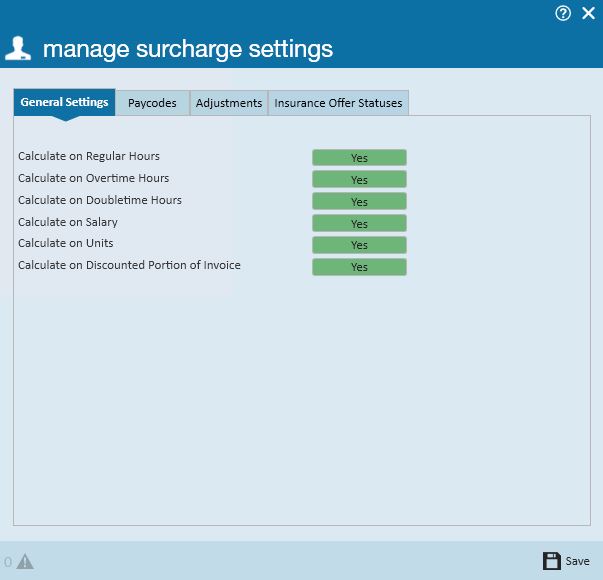
General Settings: Select each type of hours/pay that should be used in calculating the surcharge.
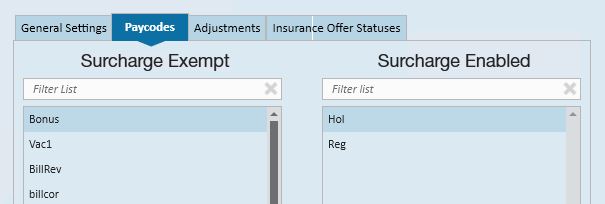
Paycodes: Select the paycodes that should be used in calculating the surcharge.

Adjustments: Select the adjustment codes that should be used in calculating the surcharge.
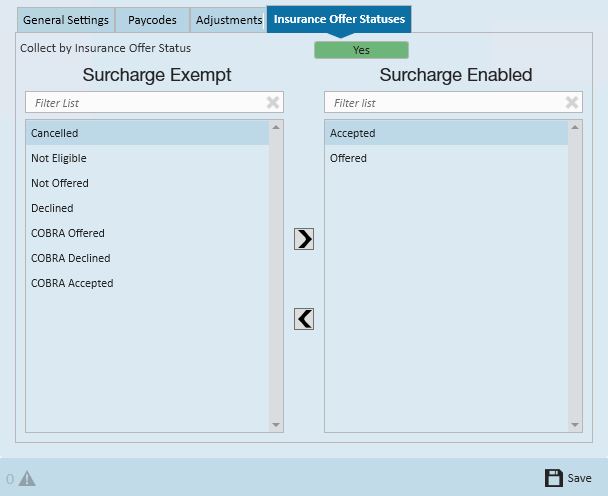
Insurance Offer Statuses: Select the insurance offer statuses that should be used in calculating the surcharge.
*Note* to select the options in the paycodes, adjustments, and insurance offer status forms click to select the options desired on the left (exempt) then click the right facing arrow to move the option to the enabled (right) side.
*Note* for insurance offer status only, if you would like to extend the surcharge based on status, make sure the yes/no toggle to set to yes.
ACA Setup Continued:

Delay Initial Measurement Period:
- Click to put an X in the box if you would like the insurance coverage start date delayed to the first day of the following month after enrollment.
- You will want to check this box if your insurance company does not allow mid-month enrollments for employees.
- If this box is checked and you have a 90 day administrative period, the system calculations will take this into account when doing the insurance due date calculation. In other words you do not need to modify your administrative period to less than 90 days to accommodate the insurance coverage start date delay.
Initial Measurement PeriodInitial Measurement Period:
- Select a length in months from the drop down field.
- The reason the initial measurement period exists is when a variable-hour employee starts working for you, you don't have any hour's history to determine their insurance eligibility and they might have begun working in the middle of the standard measurement period.
- Because it wouldn't be fair to you or them to judge simply based off of how much they worked in the remainder of the standard measurement period, the initial measurement period exists to give you time to gather that information before their eligibility is determined and you start facing penalties.
Standard Measurement PeriodStandard Measurement Period:
- Select a length in months from the drop down field.
- The standard measurement period is used for employees who have worked the full number of months of your transitional period or your initial measurement period.
- When determining whether or not ongoing employees are eligible for health insurance, you look at the hours worked by those employees during the standard measurement period (or transitional period for year one of ACA).
- In order for an employee's ACA status to be determined based off of the standard measurement period, they must have worked the entire duration of the standard measurement period. In short, it is the period of time that you use to determine insurance eligibility for the next stability period.
Standard Measurement Period End DateStandard Measurement Period End Date:
- Select a date in this field.
- This is the date that your standard measurement period ends.
- The time between the end of your standard measurement period and the start of the next stability period is your administrative period.
- So, if your stability period starts on January 1st and your administrative period is 90 days, your standard measurement period must end no earlier than October 2nd.
Approaching FTE ThresholdApproaching FT Threshold:
- Enter in a number of weekly hours in this field. This number is used in system calculations for any employees not coded with an ACA status of fulltime.
- This calculation uses the employee's average weekly hours during the current measurement period (either initial measurement or standard measurement depending on which period they are in) to flag the employee as approaching full time equivalent (FTE) status.
- These calculations will be performed during the daily maintenance procedure that is automatically run on your system.
Surcharge Type and RateSurcharge Type and Rate:
- Select the basis for the surcharge; percentage of payroll cost, amount per hour, flat rate per aIdent or percentage of invoice.
- If you select percentage of payroll cost, the surcharge will be calculated based on the percentage of the cost of the payroll.
- If you select amount per hour, this is the amount per hour billed (based on the ACA advanced settings selected) that will be added to your customer's invoices.
- If you select flat rate per aIdent, the amount billed will be per employee being billed.
- If you selected percentage of invoice, this is the percentage of the billings (based on the ACA offer statuses selected) that will be add to your customer's invoices.
- Within the rate field enter the percentage or dollar amount appropriate for the surcharge.
*Note* You will have an opportunity on an individual customer and order basis to modify the amount or percentage specific to that customer/order.
If the majority of your customers will not be charged this surcharge you may want to enable the surcharge and enter 0 as the percentage amount, then for the customers you will be billing this surcharge to; you may enter the actual percentage on the customer record.
Adversely, if the majority of your customers will be charged this surcharge you may want to enable the surcharge, enter your companies' standard percentage in this field, and for any customers you do not wish to apply this surcharge to you may change the percentage to 0 on the individual customer records.
TempWorks has added some settings validation to assist you in selecting your period lengths and start and end dates. This validation is as follows:
- Standard measurement period end date must be less than stability period start date
- Difference between standard measurement end date and stability start date must not be greater than 90 days
- Stability period to be greater than or equal to measurement period
Branch Specific SettingsAdding Branch Specific Settings
Branch Specific Settings:
The ACA settings that you select are applicable to all employee and customer records for the federal employer identification number (FEIN) that they are set up in. TempWorks allows the flexibility to apply a different set of rules for specific branches within the FEIN. This will most commonly be used for the allowable ACA exceptions for specific groups of employees.
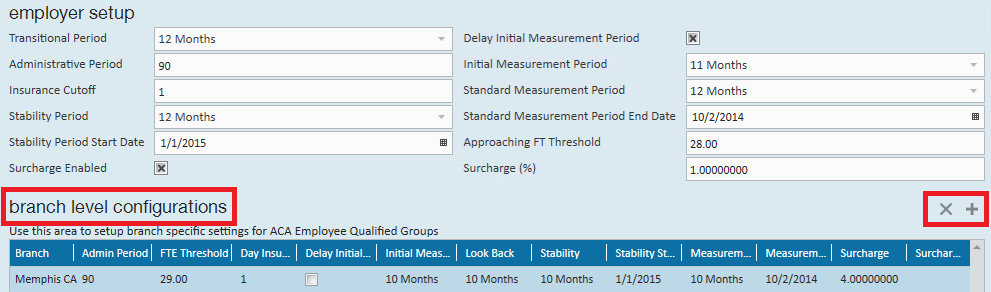
Add Branch Level Configuration:
To configure ACA setup for a specific branch click the plus sign to the right of configured branches.
The following window will display:
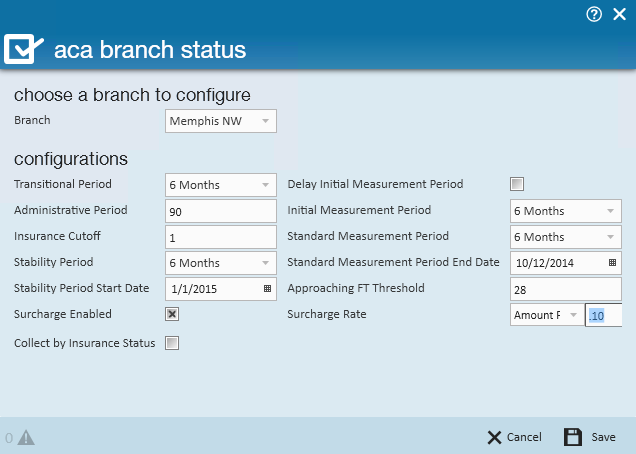
In the branch field, select the branch you would like to change the ACA settings for, then continue to make selections in the fields specific to the branch selected.
Click Save.
After you click Save, the branch specific setting will be displayed in the grid.

To delete a branch setting, click to highlight the branch in the grid then click the X to the right of the configured branches settings. Your branch settings will be removed.
*Note* If you make changes to your ACA settings in the future, existing employee calculations will remain with the previous settings until their re-evaluation period at which time the system will apply the new settings.
User Security Roles
User Security Roles
To allow users to see employee ACA coding information you must have the ACA security roles associated with the appropriate secroles.
There are two security roles for ACA:
- ACA general user -
- This user can see the employee ACA coding section in the employee/paysetup.
- They can enter hire dates, ACA statuses and insurance statuses.
- They CANNOT change the ACA hire date on the employee after it has been saved.
- ACA super user -
- This user can see the employee ACA coding section in the employee/paysetup.
- They can enter ACA hire dates, ACA statuses and insurance statuses.
- They can change hire date on an employee after it has been saved.
If neither of the ACA security roles are setup for a TempWorks secrole, users associated with that secrole will be unable to see the ACA employee setup information.
*Note* By default the servicerep role will be assigned ACA general user and payclerk role will be assigned ACA super user. Please contact your TempWorks support team to verify the ACA secroles are configured to your requirements.
Adjustments
As part of the ACA insurance regulations, an employee can only be required to pay a certain percentage of their gross pay for their portion of the contribution to the insurance costs.
*Note* At the time of the writing of this documentation that percentage is 9.5%.
TempWorks has the ability to setup the employee adjustments and associate them with a corresponding employer adjustment. The system will use the insurance premium amount, the maximum percentage allowed for employee contribution and calculate the remainder as the employer contribution.
Insurance Premium - (Employee Gross Pay * Adjustment %) = Employer Contribution
Setting Up Employer Contribution Adjustments
Set Up Employer Contribution Adjustments:
The first step in setting up your ACA insurance adjustments is to setup your employer contribution adjustments.
To set up the adjustment, click on all options/administration then in the menu on the left, click on adjustments.
Click the plus sign on the right side of the window.
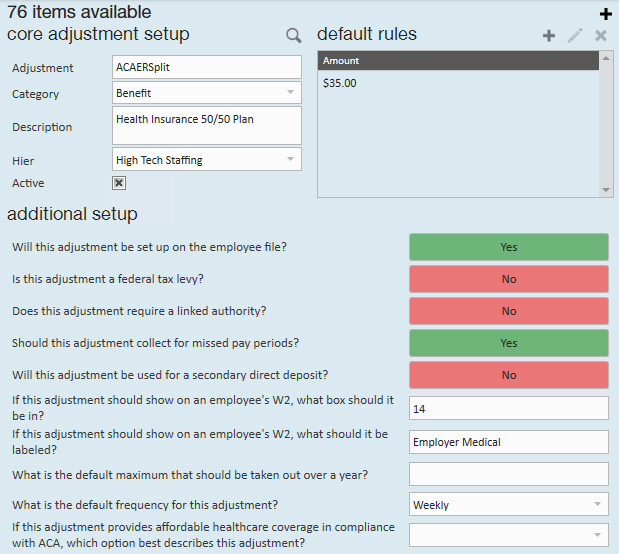
The following window will display:
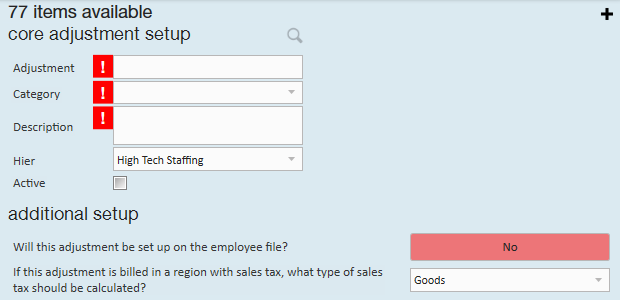
Complete the information in the following fields:
- Adjustment - Enter up to 10 characters to identify the adjustment.
- Category - Select the correct adjustment category from the list.
- For employer portion adjustments you will need to select an adjustment category that is setup in your system as a benefit. They system will alert you when you save the adjustment if you have select employer portion for the adjustment but did not select a category that is set up as a benefit.
*Note* If you obtained new medical insurance for ACA compliance you may need to have an applicable category added to the adjustments category list.
- Description - Enter in a detailed description for the adjustment. You may enter up to 150 characters.
- Hier - Select the appropriate hierarchy for the adjustment.
- Because the adjustments honor the hierarchy; you are able to set up adjustments in a way that will prohibit adjustments from being set up for employees in areas of your hierarchy that do not have that particular adjustment available to them.
- Example: All of your employees are under one health insurance provider except your employee who work for your New Mexico branch. You may set up a different adjustment specific to the New Mexico health insurance provider and associate that adjustment to the New Mexico branch in your hierarchy.
- Active - Check the Active box to make the adjustment active in the system. If you need to deactivate the adjustment at a later date you may deselect the checkbox.
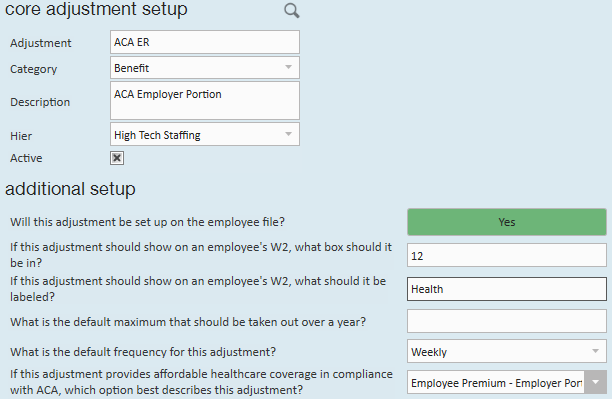
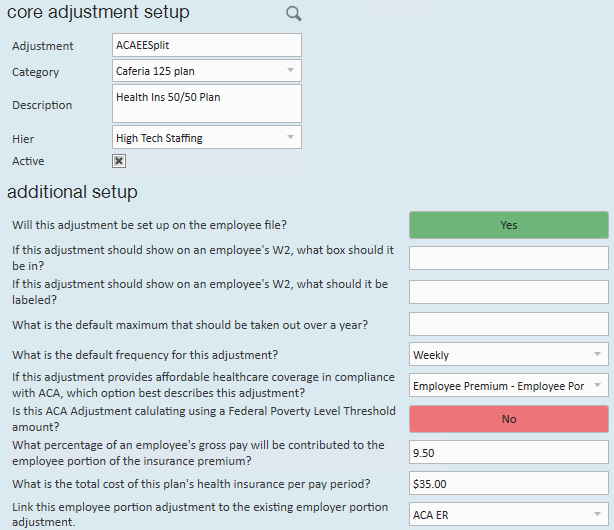
Following is an example of the setup for an employer portion medical adjustment for the core adjustment section of the window:
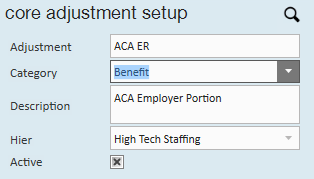
After you select the active checkbox, you will need to complete the additional setup section of the window:
- The first field in the additional setup section is will this adjustment be setup on the employee file? Click to display Yes in the answer field.
After selecting Yes, additional fields will display:
- Go to the last field labeled if this adjustment provides affordable healthcare coverage in compliance with ACA, which option best describes this adjustment.
- Select employee premium, employer portion. After selecting this option many fields will be removed.
- Complete the remainder of the fields based on which box on the W2 you would like the Adjustment to show in and what W2 label you would like.
- In the what is the default frequency for this adjustment field select from the dropdown field menu options.
Click the save button in the upper left: ![]()
In the example below, the adjustment is an employer portion adjustment for employees who are paid weekly and their insurance will be deducted with each weekly paycheck.
The second step in setting up your ACA insurance adjustments is to setup your employee contribution adjustments.
To set up the employee contribution adjustment click on all options/administration then in the menu to the left click on adjustments.
Click the plus sign on the right to add the employee contribution.
The following window will display:
Complete the information in the following fields:
- Adjustment - Enter up to 10 characters to identify the adjustment.
- Category - Select the correct adjustment category from the list. If you obtained new medical insurance for ACA compliance, you may need to have an applicable category added to the adjustment category list.
- Description - Enter a detailed description for the Adjustment. You may enter up to 150 characters.
- Hier - Select the appropriate hierarchy for the Adjustment.
- Because the Adjustments honor the hierarchy, you are able to set up Adjustments in a way that will prohibit Adjustments from being setup for employees in areas of your hierarchy that do not have that particular Adjustment available to them.
- Example: All of your employees are under one health insurance provider except your employee who work for your New Mexico branch. You may set up a different Adjustment specific to the New Mexico health insurance provider and associate that Adjustment to the New Mexico branch in your hierarchy.
- Active - Check the Active box to make the adjustment active in the system. If you need to deactivate the adjustment at a later date you may deselect the checkbox at that time.
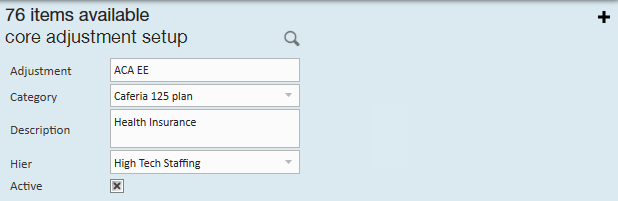
Following is an example of the setup for an employee portion medical adjustment for the core adjustment section of the window:
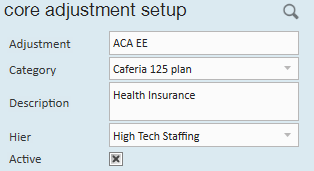
After you select the active checkbox, you will need to complete the additional setup section of the window.
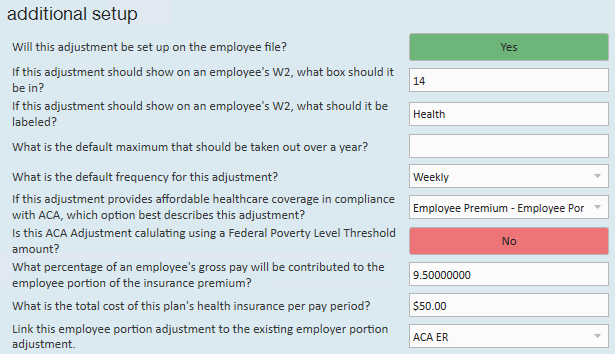
Additional Setup:
The first field in the additional setup section is will this adjustment be set up on the employee file? After selecting yes, additional fields will display.
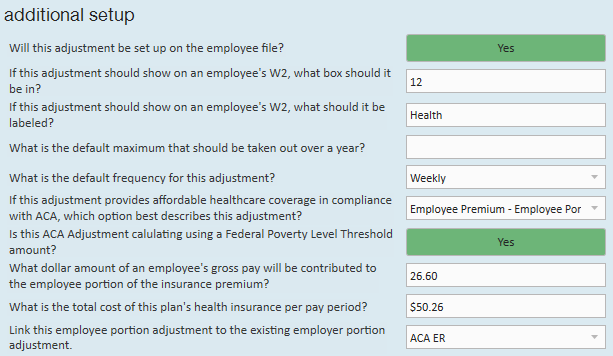
Go to the last field labeled If this adjustment provides affordable healthcare coverage in compliance with ACA, which option best describes this adjustment? Select employee premium, employee portion.
After selecting this option some fields will be removed and some will be added:
- Enter in the W2 box and label information.
- If there is a default yearly maximum for the adjustment enter that amount in the what is the default maximum that should be taken out over a year field.
- In the what is the default frequency for this adjustment field, select the appropriate frequency for the adjustment.
Is this ACA adjustment calculated using a federal poverty level threshold amount?
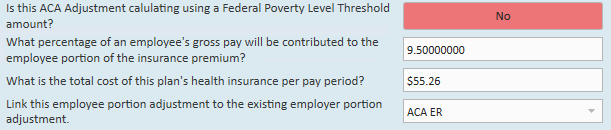
In the what percentage of an employee's gross pay will be contributed... OR what dollar amount of an employee's gross pay will be contributed... field, enter the percentage or rate. For the percentage calculation, at the time of the writing of this documentation, the maximum allowable deduction is 9.5% of gross pay. The dollar amount, if using the federal poverty level threshold, needs to be calculated for the pay period amount.
In the what is the total cost of this plan's health insurance per pay period field, enter a dollar amount based on your per employee insurance premiums. For example, if you are setting up an adjustment for weekly pay frequency you will enter the weekly insurance cost.
If you pay weekly but your insurance premiums are quoted to you by your insurance company as a monthly premium, consult with your insurance provider for the weekly amounts to be deducted. Depending on the insurance provider, your premiums may be based on calendar month or may be based on a 4 week increment.
In the link this employee portion adjustment to the existing employer portion adjustment field select the corresponding employer portion you previously set up.
When done, click the save button in the upper left: ![]()
In the example below the adjustment is an employee portion adjustment for employees who are paid weekly and their insurance will be deducted with each weekly paycheck.
Based on the setup examples above, when the Employee ACA adjustment is setup on an employee, TempWorks will look at the employees' gross pay, deduct the $50 weekly insurance premium from their pay.
If however the employees earnings are low enough where $50 represents more than 9.5% of their gross pay, the system will deduct 9.5% of their gross pay for the employee portion of the insurance premium and the remainder of the $50 insurance premium will be placed under the Employer ACA adjustment.
Tip: An ACA report is available which will allow you to report on the ACA employer portion contributions. This report can be found in the reports sections of TempWorks titled ACA Employee Adjustments.
*Note* If your insurance provider has different premiums for different groups of employees (by age, different levels of plan, etc) you can either setup one adjustment for the insurance and then adjust the rates on a per employee basis, or you can set up one adjustment for each group of employee/premium combinations.
*Note* At the time of the writing of this document, the ACA regulations require that insurance be offered to employee dependents 25 years of age and younger. However, the employer does not need to contribute to the insurance premium regardless of the cost to the employee vs. their gross pay. You may also, as an employer, offer insurance to employee spouses but it is not required For both cases you will want to have a separate adjustment code set up for dependent/spousal insurance. For the dependent/spousal adjustment code you will not associate it with an employer portion adjustment and therefore you will not incur any employer cost for this insurance offering.
*Note* if you are using a general ledger feed from TempWorks, you may need to adjust your general ledger account mapping to accommodate the new adjustments you are setting up for ACA insurance.
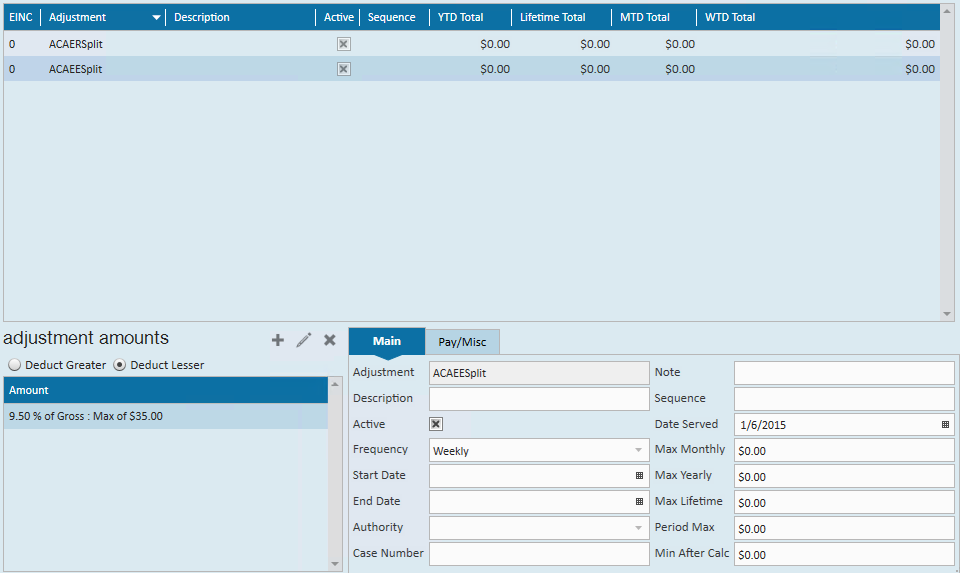
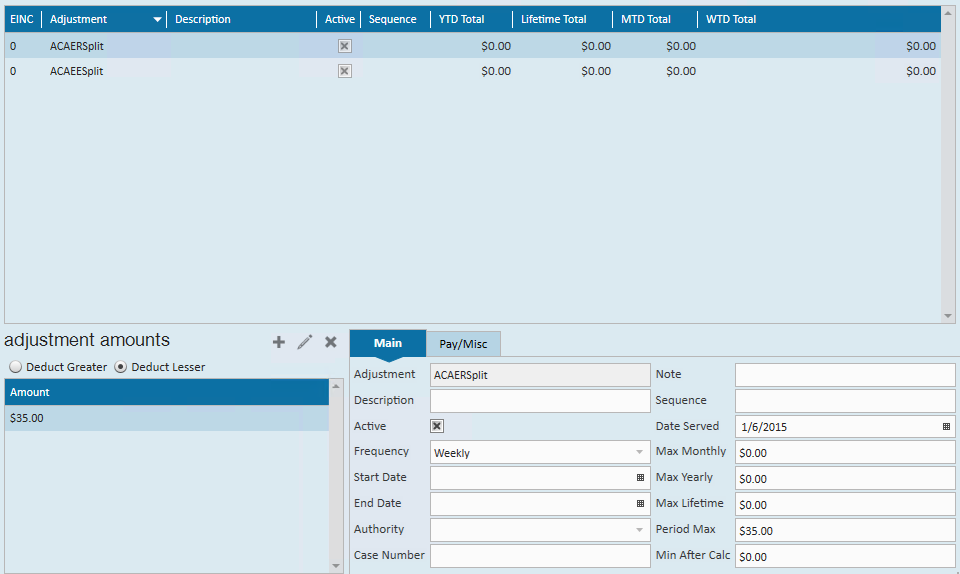
*Note* Additional adjustment scenario: If you are calculating a premium split but you still need to not deduct an amount over the 9.5% from the employee's gross wages.
Setting Up Employee Contribution Adjustments
For instance: The total of the premium per week may be $70.00 You may want to share the cost with the employee where you each contribute $35.00. In this scenario, the employee would be responsible for $35.00. You would pay the additional $35.00. However, if the $35.00 employee portion is greater than the 9.5% maximum limit of the gross for the employee for a given week, the employee would be responsible for less than $35.00.
Example:
Employee earns $9.00/40hours = $360.009.5% of employee gross wages = $34.20
In this case the employee cannot be asked to contribute the additional $.80
To handle this you will set up the employee adjustment and link it to the employer benefit adjustment as usual.
Using the example above, when setting up the employee adjustment, you will identify it as an ACA employee adjustment with a maximum of 9.5% with the total cost to the employee of $35.00 and should be linked to the employer benefit adjustment.
This combination will track the employee's responsibility and, if the dollar amount exceeds the 9.5%, it will track the overage which you will need to pick up because this adjustment it is linked to the employer ACA benefit adjustment.

*Note* An additional benefit adjustment must be set up and added to the employee's record to track the employer's original benefit responsibility. This adjustment should NOT be linked to the ACA employer adjustment.
*Note* When setting up the ACA insurance adjustment on the employee's record, the employee's portion and the additional benefit adjustment must both be set.
Employee Record ACA Setup
Employee ACA set up is different for employees who work for you prior to the beginning of your first administrative period than it is for those who start working for you after the start of your first administrative period. Following is a general work flow for both groups of employees.WorkflowEmployees Hired Or Placed On Initial Assignment Before first Administrative Period
*Note* For employees hired or placed prior to October 2nd, the hire date will automatically set during the ACA initialization process. Please see section of this manual titled ACA initialization process.
*Note* All Employees will be reflected in the administrative period regardless of whether coverage is offered or not.
Workflow
Employees Hired Or Placed on Initial Assignment Before first Administrative Period:
Full Time | Part Time |
Step 1: At beginning of 2014 Administrative Period; enter ACA Status of Full Time | Step 1: At beginning of 2014 Administrative Period enter ACA Status of Part time or Seasonal or Variable. Employee will now be tracked for hours worked and is subject to be flagged as "Approaching FTE" status |
Step 2: Employee enters into Administration Period Change Insurance Status to "Offered" | Step 2: Employee enters into Standard Measurement Period |
Step 3: When employee accepts or declines insurance change Insurance status If Accepted Set Up Employees ACA Insurance Adjustments | Step 3: Standard Measurement Period Ends |
Step 4: Employee Enters Stability Period (coverage can not be removed during this time) Employee begins a new Measurement Period Employees Admin Status will automatically change to Measurement Period when insurance status is coded | Step 4: Employee is re-evaluated |
Step 5: End of Stability Period Employee is re-evalutated. If Full Time Employee; moves to Step 2 of Full Time If employee is not Full Time, Inactivate ACA Insurance Adjustments, change ACA status to Part Time/Seasonal or Variable and Employee moves to Step 2 of Part Time | Step 5: If Full Time change ACA Status to Full Time and Employee moves to Step 2 of Full Time If Part Time Employee; moves to Step 2 of Part Time |
Employees Hired Or Placed On Initial Assignment After First Administrative Period:
Employees Hired Or Placed On Initial Assignment After first Administrative Period
Full Time | Part Time |
Step 1: If employee is expected to be Full Time; upon the first assignment Enter Employee Hire Date and ACA Status of Full Time | Step 1: If employee is expected to be Part Time, Season or Variable enter Employee Hire Date and ACA Status of Part time or Seasonal or Variable. Employee will now be tracked for hours worked and is subject to be flagged as "Approaching FTE" status |
Step 2: Employee enters into Administration Period Change Insurance Status to "Offered" | Step 2: Employee enters into Standard Measurement Period |
Step 3: When employee accepts or declines insurance change Insurance status If Accepted Set Up Employees ACA Insurance Adjustments | Step 3: Standard Measurement Period Ends |
Step 4: Employee Enters Stability Period (coverage can not be removed during this time) Employee begins a new Measurement Period Employees Admin Status will automatically change to Measurement Period when insurance status is coded | Step 4: Employee is re-evaluated |
Step 5: End of Stability Period Employee is re-evalutated. If Full Time, Employee moves to Step 2 of Full Time If employee is not Full Time, Inactivate ACA Insurance Adjustments, change ACA status to Part Time/Seasonal or Variable and Employee moves to Step 2 of Part Time | Step 5: If Full Time change ACA Status to Full Time and Employee moves to Step t2 of Full Time If Part Time Employee; moves to Step 2 of Part Time |
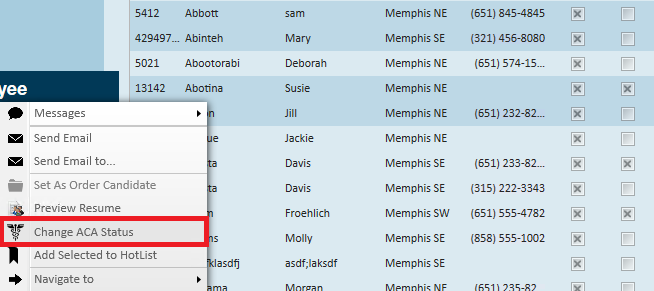
*Note* The ACA status can be changed en-masse from the search result form:
After an employee is coded with a hire date, an ACA status (full time, part time, seasonal or variable) and an insurance status, TempWorks will automatically calculated based on your system settings the employee's admin status, insurance date and next evaluation date. It will also calculate the date the employee begins and ends their measurement period and, if applicable, their stability period.
*Note* After your TempWorks database has been initialized for ACA, if an Employee does not have an ACA hire date, an assignment warning will be activated when attempting to assign them to an order. If the employee was assigned prior to the initialization but they do not have an ACA hire date, a proofing error will be activated.Employee Timeline Scenarios
Employee Timeline Scenarios
Following are employee scenarios for the following:
- 60 Day administrative period
- January 1st insurance plan year
- 12 month transitional measurement period
- 12 month stability period
- 12 Month initial measurement period
Hire Date | Transitional Measurement Period | Hours Worked During Transitional Measurement Period | Insurance Coverage Offered | Standard or Initial (if hired as part time or variable hour) Measurement Period | Hour Worked During Standard Measurement Period | Insurance Coverage Offered |
Before 11/1/13 | 11/1/13 - 10/31/14 | >1560 | 1/1/15 - 12/31/15 | 11/1/14 - 10/31/15 | >1560 | 1/1/16 - 12/31/16 |
Before 11/1/13 | 11/1/13 - 10/31/14 | <1560 | No coverage offered for 1/1/15 - 12/31/15 | 11/1/14 - 10/31/15 | <1560 | No coverage offered for 1/1/16 - 12/31/16 |
Hired 3/15/14 Considered Variable Hour | 3/15/14 - 3/15/15 | >1560 | 5/1/15 - 4/30/16 | 11/1/14 - 10/31/15 | >1560 | Through 12/31/16 |
3/15/14 Considered Full Time | NA | NA | 1/1/15 - 12/31/15 | 11/1/14 - 10/31/15 | >1560 | 1/1/16 - 12/31/16 |
3/15/14 Considered Part time | 11/1/13 - 10/31/14 | <1560 | No coverage offered for 1/1/15 - 12/31/15 | 11/1/14 - 10/31/15 | >1560 | 1/1/16 - 12/31/16 |
2/16/15 Considered Full time | NA | NA | 5/1/15 - 12/31/15 | 11/1/14 - 10/31/15 | >1560 | 1/1/16 - 12/31/16 |
4/15/15 Considered Variable Hour | NA | NA | No coverage offered for 5/1/15 - 6/30/16 | 4/12/15 - 4/12/16 | >1560 | 7/1/16 - 7/1/17 |
Coding Employees
Coding Employees:
Access an employee record.
From the employee's navigational tree select pay setup.
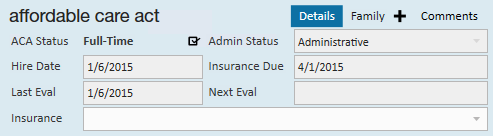
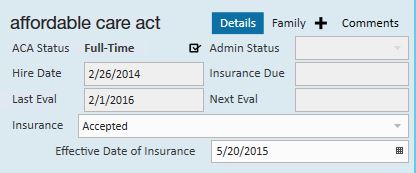
The Affordable Care Act section is in the lower right corner of the window.
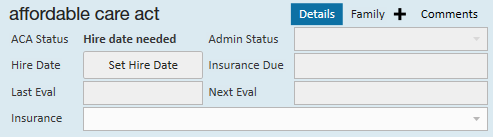
If you are setting up a new Employee record, the ACA status field will default to hire date needed.
Hire date - When you click to set hire date, the following will display:
*Note* After your TempWorks database has been initialized for ACA, if an Employee does not have an ACA hire date, an assignment warning will be activated when attempting to assign them to an order. If the employee was assigned prior to the initialization but they do not have an ACA hire date, a proofing error will be activated.
In the new status field, select from the following ACA statuses:
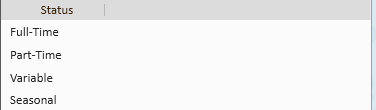
- Full-Time= Any employee whose scheduled hours qualify them as full-time status under the ACA regulations. As of the writing of this document the number of hours for full-time status is 30 or more in a week.
- Part-Time = Any employee whose scheduled hours are less than what qualifies them for full-time status under the ACA regulations. As of the writing of this document the number of hours for part-time status is any employee scheduled for less than 30 hours in a week.
- Variable = Any employee whose scheduled hours can not be reasonably determined at the time of hire.
- Seasonal = Any employee who is hired for a pre-determined period of time that is six months or less and that position typically takes place during the same part of the calendar year each year.
- Hire date - Select the date of hire based on your company's policy to determine hire date for employees.
*Note* After your TempWorks database has been initialized for ACA, if an employee does not have an ACA hire date, an assignment warning will be activated when attempting to assign them to an order. If the employee was assigned prior to the initialization but they do not have an ACA hire date, a proofing error will be activated.
Click Save.
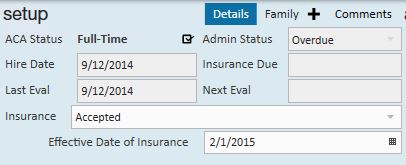
Upon saving the update employee details window, the ACA status and hire date information will automatically fill in as follows:
- The Last Eval Date fills in with the current date.
- The Next Eval date will fill in based on your system settings for length of measurement period and stability period. Next eval date will be the start date of your next administrative period.
*Note* If an employee is set with a hire date and experiences an ACA defined break in service, their hire date will automatically be reset to require you to enter a new hire date when/if the employee is placed on assignment in the future. The new hire date will be used to calculate new employee ACA cycle dates.
After an employee is initially coded with an ACA Status, they will enter into the standard measurement period. At the end of the measurement period their ACA status is re-evaluated and if a change in status occurs based on the average hours worked during the measurement period you will need to update their ACA status.
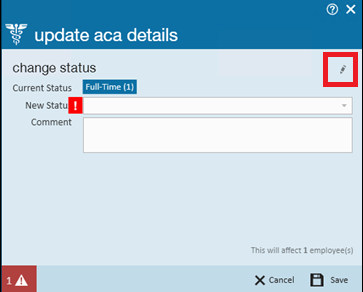
To update the ACA status, click on the icon to the right of the ACA status field.

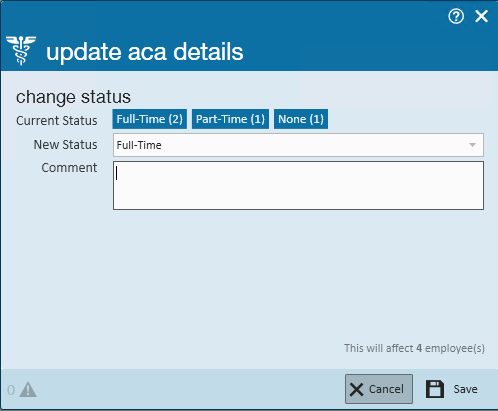
The update ACA details window will display:
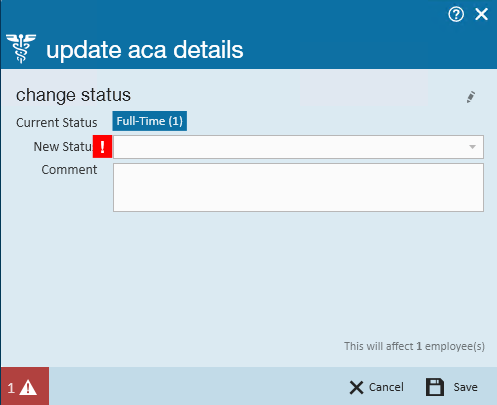
The current status will be indicated in the current status field.
Select the new status in the new status field.
Enter a comment, if desired, in the comment field.
Click save.
To Edit Hire Date:
The ACA regulations state that once you have selected an ACA status for an employee you are committed to that status until the end of the employee's next measurement period at which time they are re-evaluated. To accommodate the regulation but still factor in a margin for human error, the TempWorks system allows for users who have a security role with ACA super user status to have the ability to edit the status. (See administrative section of this manual for more information - or if you are in the ACA Employee Article, please see the ACA Administration Article for more information).
ACA super users may click on the icon to the right of the ACA status.
The update ACA details form will display:
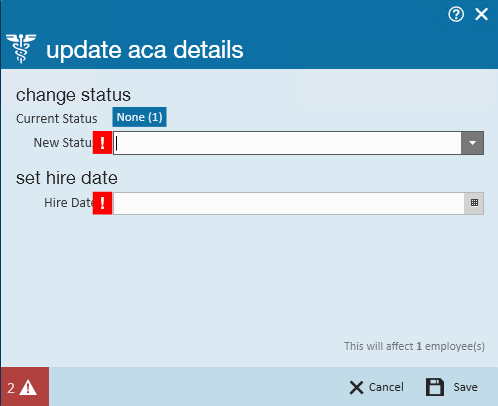
Click the pencil icon on the right side of this form to edit the ACA hire date:
A new section will display on the window titled set hire date with a field labeled hire date:
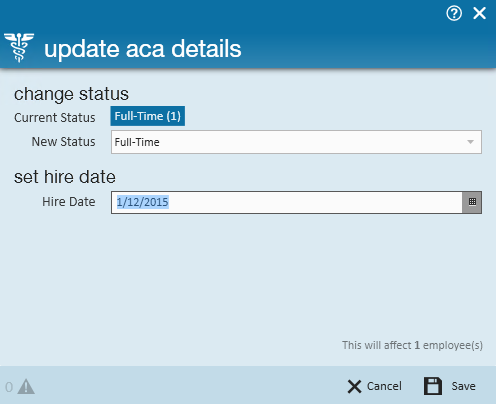
In the change status section select the status.
*Note* If there is no change in ACA status and you are simply updating the hire date field you will still need to select an ACA status.
In the hire date field select the correct hire date.
Click save.
The ACA hire status can be changed en-mass by searching for all employees who need their status updated.
Right click and select change ACA status:
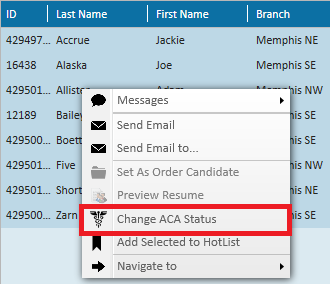
This will display the number in each of employees in each of the different ACA hire statuses:
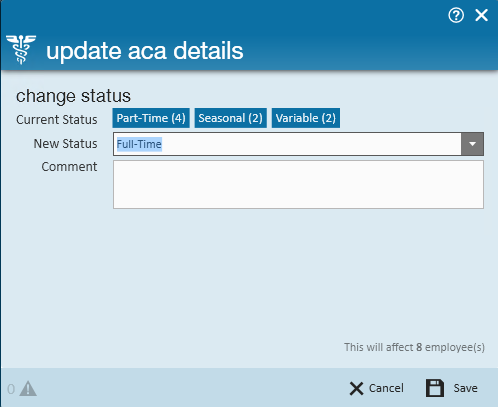
Select the new ACA hire status and click save. All highlighted employees will be updated.
*Note* By resetting the status using the mass update, you will be resetting all ACA coding information for the employee, including any existing insurance offered statuses.
*Note* The status can only be modified if the employee is in an administrative period.
Editing Family Insurance Status:
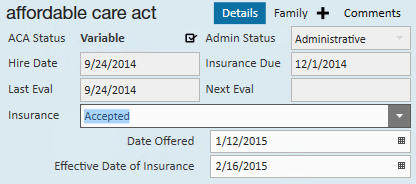
You may also enter insurance status from the Affordable Care Act section of the employee pay setup window.
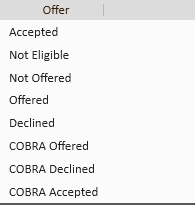
In the insurance field select from the following options:
Depending on which selection you make, you will be prompted to enter more information:
Selecting accepted will give you the opportunity to enter a date offered and an effective date of the insurance.
*Note* After selecting an insurance status of accepted, upon saving the employee record changes the adjustment setup wizard will automatically display to remind and guide the user through the insurance adjustment setup process.

Selecting not eligible will not produce additional fields. However, by selecting this status the employee will NOT be factored in the automatic calculations the system conducts to determine what percentage of eligible employees have not been offered insurance. This coding and calculation is important as ACA regulations mandate that a certain percentage of eligible employees be offered insurance or your company could be subject to fines. At the writing of this document that percentage is 70% for the year 2015, 95% for subsequent years.

Selecting not offered will not produce additional fields. However, by selecting this status the employee WILL be factored in the automatic calculations the system conducts to determine what percentage of eligible employees have not been offered insurance. This coding and calculation is important as ACA regulations mandate that a certain percentage of eligible employees be offered insurance or your company could be subject to fines. At the writing of this document that percentage is 70% for the year 2015, 95% for subsequent years.

Selecting offered will give you the opportunity to enter a date offered. The date offered will default to the current date. The employee with an insurance status of offered WILL be factored into the automatic calculations for percentage of eligible employees who have been offered insurance. However, their status is different from accepted or declined. This status is used in the time period that exists between the time the employee is offered insurance and the time the they decide to accept or decline insurance.

Selecting declined will give you the opportunity to enter a date offered, a date declined as well as a declined reason. The employee with an insurance status of declined will be factored into the automatic calculations for percentage of eligible employees who have been offered insurance.
You will select from the following list of decline reason options.
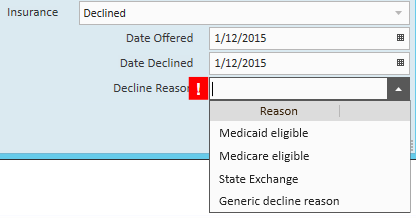
If state exchange is selected as a decline reason you will be given the opportunity to enter the state in which the employee has enrolled in the state exchange.

After the insurance information has been entered, click save in the upper left of the window.
Coding Family Coverage
You may enter family coverage offered in the employee Affordable Care Act section.
Next to the details option on the employee/pay setup form, click the family option.

To add family insurance information, click the plus button to the right of family.
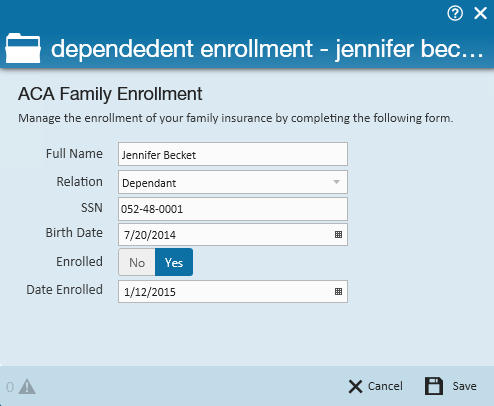
The following window will display:
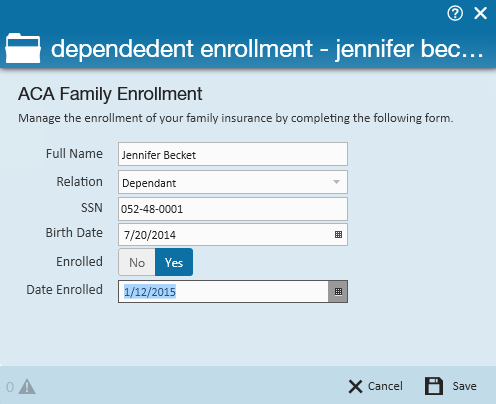
Enter the Following Information:
- Full name - Enter the full name of the family member.
- Relation - Select either spouse or dependent from the selection list.
- Note that it is very important that the correct selection is made. ACA requires that insurance be offered for any dependents 25 years or younger, but spousal coverage is not required to be offered.
- SSN - Enter the dependent's SSN.
- Birth date - Enter the dependent's date of birth.
- Enrolled - Click to highlight the correct enrollment status of yes or no.
- If yes is highlighted you will be prompted to enter an enrollment date.
- If no is highlighted you will be prompted to enter a decline date.
Click save.
Repeat for each dependent and spouse who was offered insurance under your plan.
Editing Family Insurance Status:
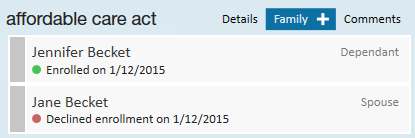
After returning to the employee Affordable Care Act section the family insurance information will be displayed and can be viewed at any time by clicking on the family option.
Editing Family Insurance StTo edit a family insurance status, access the Affordable Care Act section under employee/pay setup.
Click the family option.
The family details will be displayed.
Double click on the item you wish to edit.
The dependent enrollment window will display:
Make any necessary changes then click save.
Comments Section:
Comments SectionYou may use the comments section to enter any applicable ACA comments.
To add ACA comments to the employee ACA setup, access the Affordable Care Act section under employee/pay setup:

Click the comment option.
The following window will display:
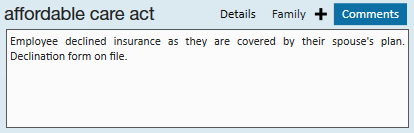
Enter the necessary comments then click the save button in the upper left corner.
ACA Insurance AdjustmentsSetting up Employee Insurance Adjustments
ACA Insurance Adjustments
During the process of employee ACA coding, you are given the opportunity to choose the insurance status. This status can be changed as the employee is moved through the insurance enrollment process.
For example; the employee may be offered the insurance but immediately upon that offer they neither accept nor decline the insurance and are given a period time to make a decision. In this scenario the employee's ACA insurance status would be set to offered with an offered date recorded.
At the point the employee makes a decision to accept the insurance, their ACA insurance status will be edited to reflect accepted:
After changing the ACA insurance status to accepted, and upon saving the employee record changes, the adjustment setup wizard will display to remind and guide the user through the ACA adjustment setup process.
Setting Up Employee Insurance Adjustments:
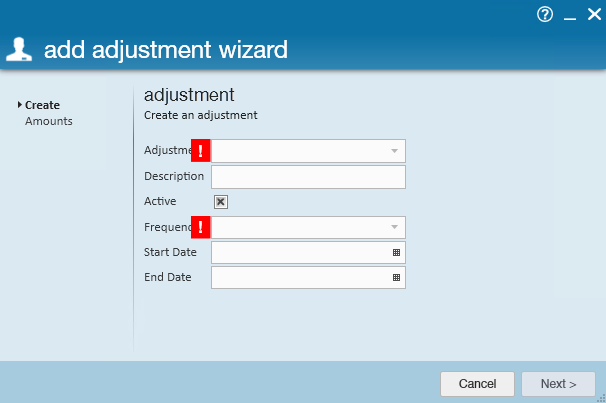
After clicking save from the employee record the add adjustment wizard window will display:

Complete the following fields:
- Adjustment - Select the appropriate employee portion adjustment your administrator has set up for ACA insurance.
- Only adjustments that were set up in administration as ACA related adjustments will appear in this selection list.
- Description - Enter a description, if desired.
- Active - the active box will default to be checked indicating the adjustment is active.
- Frequency - the frequency field will default to the frequency that was set for this adjustment when the adjustment was set up in administration.
- Start date - If you are delaying the start date of the insurance, you may enter the date the adjustment will start.
- The adjustment will be deducted from the employee's check if the start date falls within the date range of the weekend date of the paycheck.
- Leaving the start date blank will cause the adjustment to be deducted on the next paycheck processed for the employee.
- End date - This is the date the adjustment will stop being deducted on the employee's paycheck.
- Generally, you will not be entering an end date for an ACA insurance adjustment at the time you are setting it up but can come back later if and when the insurance should stop being deducted.
Click next.
The adjustment amounts window will display:
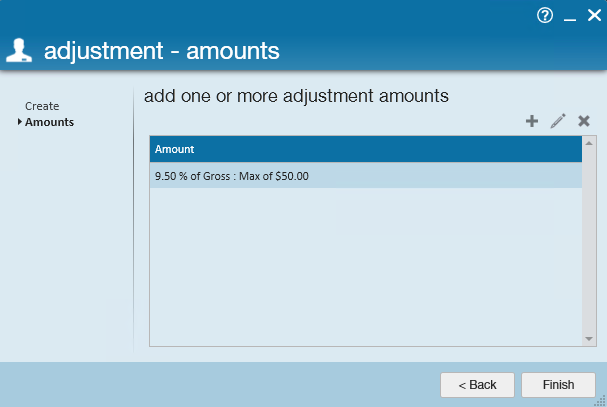
The percentage amount and the insurance premium amount will default based on what your administrator setup in administration.If you would like to edit those amounts click the pencil in the upper right corner.
The adjustment rule window will display.
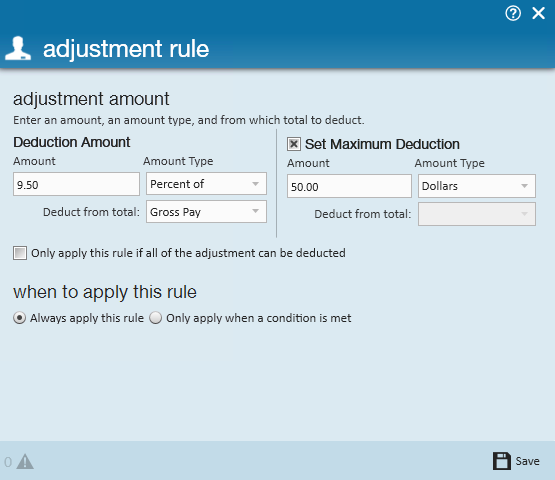
Make any changes to the deduction amount or maximum deduction then click save.
*Note* Your administrator, during set up of the adjustment, associated the employee insurance adjustment to the corresponding employer adjustment. There is no need to set up a separate adjustment for the employee portion on the employee record.
TempWorks Enterprise will automatically calculate the employer portion based on the settings in the employee adjustment and the employee's gross pay.
*Note* for an ACA employee insurance adjustment that is linked to an employer adjustment do NOT check the box next to only apply this rule if all of the adjustment can be deducted.
After clicking save you will be returned to the adjustment amount window.
Click finish.
If the employee also has dependent insurance with a status of enrolled the following window will display:
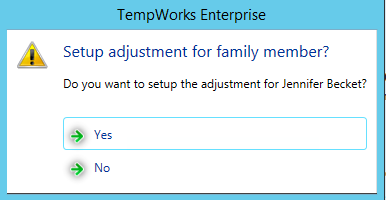
Clicking no will return you to the employee pay setup window.
Clicking yes will prompt you to set up an additional adjustment through the add adjustment wizard.
Select the adjustment that was created in administration for dependent insurance and continue with the adjustment set up.
*Note* The adjustment selection for dependent insurance will not have a corresponding employer portion and the employee will be responsible for paying the full insurance premium regardless of their earnings. If your company voluntarily offers an employer contribution for the dependent and spousal insurance, your administrator will have set up these benefit adjustments accordingly.
After setup of the adjustments is completed, you will be returned to the employee pay setup window and all changes will have been saved.
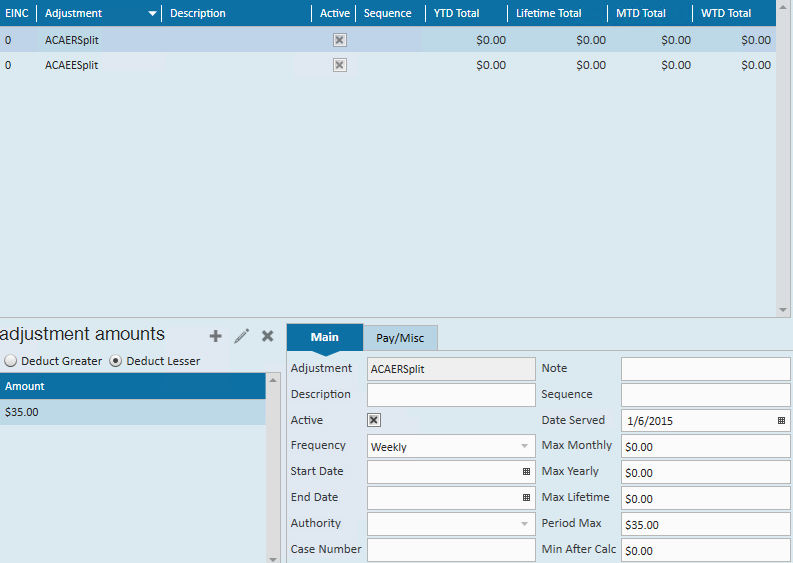
Viewing Adjustments
To view employee adjustments select pay setup/adjustments form the employee record.
The following window will display:
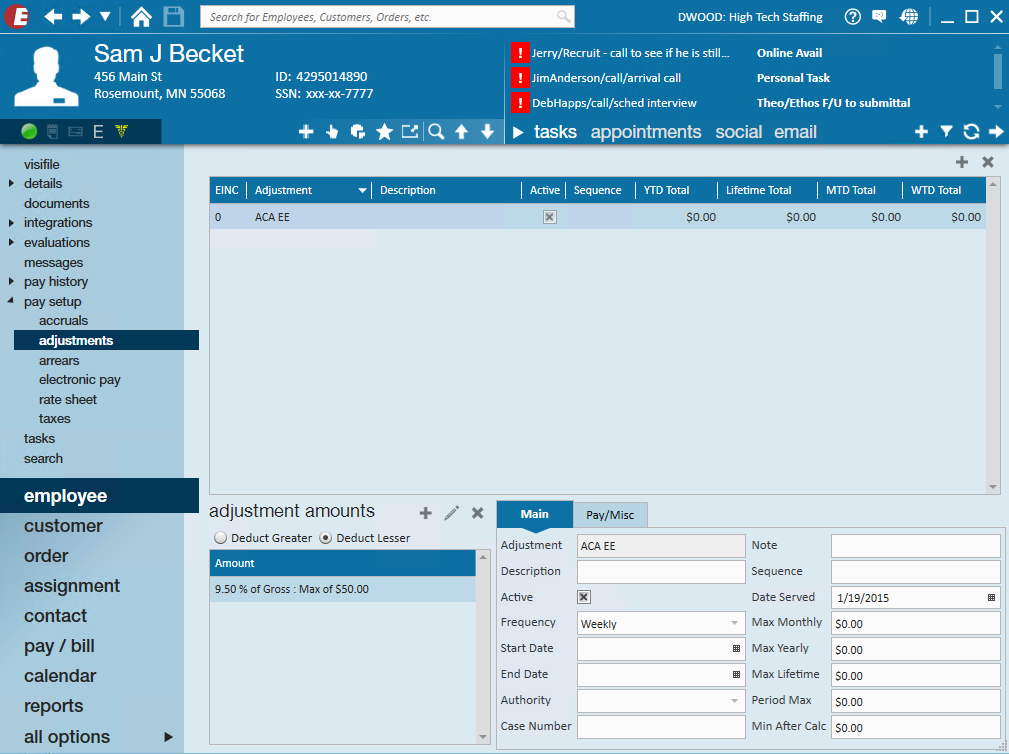
All adjustments set up for an employee will be displayed in this window.
Additional adjustment scenario:
Example:Employee earns $9.00/40hours = $360.009.5% of employee gross wages = $34.20
This combination will track the employee's responsibility and, if the dollar amount exceeds the 9.5%, it will track the overage which you will need to pick up because this adjustment it is linked to the employer ACA benefit adjustment.
*Note* An additional benefit adjustment must be set up and added to the employee's record to track the employer's original benefit responsibility. This adjustment should NOT be linked to the ACA employer adjustment.
When setting up the ACA insurance adjustments on the employee's record, the employee's portion of the additional benefit adjustment must both be set.

Inactivating Adjustments
If an employee is no longer eligible for your insurance or chooses to cancel their insurance you will want to inactivate their ACA insurance adjustment code(s).
To inactivate an adjustment access the employee record. In the left hand menu select pay setup/adjustments.
The following window will display:Click to highlight the adjustment you would like to inactivate.
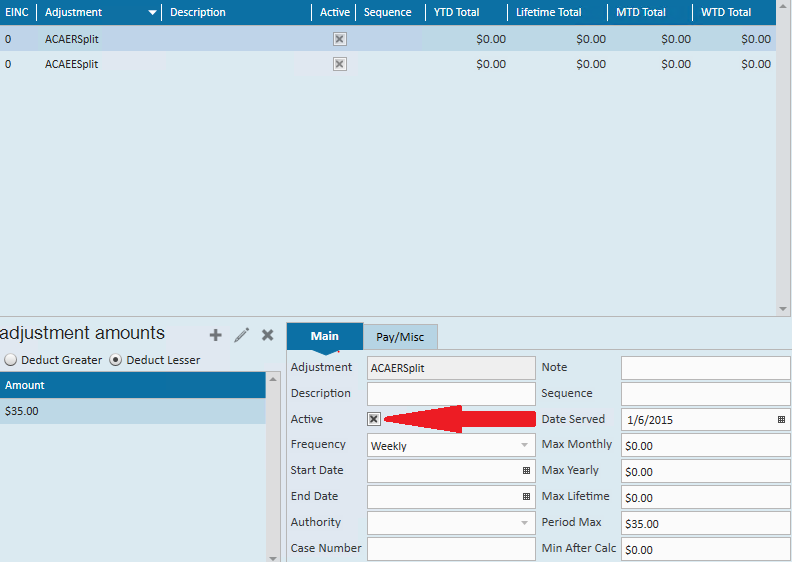
In the lower portion of the window on the main tab there is an active field with a check box.
Click to deselect the check box.
Click the save button in the upper left corner of the window.
For complete documentation on all the features of the adjustment window please refer to the How to Setup Garnishments article.Employee ACA Avatar Icon
Employee ACA Avatar Icon:
An icon is available in the employee record avatar area specifically for ACA.

The following icon statuses will potentially be displayed in the employee avatar Icon area:
- In measuring - No action needed until the end of the current measurement period. The icon will be displayed in GREEN.
- In administrative period - Please review the employee's work history to determine their ACA status for the next stability period. The icon will be displayed in YELLOW.
- Insurance overdue - You are past the employer mandated amount of time allowed to review the ACA status of this employee. The icon will be displayed in RED, as shown.
- Nothing - The employee is not in any periods and does not have an ACA status. A review of this file is suggested. The icon will be displayed in WHITE.
- Break in service - The employee has had a break in service. It is suggested that the file is reviewed to ensure insurance has been suspended. The icon will be displayed in GRAY.
Employee ACA Enhanced Search:
Employee ACA Enhanced SearchThe ACA data is searchable in the employee enhanced search area. For complete details and functionality regarding Enhanced Searches please refer to the TempWorks Searching Article.

To access the enhanced search area click on the magnifying glass icon next to employee in the navigational tree.
Click on the enhanced search option.
*Note* you may want to click the clear criteria button in the upper right section of the window before creating an enhanced search.
There are two categories of ACA search criteria: ACA and ACA statistics.
The following are the search options in the ACA category:
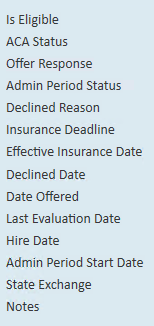
The following are the search options in the ACA statistics category:

You may search using any combination of ACA criteria as well as criteria from any other category.
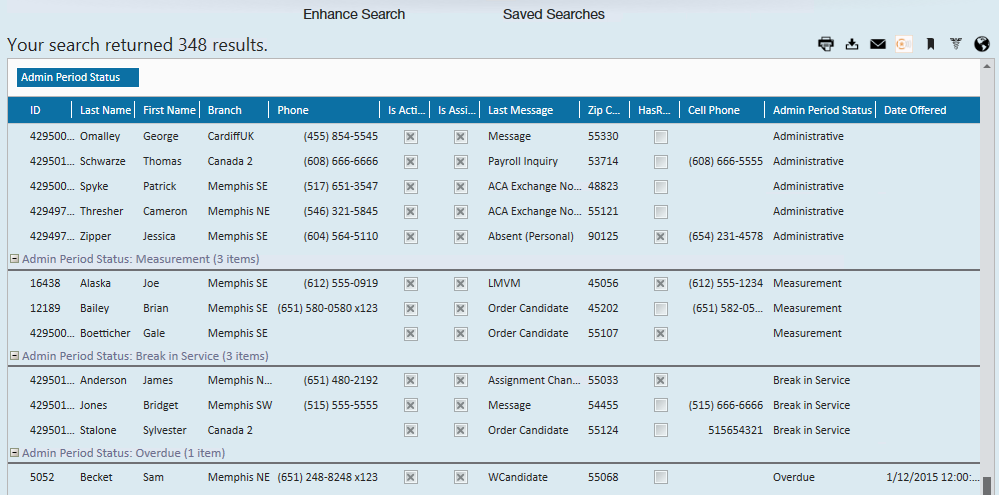
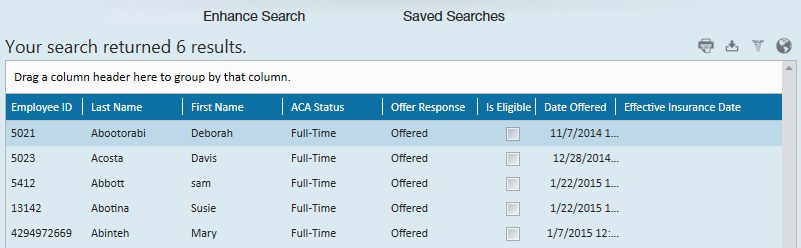
The following is an example of a common and useful ACA search to allow you to pull a list of employees who are currently assigned and view their administrative period status as well as their insurance offered status.

Employee Status/Is Assigned/Yes

ACA/admin period status/show in results

ACA/date offered/show in results
Click the search button, your results will be displayed.
*Note* Employees who are not being offered coverage will be reflected in the administrative period.
Click and drag the column heading for admin period status and drop it in the blank space above the column headings. By doing this you will be grouping your list by the administrative period status.
You may click drag and drop the column headings horizontally to move the admin period status and date offered columns closer to the left for easier viewing.
Following is a sample of what the search results would look like:
ACA and Pay Codes:
Pay codes are can can be configured to flag Enterprise to count towards ACA calculated hours. Standard Enterprise pay codes of Hol, Reg, Vac1, Vac2, ELECT, Sick, UnbillOT, and Auto OT are flagged as ACA Hours pay codes.
If you have customized your pay codes or would like to flag additional standard pay codes to count toward ACA calculated hours you may do so by contacting the TempWorks support department. They will also be able to send you a list of your current pay codes.Employees On Special Leave Of Absence
Employees on Special Leave of Absence:
Employees who are on an ACA special leave of absence such as FMLA, jury duty and military service are not considered as having a break in service for purposes of ACA. The system calculations that are used to determine breaks in service are based on the hours worked and periods of time when hours are not worked.
To ensure employees on an ACA special leave of absence do not get flagged with a break in service, a timecard will need to be processed each pay period using a pay code that is setup to count ACA hours but not count as hours worked.
If you have a situation of special leave of absence you will need to have a pay code setup that is flagged as ACA hours but not hours worked. You may have this configured either as a generic protected leave of absence pay code or you may have one configured for each specific scenario IE: FMLA, military service, etc.Each pay period you will process a timecard for the employee using this pay code with their standard number of hours per pay period. Depending on your systems settings, hours may not calculate for a $0 check and you many need process a 1 cent transaction.
Customer/Department/Order specific surcharge
Customer/Department/Order Specific Surcharges
The ACA surcharge is a percentage of billings that you may choose to add to a customer's invoice in an attempt to re-coup some of your ACA insurance expenses.
In the administration section, your administrator can select to activate ACA surcharges for invoicing. Additionally, the administrator may setup a default system or branch wide surcharge percentage. If your system was setup this way all customers will have that percentage of billings added to their invoice as an ACA surcharge.
You have an opportunity on an individual customer/department and order basis to modify the percentage specific to that customer/department/order. If the majority of your customers will not be charged this surcharge your company may want to enable the surcharge and enter 0 as the percentage amount in the system or branch administration settings, then for the customers you will be billing this surcharge to; you may enter the actual percentage on the customer/department record.
Adversely, if the majority of your customers will be subject to this surcharge your company may want to enable the surcharge, enter your company's standard percentage in the system/branch wide settings in administration, and for any customers you do not wish to apply this surcharge to you may change the percentage to 0.
*Note* You may have your system configured to only have the ACA surcharge calculated on employees with specific ACA insurance statuses.
For example: you may want to only charge the surcharge on employees who have accepted the insurance. By default, the surcharge will be charged on all employees on the invoice. If you would like to specify insurance statuses for the surcharge, those can be set at the entity, branch, customer, department and order level.
Adding a Customer Specific Surcha
Adding a Customer Specific Surcharge:
To add a customer specific ACA surcharge, access the customer record then navigate to the invoice setup/adjustments area. The ACA surcharge setup is at the top of this form:
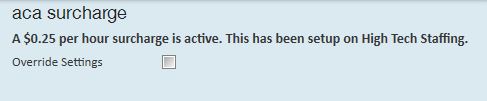
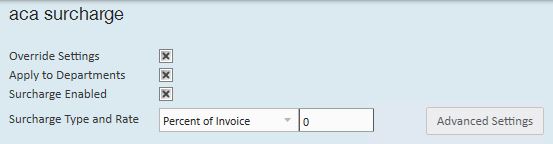
The system or branch level settings will be displayed. To override the system or branch level settings click to put a checkmark in override settings check box.
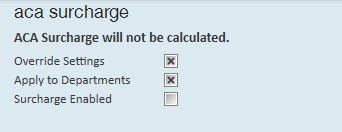
By overriding the ACA settings an ACA surcharge will not be calculated for this customer.If you would like to the filter down to the departments of this customer click to place an x in the apply to departments field.
*Note* If apply to department is selected, TempWorks will apply the surcharge to all existing departments as well as any new departments added after the surcharge is set up.
To apply a different ACA surcharge to this customer (and/ or its departments) click to place an x in the surcharge enabled field:
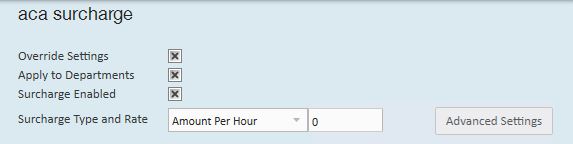
- In the surcharge type and rate field select the basis for the surcharge; percentage of payroll cost, amount per hour, flat rate per aIdent or Percentage of Invoice.
- If you select percentage of payroll cost, the surcharge will be calculated based on the percentage of the cost of the payroll.
- If you select amount per hour, this is the amount per hour billed (based on the ACA advanced settings selected) that will be added to your customer's invoices.
- If you select flat rate per aIdent, the amount billed will be per employee being billed.
- If you selected percentage of invoice, this is the percentage of the billings (based on the ACA offer statuses selected) that will be add to your customer's invoices.
*Note* you will have the opportunity on each individual order to modify the amount or percentage specific to that order.
Click to select advanced settings if surcharges are going to be billed to help offset the cost of ACA insurance, and you want to also determine what hours, paycodes, adjustments, and offer statuses will be used to determine the surcharge amount.
General settings: Select each type of hours/pay that should be used in calculating the surcharge.
Paycodes: Select the paycodes that should be used in calculating the surcharge.
Adjustments: Select the adjustment codes that should be used in calculating the surcharge.
Insurance offer statuses: Select the insurance offer statuses that should be used in calculating the surcharge.
*Note* to select the options in the paycodes, adjustments, and insurance offer status forms click to select the options desired on the left (exempt) then click the right facing arrow to move the option to the enabled (right) side.
*Note* for insurance offer status only, if you would like to extend the surcharge based on status, make sure the yes/no toggle to set to yes.
When done, click the save button.
After saving, only the invoicing for employees who fit into the selected statuses will be billed for the surcharge.
Exempting a Customer or Department from the ACA Surcharge:Exempting A Customer or Department Form the ACA Surcharg
If you would like a customer or department of a customer to be exempt from the ACA surcharge, there are two ways to accomplish this.
If you would like the surcharge to show on the invoice but at a 0% you will want to setup the surcharge percentage as zero (0). Click to place an X in override settings, click to place an X in apply to departments (if desired). Select surcharge enabled and change the surcharge type and rate to zero (0):
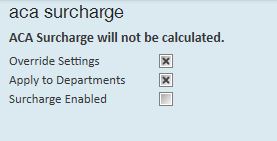
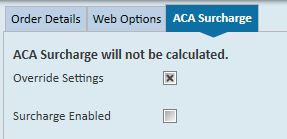
If you would not like the surcharge to show on the invoice you will want to select to override settings but do not select to surcharge enabled. Note that the description at the top indicates that a surcharge will not be calculated.
Adding an Order Specific Surcharge
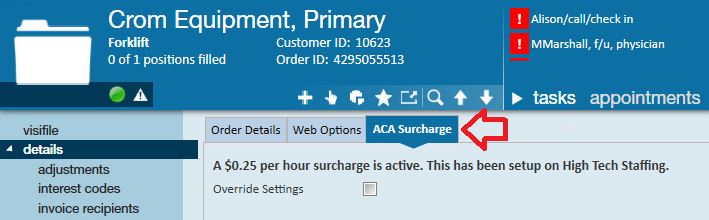
Adding an Order Specific Surcharge:
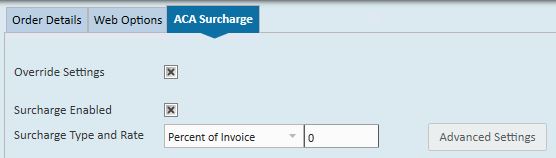
To add or adjust the system default rate for an ACA surcharge on a specific order, access the order and click details. At the top of the details form, select the ACA surcharge tab:
To override the ACA surcharges at the order level click to place an x in the override setting box.
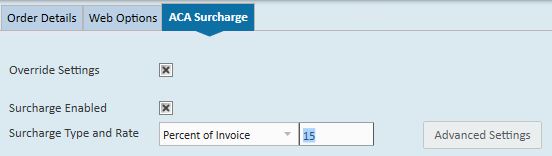
This will open a surcharge enabled check box:
To enable the order specific surcharge click to place an x in the surcharge enabled box:
- Select the surcharge rate at which to bill this order.
- In the surcharge type and rate field select the basis for the surcharge; percentage of payroll cost, amount per hour, flat rate per aIdent or percentage of invoice.
- If you select percentage of payroll cost, the surcharge will be calculated based on the percentage of the cost of the payroll.
- If you select Amount Per Hour, this is the amount per hour billed (based on the ACA advanced settings selected) that will be added to your customer's invoices.If you select flat rate Per adent, the amount billed will be per employee being billed.
- If you selected percentage of invoice, this is the percentage of the billings (based on the ACA offer statuses selected) that will be add to your customer's invoices.
Click to select advanced settings if surcharges are going to be billed to help offset the cost of ACA insurance, and you want to also determine what hours, paycodes, adjustments, and offer statuses will be used to determine the surcharge amount.
General settings: Select each type of hours/pay that should be used in calculating the surcharge.
Paycodes: Select the paycodes that should be used in calculating the surcharge.
Adjustments: Select the adjustment codes that should be used in calculating the surcharge.
Insurance Offer Statuses: Select the insurance offer statuses that should be used in calculating the surcharge.
*Note* to select the options in the paycodes, adjustments, and insurance offer status forms click to select the options desired on the left (exempt) then click the right facing arrow to move the option to the enabled (right) side.
*Note* for insurance offer status only, if you would like to extend the surcharge based on status, make sure the yes/no toggle to set to yes.
When done, click the Save button.
After saving, only the invoicing for employees who fit into the selected statuses will be billed for the surcharge.Exempting An Order From the ACA Surcharge
Exempting an Order from the ACA Surcharge:
If you would like an order to be exempt from the ACA surcharge, there are two ways to accomplish this.
If you would like the surcharge to show on the invoice but at a 0% you will want to setup the surcharge percentage as zero (0). Click to place an X in override settings, click to place an X in apply to departments (if desired).
Select surcharge enabled and change the surcharge type and rate to zero (0):
If you would not like the surcharge to show on the invoice you will want to select to override settings but do not select to surcharge enabled. Note that the description at the top indicates that a surcharge will not be calculated.
*Note*If you had previously enabled the surcharge at the employer level, and set up custom rates at the customer or order level, the calculation method and rates will NOT be overridden on the customer or order if you switch calculation methods and rates in the administration/employer area. Any changes at the administration level will NOT affect any calculation method already existing at the customer or order.
Enhanced ACA Module
There are several additional features available in the Enhanced ACA Module. The Enhanced ACA Module is designed to improve even further on the efficiencies of the ACA features in TempWorks by combining ACA data into easy to read dashboards and analytics. The ACA dashboard is an additional module of TempWorks. If you do not have this option in your database please contact your Account Manager for more information. Employee ACA Window
Employee ACA Window
If your company has the Enhanced ACA Module the following window will be accessible from the employee record details/ACA.The employee ACA dashboard combines relevant ACA information in one convenient place along with providing some useful graphical data.

The ACA setup that is available under the employee record pay setup window is also available on the employee's ACA dashboard.
You may set up the ACA information in either place. Changes made to the set up in one area will automatically be reflected in the other.
Employee Dashboard:
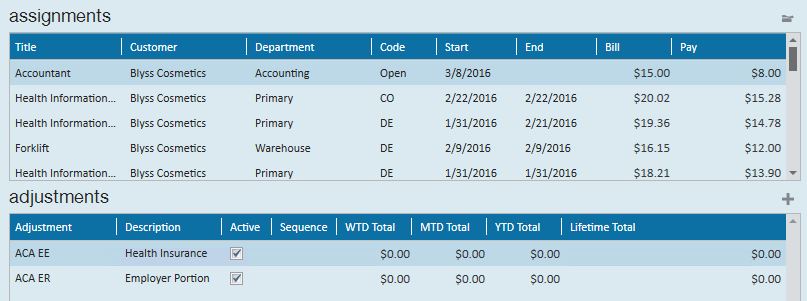
Employee DashboThe Employee ACA dashboard also displays assignment information and adjustment information.
Only adjustments that were setup and coded as ACA adjustments will be displayed here, unlike the adjustments setup on the regular pay setup/adjustments area which will display all adjustments.
This allows for quick entry and view of only ACA relevant information in one place.
The upper right corner provides the opportunity to view two different graphs.
To view a trending of hours click on hours breakout in the upper right.

The graph will display 12 months of monthly hours totals form current month back to the previous 11 months. Totals for each month are listed as well.
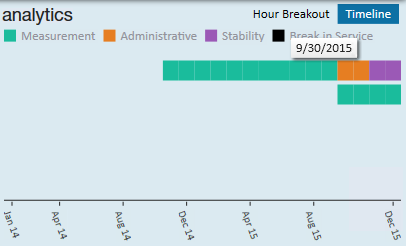
To view an ACA Status Timeline click on the Timeline in the upper right.
The timeline will reference your measurement period, administrative period and stability period lengths that your administrator set up. It also will reference any breaks in service based off the ACA 16 week break in service rule as well as the ACA assignment length break in service rule.
An employee who was just setup with an ACA status and had no previous assignment history would look similar to the following:

A new employee will have two timelines. The first timeline line (cycle) is the initial measurement. The second line is the next cycle leading up to the next administrative period.
Keep in mind that an employee can be in the administrative period or stability period for one cycle and the measurement period for the next. Thus, the reason you see two cycles in the example of a new employee.
*Note* Employees who are not being offered coverage will be reflected in the administrative period.
Over the course of several years an employee will have a timeline for each ACA cycle.
Example: Cycle A 2014/2015, Cycle B 2015/2016, Cycle C 2016/2017, Etc. up to a system maximum of 6, at which time the oldest cycle will drop off and the most recent cycle will replace it.
The timeline dates displayed in the grid will always be reflective of your current cycle. You may view specific dates for all cycles by hovering your cursor over the start and end points of the periods in the grid and the MM/DD/YYYY date format will display.
Company ACA Dashboard:
The company ACA dashboard is an area that will provide useful ACA analytics at a single glance. Many options include the ability to drill down to the source information.
To access the ACA Dashboard, select All options/ACA
The following window will display:

In the upper left menu select analytics. The following window will display:

- Cost of insurance - The cost of insurance widget displays a one year look back trend of employee contribution and employer contribution for any adjustments that are set up as ACA adjustment types.
- Employee Status - The employee status widget displays the number of employees who are currently in an administrative period as well as the number of employees who are approaching insurance eligibility based on their historical hours and the number of hours that were set up in administration as approaching fulltime equivalent status.
- This widget provides drill down capability.
- Clicking on the widget will navigate you to a search list which will display the employees who are represented in the widget statistics.
- Assigned Employees - The assigned employees widget will display the percentage of your assigned employees who have an ACA insurance status of accepted.
- Offered Status - The offered status widget displays the percentage of employees who have been offered, have declined or have accepted insurance vs. those who have an ACA insurance status of something other than offered, declined or accepted.
- This metric is an important metric to determine if you are in audit compliance regarding the percentage of employees who are required to have been offered insurance.
ACA Enhanced Search:
ACA Enhanced Search and Mass UpdateACA Enhanced Search
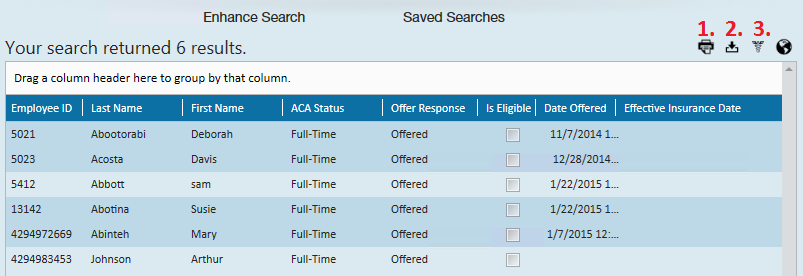
To access the ACA Enhanced Searching, select all options/ACA
Click on the search option in the upper left (1.). Click enhanced search (2.). The following search options will be displayed (3.):
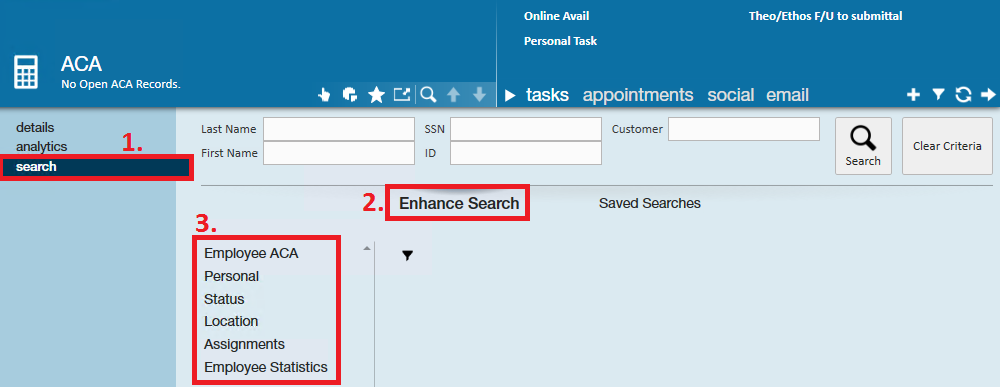
For complete details on TempWorks Enterprise Enhanced search functionality please refer our Knowledge Base article on searching.
Below is an example of a search you many run form the ACA enhanced search window:

Employee ACA/ACA status = full-time
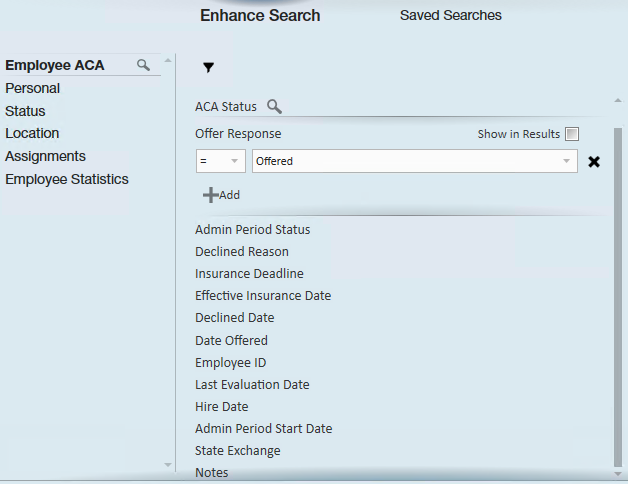
Employee ACA/offer response = offered

Employee ACA/date offered - show in results
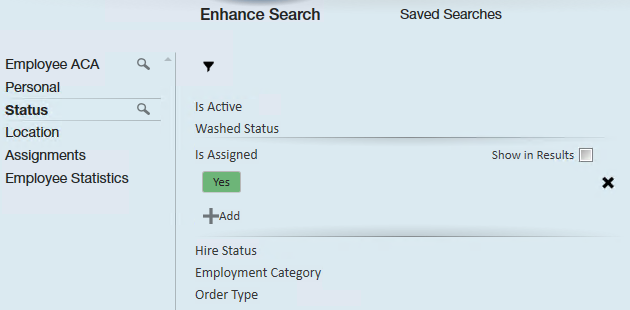
Status/is assigned/yes
Click search.
Your search results will be displayed:
ACA Status Mass Update
You may print the results (1.), export the results to excel (2.) or you may click to highlight one or more employees in the search results list and click the change ACA status option (3.) in the upper right corner of the search list.
If you select to update the ACA status the following window will display:

Select the new status you would like to change for the selected employees then click save.
Other ACA Considerations
There are many tools within TempWorks Enterprise that you may choose to utilize that will help you with areas of ACA administration. Following are some ideas you may wish to implement within your organization.
Doc Center or HRCenter:
DocCenter and HRCenter can be used as a tool for your employees to either enroll in your ACA insurance plan or to decline the insurance plan.
If you are using either DocCenter or HRCenter you may wish to send your account manager your insurance enrollment forms to have them added as part of your on-boarding document process. Those forms can be set up to Post Fill into the insurance status field on the ACA setup section.
Email Templates and Mass Email
You may wish to use the employee search area to search for employees who have been offered insurance but who have not responded.
If you have created an email template for a reminder, you can use the mass email capability to quickly contact your employees with a reminder. This will automatically document in each employee record that the notification was sent.
You may wish to use the employee specific reports and have a custom report created for Cobra notification letters.
If your insurance carrier is not sending these notifications out for you, having the letter generate with the employee information pre-filled will save you administration time.
You may wish to set up assignment restrictions in relation to the employee ACA setup.
For example, a useful assignment restriction may be one that gives a soft (warning) or hard (cannot continue) stop if an employee is assigned and they do not have ACA coding set up in their pay setup window. When deciding on assignment restrictions, remember to keep in mind your company's operational process.
The example above would not work, operationally, if your company is not allowing recruiters to code ACA and tasking the payroll department with ACA Coding.
*Note* At the time of this writing, there is a default assignment restriction which will warn (soft stop) when assigning an employee who does not have an ACA hire date.
Appendix A - ACA Initialization Process
Appendix A - ACA Initialization Process
To assist you with the initial coding of your employees who have worked for you , TempWorks will be running an initial process on your database the night of October 1, 2014.
*Note* You must have your administration section ACA periods set up prior to the night of 10/1/2014. If you do not have this set up, the initialization process will be unable to process the calculations and initialization will not be performed on your employee records.
*Note* If you are not live on an ACA compatible version of TempWorks by 10/1/2014, this initialization process can be run manually on your system. Please contact product support to request the initialization of your ACA employee coding.
What the Initialization Process Will Do
The initialization process will:
1. Clear out any ACA hire dates that have been coded on the employee ACA coding section:
2. Clear out any previously calculated cycles and dates if hire date was previously entered. (Last eval, admin status, insurance due, next eval...)
3. Add hire date to the employee ACA coding section based on the timecard history that exists in the TempWorks Enterprise database.
a. Hire date = The first day of the first week the employee was paid. If there was a break in service per the ACA break in service rules, the hire date is the first day of the first week they were paid after the last break in service. What the Initialization Process Will Not Do
The initialization process will not:
1. It will not clear out any insurance statuses that existed on the employee records at the time the initialization is performed.
2. It will not insert a hire date for any employees who are assigned on their first assignment but have not yet been paid at the time of the initialization process. You will want to identify any employees who fall into the above criteria and after 10/1/2014 enter their hire date in the ACA employee coding section. (Employee/pay setup)
*Note* If you do not code an employee who meets the above criteria you will receive a warning during the payroll proofing that the employee does not have an ACA hire date.
Coding Employees After the Initialization Process
After the initialization process has been completed you will want to identify those employees who should be coded as full time and offered insurance and those who should be coded as part time with an insurance status of not eligible.
The Affordable Care Act reports in TempWorks Enterprise will be useful in identifying these two groups of employees.
The ACA lookback reports can be used to identify the employees who, based on your selected transitional measurement period, qualify as full time status and should be coded with and ACA status of full time and offered insurance.
To identify these employees, run the Affordable Care Act benefit lookback list report using your transitional measurement period dates, selecting show current assigned employees, group by employee and entering 30 into the average hours <= field:
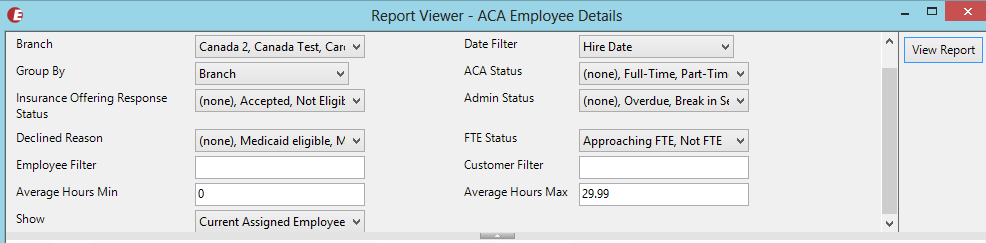
 To identify the employees who are currently assigned but who do not qualify as full time (average 30 hours during the transitional measurement period), run the ACA employee details report with the criteria displayed below.
*Note* you may also choose to run this report using the average hours min = 0 and average hours max = 29.99.*Note - The approaching FTE and not FTE status for the employee is calculated based on the employee average hours during the measurement period for which they are in.
Appendix B - How and When are Employee ACA Cycle Dates Calculated
Appendix B - How and When are Employee ACA Cycle Dates Calculated
The employee ACA cycle dates are automatically calculated in your database each night during a procedure called daily maintenance.
- Measurement period
- Insurance due date
- Execute date must be between admin period start and end date, thus you will start to see these populated during the administrative period
- The insurance offer response must have a non decline reason, ie: accepted or offered
- Next evaluation
- Admin period status
- Break in service
- If an ACA defined break in service is calculated, this will end the cycle for an employee, clear out the ACA hire date and require a rehire to occur
- This date will clear out 2 weeks after the break in service criteria is met to accommodate for biweekly payroll and late timecards
Related Articles
- None