What is a Page?
In HRCenter applicants/employees use applications called "workflows". Every "workflow" in HRCenter is made up of "steps" and those steps are made up of "pages". An easy way to illustrate this is to think of workflows as a book and the steps are the chapters. That means that pages are the individual sections (ex. Work History, Education, Resume) an applicant will fill out during each step.
There are three types of pages: information, survey, and form.

What is an Information Page?
Information pages are the most common type of page utilized in HRCenter. They include different sets of information for an applicant to fill out such as pre-screening, contact info, or education.
This article covers:
Creating Information Pages
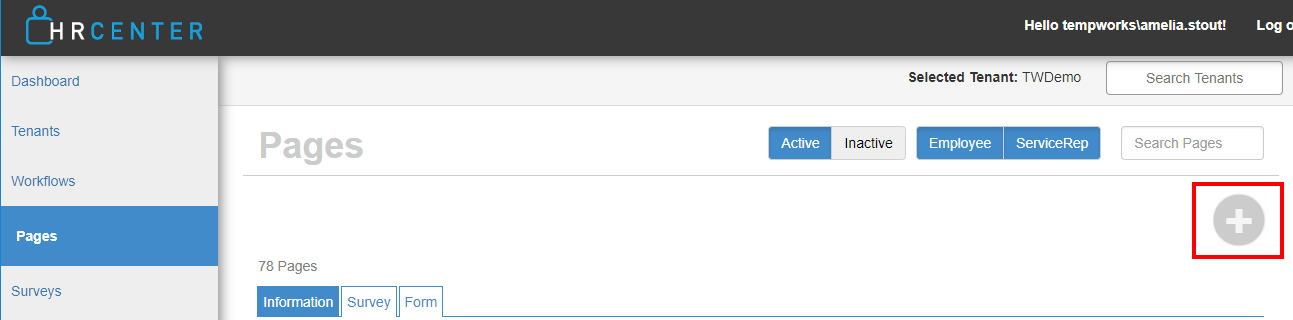
To create a new information page in HRCenter, you must first log into your HRCenter Admin portal. Then navigate to pages on the left.
- Select the + Icon on the right to add a page
- A new window will open, fill out the basic settings
- Enter the following information:
- Internal name - a name that makes it easy to identify this page within HRCenter Admin- this will not be displayed publicly
- Display name - the name that will display as the title of the page for applicants
- Primary Actor Type - select employee
- Page Type - select information
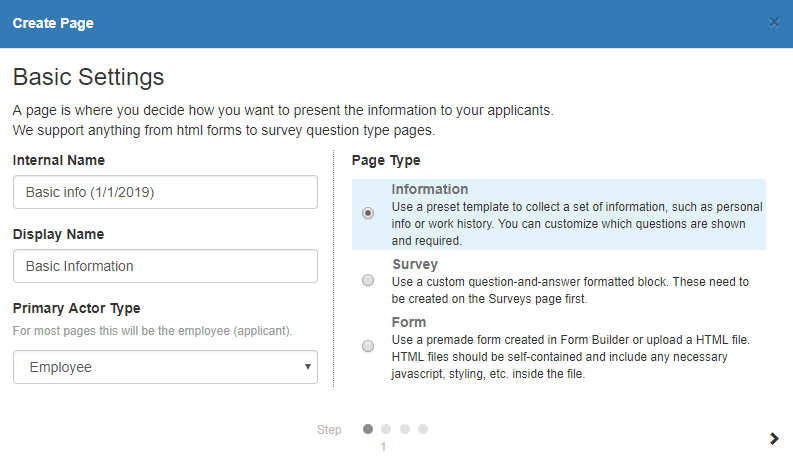
- Select the arrow on the bottom right to continue
- Enter the following information:
- Select the information page requirements
- Under the page section, select the page type
- Each page type will contain different sets of information. Once you have selected a page type, the fields included will be shown on the right
- On the opposite side, customize each field
- Select 'Hide' to stop a field from being shown
- Select 'Required' to make an applicant fill out this field before they can continue or submit the application
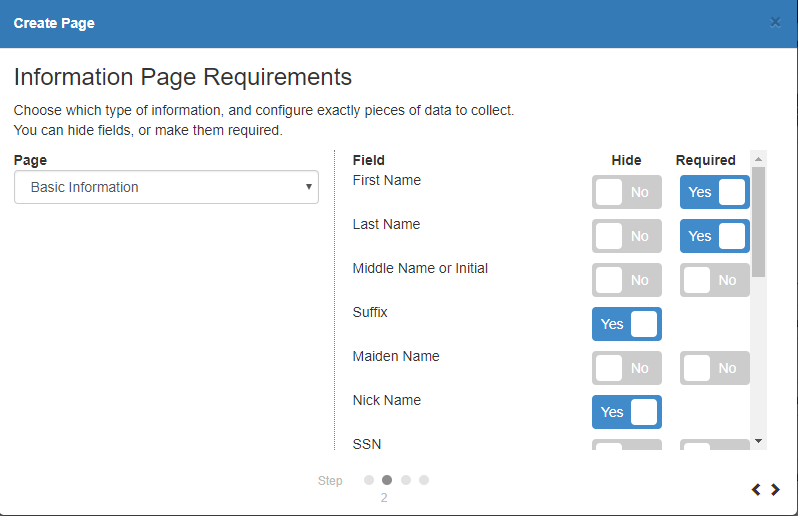
- Select the arrow on the bottom right to continue
- Under the page section, select the page type
- Enter configuration details
- This section allows you to dictate additional settings and options for a page
- Category does not need to be filled out as it will default to the correct type
- Postfill procedures are an additional customization option available to change where specific fields populate. If you are interested in learning more, contact your account manager or TempWork's support
- These procedures need to be set up by a TempWork's employee
- This page may have different options depending on what page type you select
- For example, the application info page type contains information about convictions and felonies. The configuration page for this page type includes:

- For example, the application info page type contains information about convictions and felonies. The configuration page for this page type includes:
- This section allows you to dictate additional settings and options for a page
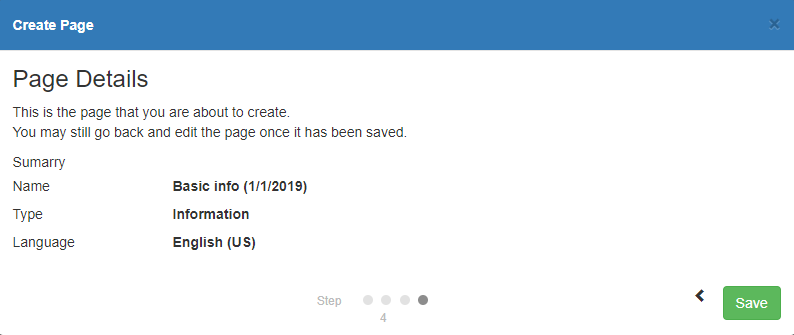
- Review page details
- This is the last page before saving. Please review the summary information before selecting save.
- This is the last page before saving. Please review the summary information before selecting save.


List of common information page types available:
- Additional Qualifications: includes military experience and certification information
- Application Information: includes how heard of info, convictions, and position type
- Availability: includes date available, desired pay, and shifts
- Basic Information: includes address, first and last name, etc.
- Contact Information: includes phone numbers, emergency contact, etc.
- EEO: includes equal employment opportunity questions
- Education: includes dates attended, GPA, high school, etc.
- Identification: includes drivers license/id info
- Languages: includes questions for writing, or speaking different languages
- Pre-Screen: includes background check, felony, and drug test information
- References: includes name, contact , and company information
- Resume: gives your applicants the option to upload a resume
- Skills: gives your applicants the option to select their skills (public interest codes)
- Transportation: includes transportation options
- Work History: gives your applicants the ability to enter past job information
Editing Information Pages
To update page information including name and required fields:
- In HRCenter Admin, navigate to Pages on the left
- Click on the name of the page you wish to edit
- You will be brought through the steps to rename, change required fields, etc.
- Note that you can not change the page type once it has been set
- Select save at the end to save your edits
To deactivate a page that should no longer be used:
- In HRCenter Admin, navigate to Pages on the left
- Click on the yellow deactivate button to the right of the page you wish to deactivate

- The page will then disappear from the active view
- To see pages that have been deactivated, select the "inactive" toggle button at the top of the page

- To see pages that have been deactivated, select the "inactive" toggle button at the top of the page


Next Steps
Once a page has been added, you can add it to an existing workflow or create a new workflow for applicants or employees to fill out. See How to Create & Edit Workflows for more information.
See related articles below for additional page creation options.