What is a GL Journal Entry Export?
A GL Journal Entry Export is a standard export that will allow you to extract your financial data from Tempworks. With a standard General Ledger, you will be able to map your pay codes, adjustment codes, taxes, worker’s comp codes, sales, and AR Payments against those sales into different General Ledger (GL) accounts. Each week the system will sum up the revenues and expenses mapped to each GL account and export them to a file to be imported into your financial system. This will allow your company to have a bigger picture of your finances within Tempworks.
This article includes:
- Custom GL Journal Entry Export Setup Process
- How it Works
- GL Account Mapping Setup
- Sales Mapping
- Assignment Setup
- Customer Setup
- Timecard Setup
- How to Run GL Journal Entry Export
- Reports to Reconcile the Export
Setup Process for Custom GL Journal Entry Exports
Tempworks utilizes a 3-phase process to set up custom GL Journal Entry Exports
Phase 1 begins with you providing your Chart of Accounts to the Tempworks Team electronically. Our Report technicians will then take and import your chart of accounts into your system as well as set up the underlying framework for your customized GL Journal Entry Export.
*Note* We ask that you take the time to ensure that only Tempworks-related accounts are contained within the Chart of Accounts you provide.
Phase 2 begins once the Report Technician notifies you that they have finished importing your accounts that were provided within your Chart of Accounts. During this phase you will be asked to map your newly imported accounts to the best of your ability. You can find instructions on how to map your accounts within Enterprise here. Once you have mapped your accounts to the best of your ability, please reach out to your account manager or support representative to begin phase 3 of your customized GL Journal Entry Export.
Phase 3 of the custom GL export setup will begin with a meeting between you and the Report technician who is setting up your GL. The purpose of this call will be to go over any questions that you had while mapping your accounts during phase 2, as well as discuss any customizations that will need to be made to properly import your data into your accounting software. Once the customizations have been determined the Report Technician will work to make the necessary changes to implement these customizations into your GL.
*Note* GL Customizations can include but are not limited to:
- Separate account mappings for Temp and Staff employees
- Separating accounts by Branch
- Adding account number extensions (such as branch codes included in account numbers)
- Conditional account mappings
| Phase 1 | Phase 2 | Phase 3 |
|
|
|
How it Works
At some point, you will want to extract your financial data from TempWorks to enter them into your accounting software. You can either use some of the standard TempWorks reports to find the numbers you are looking for or you can have a customized GL Journal Entry Export created to fit your needs.
Using Standard TempWorks Reports
If you decide that a GL Journal Entry Export might not be something you want to invest in at this time, don’t worry, we have you covered. We have a standard report called General Ledger that is available to all of our Infinity clients out of the box, free of charge. This report is a one stop shop for all of your basic accounting numbers you may need:
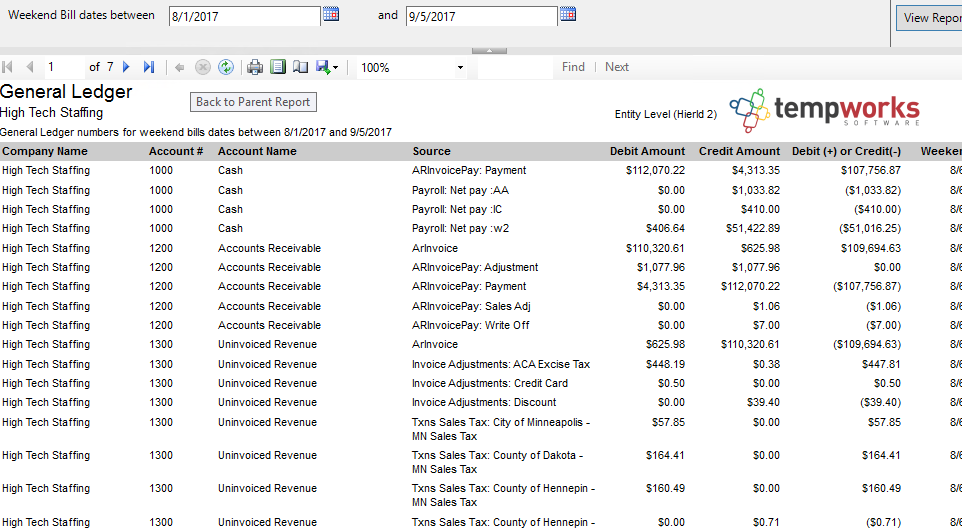
This report was designed to give you the same numbers as our custom GL Journal Entry Exports, minus the custom mapping area, configurations, and different break out level abilities that come with our custom GL Journal Entry Export.
Therefore, if you want to break out your overtime or to have your numbers separated for each branch location, the report will not do that for you, but we can do that in a custom GL Journal Entry Export.
*Note* GL Journal Entry Exports are not something that comes standard with your purchase of TempWorks Enterprise. They must be setup and configured for you before they are available to use. Please contact your Account Manager if you are interested in having a GL Journal Entry Export setup for your company.
Requesting a Custom GL Journal Entry Export
If you are looking for a more robust and customized reporting option, you are more than welcome to request a custom GL Journal Entry Export. If this interests you, please reach out to your account manager or support representative to get this process started.
The remainder of this article covers the Custom GL Journal Entry Export options.
GL Account Mappings Setup
One of the features of using a custom GL journal entry export is that you can adjust how your accounts are mapped at any time without having to call our support team.
To find GL account mapping options:
- Navigate to Enterprise > All Options > Administration
- Select "GLS Account Map" on the left to adjust mappings
Once here, filter for the mapping type you want to adjust or review. In the below example to see the account mappings setup for the payroll taxes in the system, choose the “Payroll Tax” type.
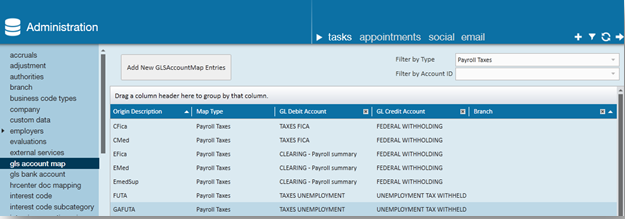
Taxes may have both an expense and a liability account (employer paid taxes). You will adjust the GL Debit Account ID to adjust the expense account and the GL Credit Account ID to adjust the liability account that the tax is going to. For taxes that do not have an expense account, only adjust the Credit account.
Anytime you see an account mapped to the account “CLEARING - Payroll Summary”, account number 9991, you will not be able to change that account mapping. The “CLEARING - Payroll Summary” account is our internal Payroll Summary account which we use as a wash account and we do not display it on any of the GL Reports/Exports. You can think of this account as an Accrued Payroll/Wages account and since this account will always come through the export with an amount of zero for a given weekend bill, we do not show it as there is no need to hit an account with a $0 amount.
*Note* If a mapping has a branch associated with it, that is a specific branch override mapping, meaning any items for that branch will go to the accounts specified on the branch mapping record instead of using the system wide mapping. If you need to setup branch specific mappings, please contact our support department and get in touch with one of our GL Technicians.
Sales Mapping
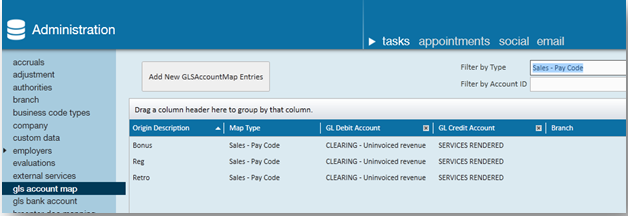
For the sales side of things, we also use a wash account just like the CLEARING - Payroll Summary account on the Payroll side. The Sales wash account is “CLEARING - Uninvoiced Revenue”, account number 9992. Therefore, whenever you see a mapping sent to the “CLEARING - Uninvoiced Revenue” account, you will not have the ability to change that account mapping and you will only be able to change the account mapping on the other side.
*Note* If a mapping has a branch associated with it, that is a specific branch override mapping, meaning any items for that branch will go to the accounts specified on the branch mapping record instead of using the system wide mapping. If you need to setup branch specific mappings, please contact our support department and get in touch with one of our GL Technicians.
The following chart indicates different items/map types that we use to map accounts to: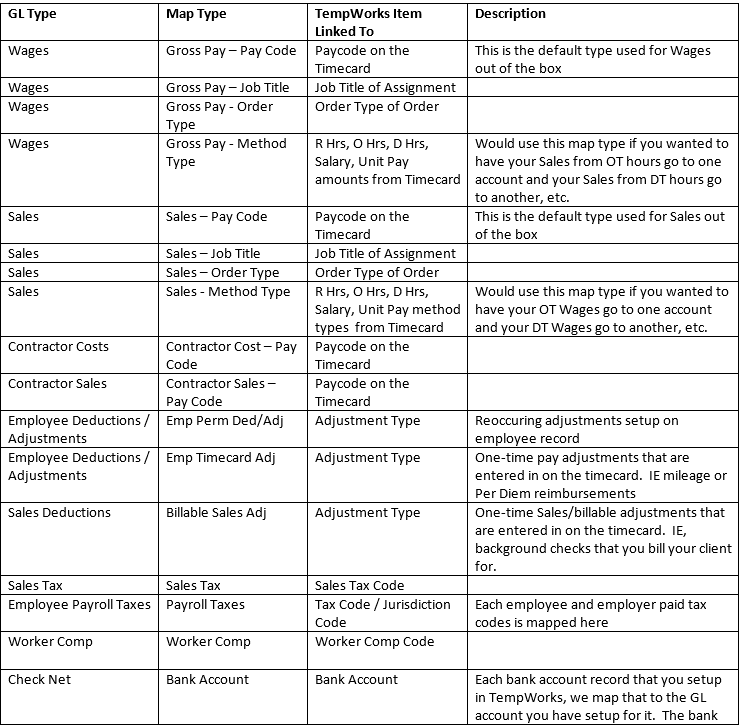
For Wages and Sales, you cannot use all 4 map types, you must choose one as the primary and then you can choose another to be the secondary if needed. By default, the system uses the pay code to map Wages and Sales. Contact our support department if you would like to have your Wages or Sales map type changed to one of the other 3 map type options.
*Note* All mappings have the ability to be combined with each other, meaning I can map my MN State Income Tax to one account for all of my OT Hours and then to another account for all other pay method types. We also have the ability to do branch specific mappings as specified above.
Assignment Setup
Assignment information will determine where sales and payroll costs are associated within the GL Journal Entry export. The following information indicates what fields are crucial to ensure mapping is correct on your GL.
Branch Name
- The branch setup on the assignment will determine what branch/GL Code the sales and payroll costs flow through to the GL Journal Entry Export on and correspondingly what entity the sales/payroll costs will be associated with.
- For example, if the branch on the assignment is set to Eagan (Eagan is a branch listed in entity Test Staffing) then the sales and payroll costs generated from that assignment will go to the Test Staffing entity because the Eagan branch is setup in the Test Staffing entity. The sales/payroll costs for that assignment will also be associated with the Eagan branch since the branch is set to Eagan.
- It is therefore, very important to ensure that the entity of the branch and the entity/company on the assignment match.
- If there are branch specific account mappings setups, then the branch will also determine the account that the payroll costs and sales get associated with.
- Branch name can be found on the details section of an assignment under "Other Information":
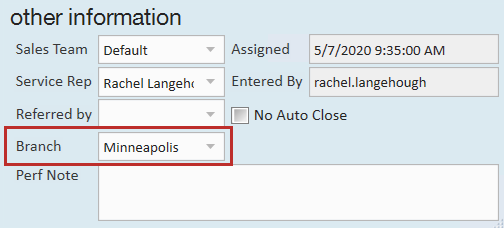

*Note* The branch name can also be changed on a specific timecard and that will change what branch the revenues and expense for that timecard go to. However, the branch on the timecard always defaults to what is on the assignment at the time the timecard is created.
Company
- The company selected on the assignment determines if the work was done by the staffing company employee (W2) or a vendor employee (1099).
- If the company on the assignment is not set to the staffing company and the W2 check box is not checked, then the sales from this assignment will go to the account we specify for the sub-contractors and the payroll costs will go to expense account we specify for the sub-contractors.
- If the W2 box is checked and the assignment is set to staffing company, then the revenues and payroll cost expense will go to the normal revenue and payroll cost expense accounts.
- Company name can be found the assignment details page under Financial Details. This field is typically not touched unless you are utilizing Vendors:
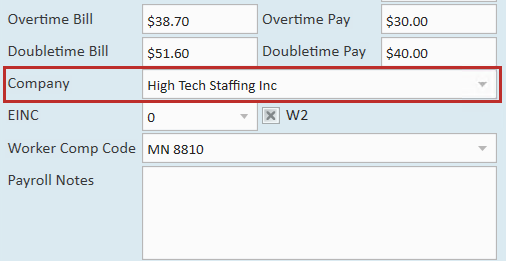

Worker Comp Code
- Worker comp codes are all mapped individually and can be mapped to different GL Accounts if needed.
- Worker Comp Code is found under company on the assignment details page:


Customer Setup
Within the customer record there will be certain information that determines where AR and Cash Receipts tie into the GL Journal Entry Export.
Branch Name
- The branch setup on the customer will determine what branch/GL Code the AR for that customer will flow through to the GL Journal Entry Export on and correspondingly what entity the AR gets associated with.
- For example, if the branch on the customer is set to Eagan (Eagan is a branch listed in entity Test Staffing) then the AR generated for that customer will go to the Test Staffing entity because the Eagan branch is setup in the Test Staffing entity.
- Once the branch on the AR is set, then the invoice payments/cash receipts will be applied to the same branch and entity that the AR was posted to.
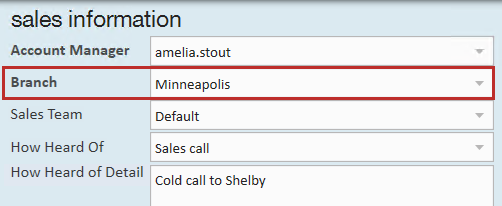
- Branch name on the customer record is found under Details > Sales & Service in the "Sales Information" section:

Timecard Setup
Specific information within the timecard will determine what account the Sales and Gross Payroll Cost for W2 employees will get associated with in the GL Journal Entry Export. Below are the options available for how we map out the Sales and Gross Payroll Costs in the GL Journal Entry Export.
Pay Code
- The pay code setup on the timecard will determine what account the Sales and Gross Payroll Cost will go to base upon the mapping setup for each of the pay codes. Each pay code has the ability to be mapped to separate Sales and Gross Payroll Cost accounts for W2 employees.
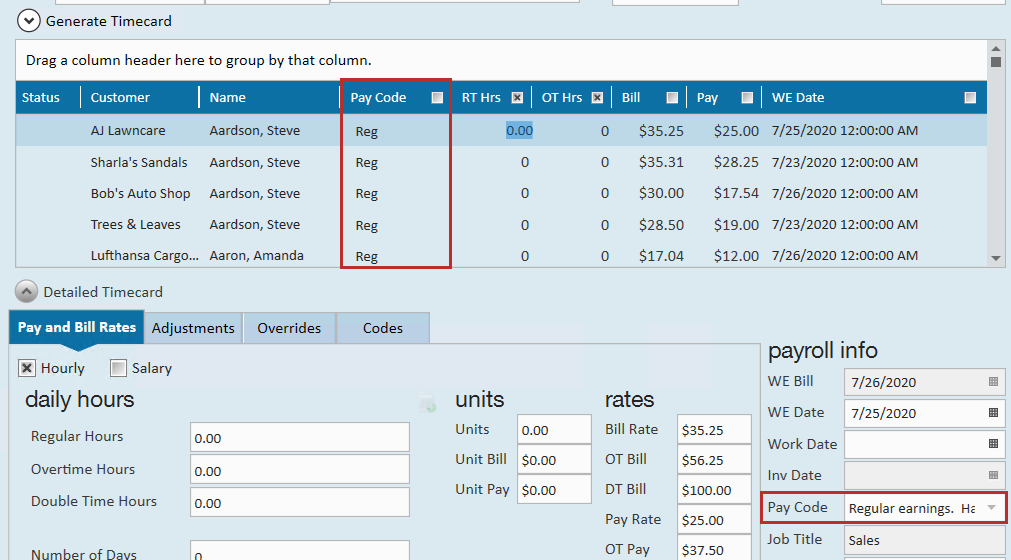

Job Title
- The job title setup on the timecard will determine what account the Sales and Gross Payroll Cost will go to based upon the mapping setup for each of the job title.
- Job titles cannot be changed on the timecard itself, but you can update the job title located on the assignment record and then refresh this timecard to see the new job title. Job title can always be found under payroll info on the detailed timecard:
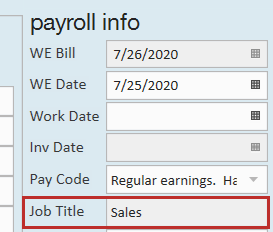
- Job titles cannot be changed on the timecard itself, but you can update the job title located on the assignment record and then refresh this timecard to see the new job title. Job title can always be found under payroll info on the detailed timecard:
- Each job title has the ability to be mapped to separate Sales and Gross Payroll Cost accounts for W2 employees.

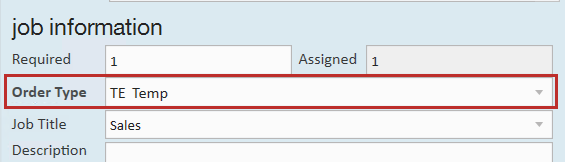
Order Type
- The order type setup on the timecard (this order type will default to what is setup on the employee’s order that they are assigned to) will determine what account the Sales and Gross Payroll Cost will go to based upon the mapping setup for each of the order type.
- Each order type has the ability to be mapped to separate Sales and Gross Payroll Cost accounts for W2 employees.
- Order types can be found under the details page of an order record:

How to Run a GL Journal Entry Export
Because each accounting software requires the GL data in a different format to import the journal entry successfully into that accounting software, how you run your GL Journal Entry Export may differ depending on what accounting software you are exporting to.
You will see there are a few ways to you run your GL Journal Entry Export report/export file to get the data in the needed format to import the journal entry into your accounting software. However, remember that your way could be different than what is shown here:
Pulling the GL Export as a Report
Navigate to Reports, filter for the GL or select the Exports report group.
Double-click on your GL Journal Entry Export report, this report name will be GL Journal Entry Export " Accounting Software Name". Once the report is opened you may now export your report to excel if needed.
*Note* If you are exporting to QuickBooks, please refer to the Importing GL Journal Export Into QuickBooks document for further help on exporting and importing.
Pulling the GL Export in Pay/Bill
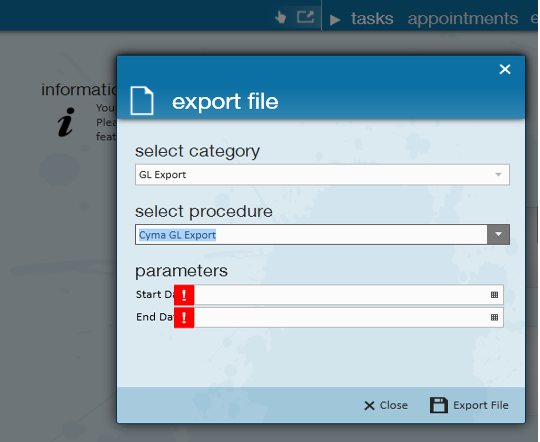
Navigate to Pay/Bill (1.), select the actions menu (2.), select Export (3).
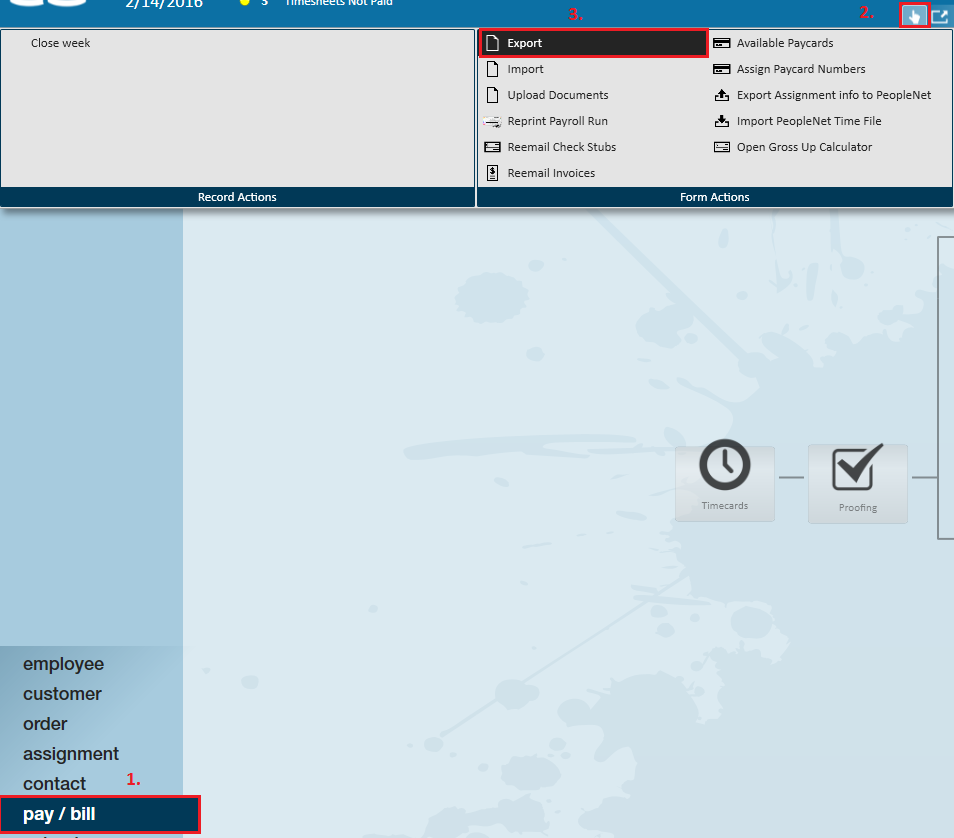
Each export is setup custom to client needs, the next steps will be determined by how your custom export was setup for you. Choose the correct category, procedure, enter parameters, and export.
Memo Column Explanation
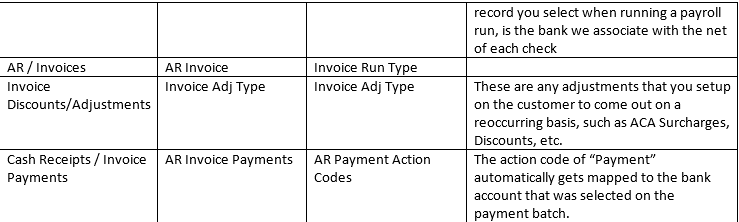
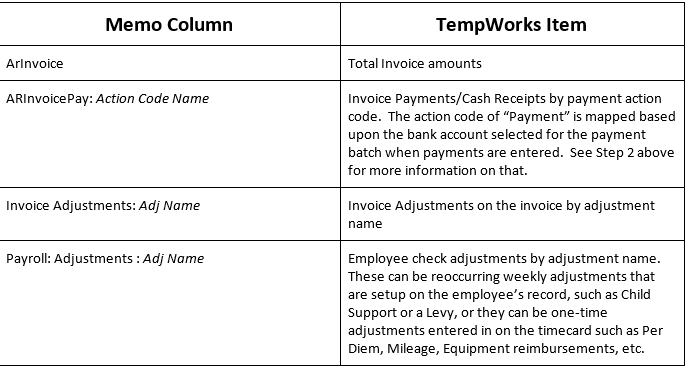
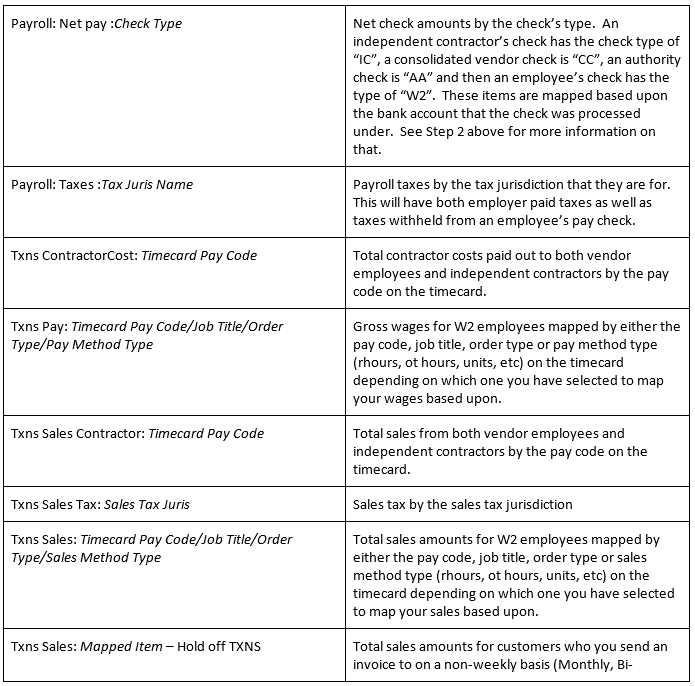
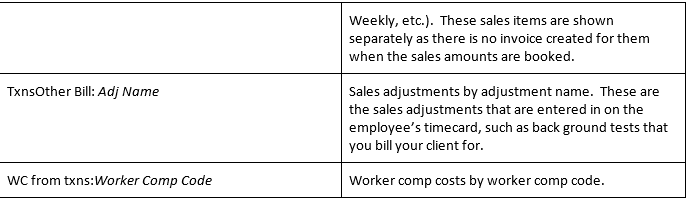
The memo column on the report will tell you what item in TempWorks the line-item amount is from. For instance, an employee’s child support adjustment amount withheld from their check will be shown as “Payroll: Adjustments : ChildSupt”.
Below is a list of the different Memo descriptions and what they line up with in TempWorks.
*Note* Anything listed below in italics is a variable where the name for the type of item that is mapped will show up. This type name is what is called the Origin Desc in the admin gl account mapping area discussed in step 4 below.
Reports to Reconcile GL Export
Once again, when running reports, keep in mind the GL Journal Entry Export pulls in data by the weekend bill date or what is sometimes referred to as your processing week date (this is always a Sunday date). Your GL Journal Entry Export report/export file may pull in the check date, invoice date or payment date in the output, but the GL Journal Entry Export always filters on the weekend bill date.
Use the reports list below to help you balance and troubleshoot the GL Journal Entry Export:
- Invoice Payments
- This report will show you all of the details of the Invoice Payments/Cash Receipts that have been entered into the system. If you want to see the detail of a GL Journal Entry Export report/export file, run the report by Weekend Bill date.
- Invoice Register
- You can use this report for trouble shooting and balancing. This report will show you the details of your new AR amounts for a given date range. If you want to see the detail of a GL Journal Entry Export report/export file, run the report by Weekend Bill date.
- Check Register
- You can use this report for trouble shooting and balancing payroll data over all. This report will give you one line per check and can be grouped by the bank id that the check was processed on for you to tie out to the GL Journal Entry Export the Net payroll amounts that hit the bank account. If you want to see the detail of a GL Journal Entry Export report/export file, run the report by Weekend Bill date.
- Tax Deposit
- You can use this report for trouble shooting and balancing taxes. If you want to see the detail of a GL Journal Entry Export report/export file, run the report by Weekend Bill date.
- Employee Adjustments
- You can use this report for trouble shooting and balancing adjustments. If you want to see the detail of a GL Journal Entry Export report/export file, run the report by Weekend Bill date.
- Management Report
- This is an overall report that splits things by branch. This is a helpful one stop place for by branch totals. The Management report only runs by the Weekend Bill date, so there is no need to choose the correct date filter on here to match up with your GL Journal Entry Export report/export file.