
What are Hot Lists?
Hot lists allow you an opportunity to place employees & customers within given static lists in order to easily access and locate them, without having to run a search.
Hot lists may commonly be used to group employees who have been pre-qualified for a specific customer or skill set, or to track your key or target customers.The hot list section of Enterprise can be accessed directly from the navigational tree/all options/hot lists.
How to Create a Hot List:
Hot lists can be created from three different areas - 1. within the hot list section, 2. from a search result, or 3. from within a specific employee or customer record.
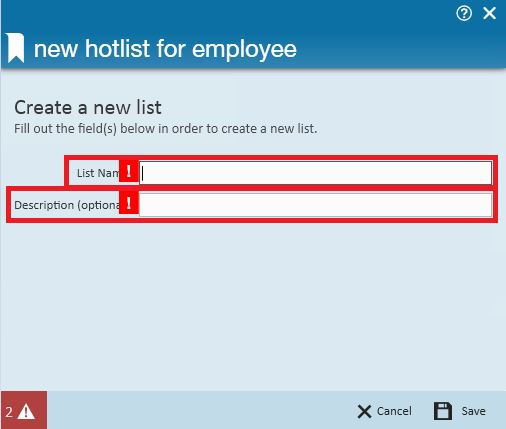
1. Create a hot list from the hot list section:
Hot lists are separated by record type and can be created for either employees or customers. To create a hot list click on the plus icon located to the right of the hot list type:

This will provide you with the new hot list form where you will enter the list name and description. Enter in the desired list name and description and click save. You have now created your hot list.
2. Create a hot list from a search result:
If you have completed an employee or customer search, and wish to add all, or some, of those results to a new hot list, you can create a hot list directly from the search result. To do so, click on the add to hot list button located in the upper right of your search result:
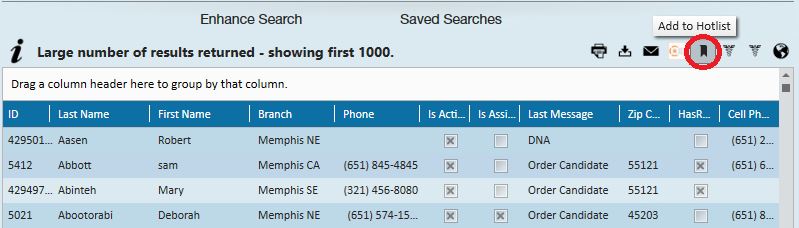
To create the new hot list, enter the name and description in the fields provided, then click save. Creating a new hot list this way will have added the selected employees or customers to that list in the same step. You can also access this form by right clicking with your mouse and selecting the add selected to hot list.
3. Create a hot list from within an employee or customer record:
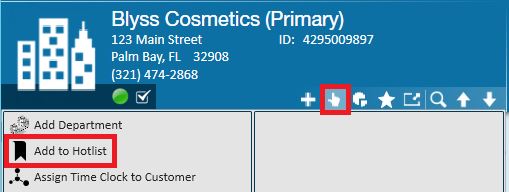
If you are already within the record and would like to add an employee or customer to an already created list, click on the actions button and select the add to hot list option.
To create the new hot list, enter the name and description in the fields provided, then click save.
Add Employees or Customers to an Existing Hot List:
Once you have created the hot list you can add employees or customers to a hot list at any time from either a search result, or from within the specific record.
If the desired employee or customer has returned in a search result, you can add that record to a hot list by either right clicking with your mouse and selecting add selected to hot list or by clicking on the add to hot list button in the upper right hand area of your search result. Right click with your mouse:

Add to hot list:

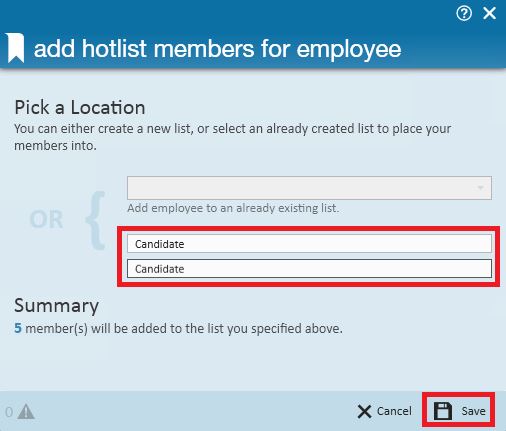
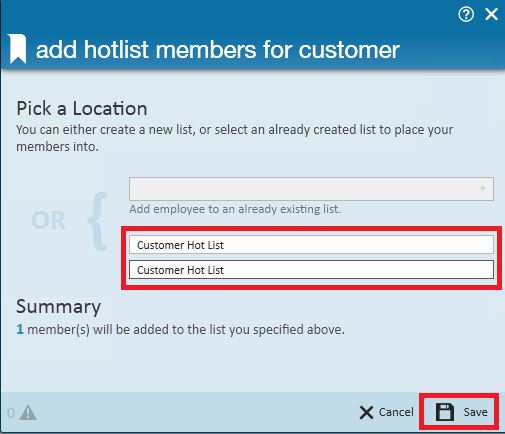
Both options will provide you with the add hot list members form. Select the hot list you wish to add the record to by using the add to an already existing list drop-down then click save.
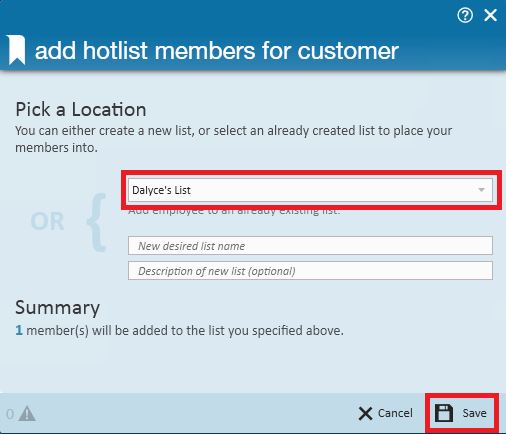
*Note* Only hot lists which you have created, or have been made public by other users will be displayed in this drop-down.
*Note* You can select multiple records at the same time by holding down your Ctrl key and selecting multiple line items with your mouse.
Find a Hot List:
To locate the hot list you wish to utilize, navigate to the hot list area of Enterprise from the navigational tree.
You can then search for your desired hot list by using the available search and filter options.
If searching by name, you can utilize the text search field which will search for employee and customer hot lists and saved searches that meet those criteria in the name and description field.
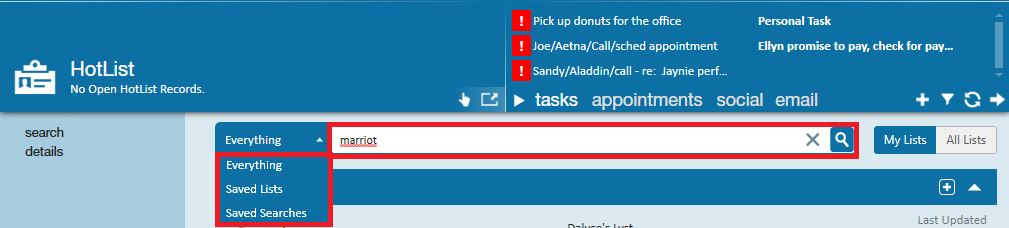
You can quickly filter what hot lists & saved searches you are viewing by filtering between hot lists, saved searches, or everything. You can also filter between viewing your lists or viewing all lists, which includes those that have been made public, by using the My Lists or All Lists filter options.

*Note* By default the search setting will be everything (both hot lists and saved searches)
The (1.) > symbol signifies a hot list
The (2.) magnifying glass symbol signifies a saved search.

To open a hot list or to run the desired saved search, double click on the desired line item.
*Note* Only hot lists which you have created, or have been made public by other users will be displayed in this drop-down.
Functionality Available to you Within the Hot List:
Employee Hot List Functionality:
Within the hot lists, different functionality is available for employees and customers.There are some actions available to you by right clicking on the desired list.
- Send Call-Em-All Broadcast: Allows you to send a Call-Em-All Broadcast to those employees on the hot list.
- Send mass email: If synced with your email, selecting this option will open up an email with the employee's email addresses (if available) placed in the bcc field.
- Send Text: Allows you to send text messages utilizing the ZipWhip integration. Not sure what ZipWhip is, follow the link- ZipWhip Integration
- Remove from list: Selecting this option will remove (delete) the hot list.
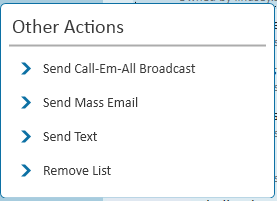
*Note* Call-Em-All is a 3rd party integration and may not be available in your system. For more information, please contact your TempWorks Account Manager.
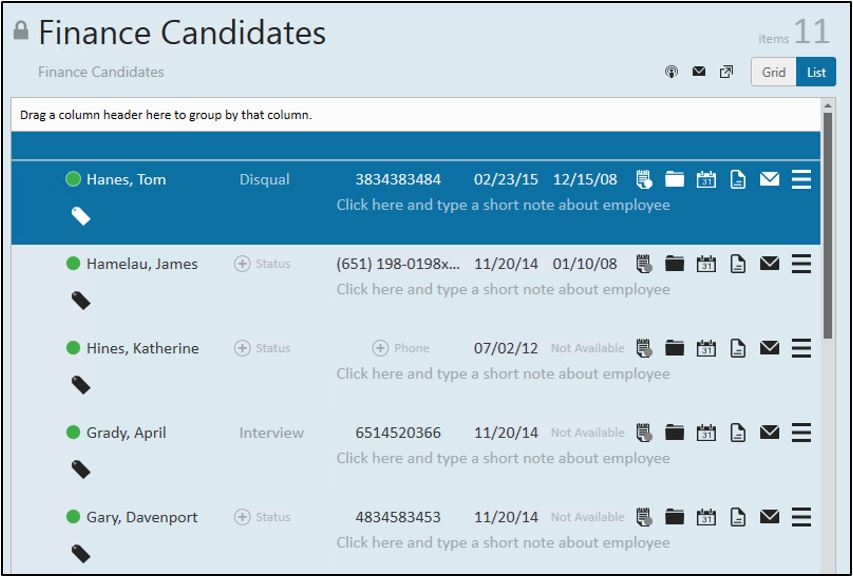
Once you have opened the employee hot list (double click to open) the members of the hot list will be displayed:
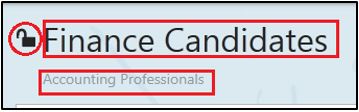
By default, new hot lists that are created are private. If you wish to make a hot list public, click on the padlock to 'unlock' the list. This will allow other users to see and add employees to your hot list. You can also change the hot list name and description at any time by clicking on the field and editing as desired.
On the top right of the list, there are specific functions in correlation with the hotlist:
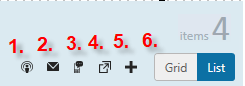
- Send a Call-Em-All broadcast: Will launch a broadcast to all selected employees.
- Send a mass e-mail: Utilize this option if you wish to send a mass e-mail to selected employees. This can be beneficial if you need to inform employees that a position is open, start times of a position, dress code information, and more.
- Send a text: Allows you to send text messages to selected employees utilizing the ZipWhip integration. Not sure what ZipWhip is, follow the link-ZipWhip Integration
- Tear off Page: Select this option to take this hot list into a tear off page.
- Mass assign to an order: Utilize this option to mass assign selected employees within the hotlist to the last selected order that was viewed in the system. The assignment restriction window will populate, allowing you to confirm or fix the restrictions and directly assign the employee without ever leaving the hotlist.
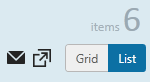
- Grid/ List: Change the view of the hot list from a list to grid format.
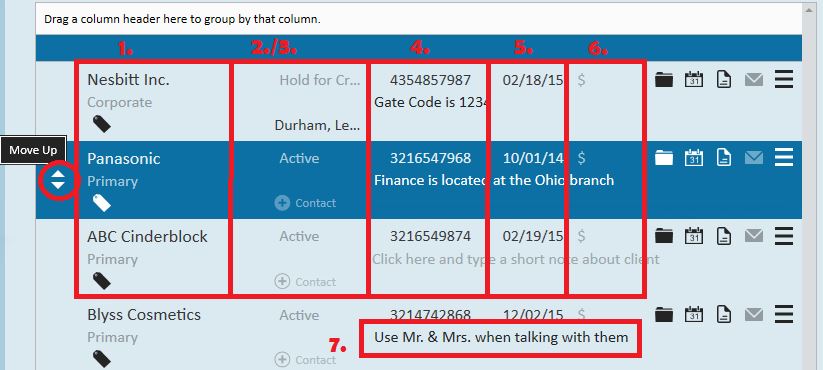
Alter the sorting of the list by clicking on any of the column headers or you can manually manipulate the order of the list by moving employees up or down by clicking on the arrows, as seen below.
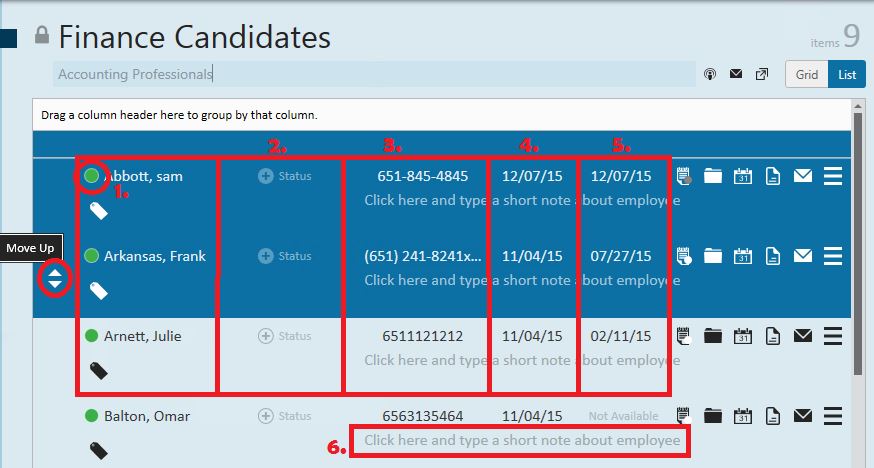
- Active: A green dot in front of the employee name notifies you that this is an active employee.
- Hot List Step: This column allows you to track the status of an employee in relation to this specific hot list. This is not correlated to a candidate status (tied to an order) nor is it logged, or visible, on the employee's record.
- Phone Number: The employee phone number will be displayed and further contact information can be viewed and entered by clicking on the phone number.
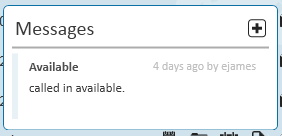
- Last Message: This will display the date of the last message logged on the employee record. Clicking on this will display message history. You can also create new messages from here by clicking on the plus sign.
- Last Available: This column will display the last date an "available" message logged on their record.
- Note: Add any note, as desired.
Hot List Icons:
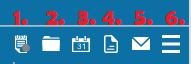
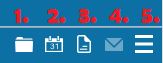
- Display the employee assignment history. If this icon has a grey dot, it signifies that the employee is not currently on an assignment. If the employee is currently assigned, the dot will be white.
- Displays to you any active orders on which the employee is currently a candidate.
- Displays any open tasks associated to that employee.
- Displays any resumes attached to the employee record.
- Opens an email addressed to the employee.
- Opens additional actions (below) that can be completed:
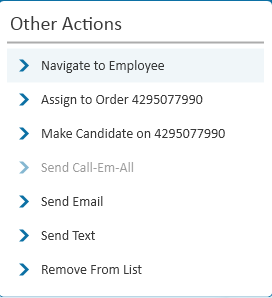
- Navigate to employee: Takes you to that employee's record.
- Assign to Order...: Utilize this option to assign the employee to the last selected order you were working in.
- Make candidate on...: You may select to add the selected employee as a candidate on the last selected order you were working in.
- Send Call-Em-All: Will launch a Call-Em-All for the employee.
- *Note- Call-Em-All is a 3rd party integration and may not be available in your system. For more information, please contact your TempWorks Account Manager.
- Send email: Selecting this will launch an outgoing email to the employee.
- Send Text: Allows you to send text messages to the employee(s) utilizing the ZipWhip Integration.
- Remove from list: removes the employee from this specific hot list.
Customer Hot List Functionality:
Before opening a customer hot list there are some actions available by right clicking on the desired list.
- Remove List:
- Selecting this option will remove (delete) the hot list.


Once you have opened the customer hot list (double click to open) the members of the hot list will be displayed:
By default, new hot lists that are created are private. If you wish to make a hot list public click on the padlock to 'unlock'. This will allow other users to see and add customers to your hot list.
You can also edit the hot list name and description at any time by simply clicking on the field name and editing as desired.
On the top right of the list, you have an option to change the view of the hot list from "list" to "grid," as well as sending a mass email, or taking this hot list into a tear off page.
You can alter the sorting of the list by clicking on any of the column headers or you can manually manipulate the order of the list by moving customers up or down by clicking on the arrows.
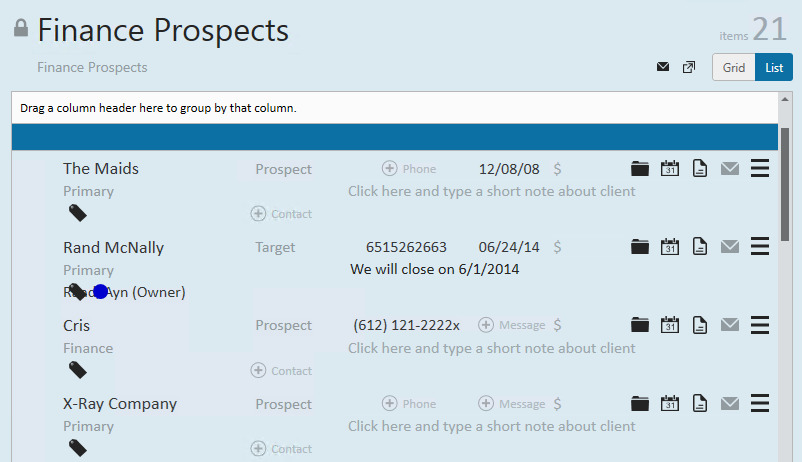
- Customer name and department name: This indicates the customer name and department of the customer.
- Status: This is the status from the customer record. Changing the status here will change the status of the customer record.
- Contact name: This should be the contact affiliated with this specific hot list. If no contact is displayed, click the add button to add one.
- Phone number: This is the customer phone number.
- Last message: Displays the date of the last message logged on the customer record. Clicking this date will display all messages logged on that customer.
- Revenue: This is a currency field where the estimated revenue can be tracked. This is not displayed on the customer record and is specific to the hot list.
- Notes: Add any additional notes you want
Hot List Icons:
- The order icon will display all orders affiliated with this customer. It will allow you to create a new order.
- Displays any open tasks associated to that customer.
- Document icon will display any documents attached to the customer record.
- Clicking on this icon will open an email to that customer with the address in the "to" field.
- Clicking this icon will open additional actions (below) that can be completed:

- Navigate to Customer: Will direct you to the customer visifile page.
- New Order: Creates a new order request.
- Remove From List: Removes (deletes) the selected customer from the hot list.
Hot List Tags:
Hot list tags are designed to tag specific records within the hot list.
Examples of tags you may want to create:
Employee tags:
- Within a list of employees you are preparing in anticipation of a peak season, use tags to identify 1st string candidates from 2nd string candidates.
Customer tags:
- Within a list of customers where you are housing your prospects, use tags to identify target accounts from prospect accounts.
- Within a list of customers you are responsible for servicing, use tags to identify level 1, level 2, and level 3 customers.
Identify what tags you would like to use and decide on what color you would like to make that tag. You administrator will be able to create tags for you.
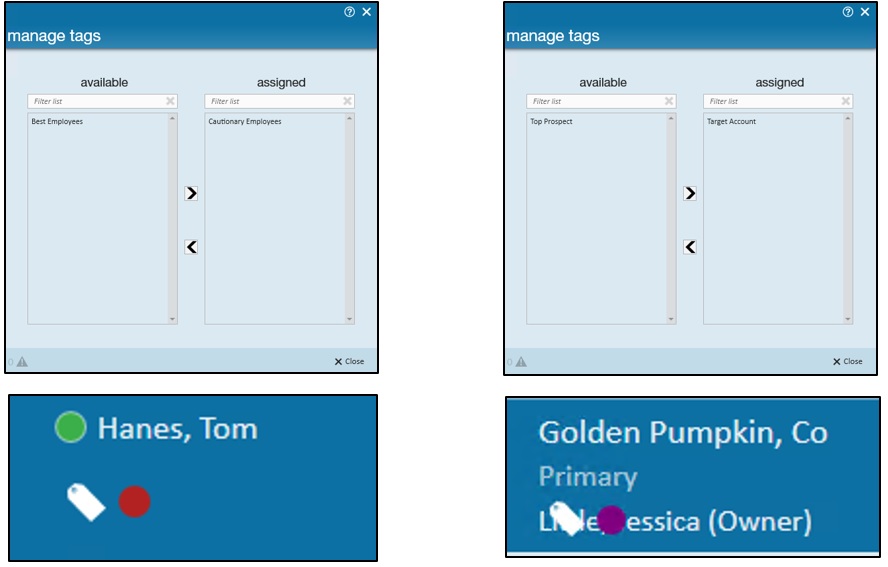
To Tag records within Hot Lists:
Once a tag is set up in administration, navigate to your hot list to tag the members of that list. Click on the tag icon to select the tag to associate with this list:
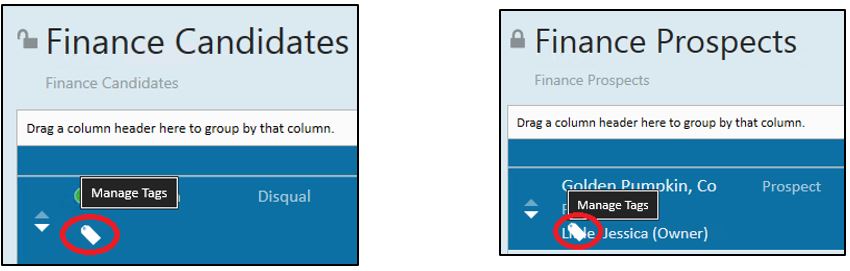
Select the tag(s) from the list on the available side and move them to the assigned side to tag this record.
Tags can be removed using the same method; click on the tag and move the tag from the assigned side to the available side.
*Note* Records can have multiple tags.
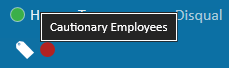
To quickly identify what a tag means, hover your mouse over the colored tag circle:
Related Articles
- None