You have received payments from your customers and now you need to document these payments in Enterprise. This article will walk you through the basics of paying an invoice in Enterprise, and will go over some specific functionalities that Tempworks provides to make invoice payments easier.
1. Begin by expanding the Invoicing box from the Pay/Bill dashboard of Enterprise and select to (1.) "Pay invoices":

This will automatically open the invoice payments wizard.
2. Select a (2.) Payment Date and the (3.) Bank Account that will be used for this payment session. Then, select (4.) to start a new session:
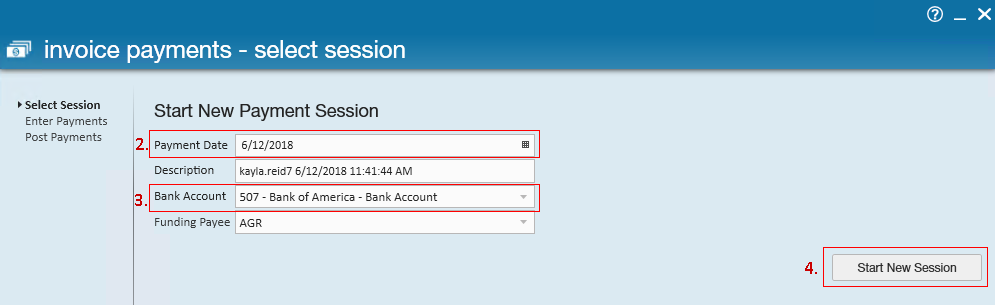
If you have a session already started, you can choose to continue the session by selecting the correct session.
3. Once you are in a session, there are many (6.) search parameters to help you filter out the invoices you need to pay. This article about searching will go into how all these parameters can help narrow your search.

4. After you have found the invoices you need to pay, you can start to look over the invoices and get payments recorded.

You have the ability to (7.) expand the invoice to go over the transactions to verify what invoice you are paying. Also, there are many actions that can be taken just from the (8.) icons listed at the top of the list. Below is a brief description of what each of these icons can be used for.
![]() Save Payments – this will save all the payments made so far in the session allowing you to exit the session and return later to continue.
Save Payments – this will save all the payments made so far in the session allowing you to exit the session and return later to continue.
![]() Log Message – allows you to log a message connected to the customer, such as a message about a credit memo.
Log Message – allows you to log a message connected to the customer, such as a message about a credit memo.
![]() Pay with Lump Sum Check – allows you to pay with a lump sum. This article will go through the complete process for doing so.
Pay with Lump Sum Check – allows you to pay with a lump sum. This article will go through the complete process for doing so.
![]() Pay in Full – quickly inserts a pay amount that equals the pending balance on any invoices you have selected at the time.
Pay in Full – quickly inserts a pay amount that equals the pending balance on any invoices you have selected at the time.
![]() Upload Lockbox Feed – allows you to upload the feed from Lockbox. This article will go into detail about how this works.
Upload Lockbox Feed – allows you to upload the feed from Lockbox. This article will go into detail about how this works.
![]() Load New Payments – this will load a list of all payments made in this session so far.
Load New Payments – this will load a list of all payments made in this session so far.
![]() Create Zero Dollar Invoice – allows you to create a zero dollar invoice. This article will go into detail about how this works.
Create Zero Dollar Invoice – allows you to create a zero dollar invoice. This article will go into detail about how this works.
![]() New Line Item – creates a new line item for the invoice selected so that you can document multiple payments/actions on one invoice.
New Line Item – creates a new line item for the invoice selected so that you can document multiple payments/actions on one invoice.
![]() Remove Payment – Removes a payment made in this session that may have been entered by mistake.
Remove Payment – Removes a payment made in this session that may have been entered by mistake.
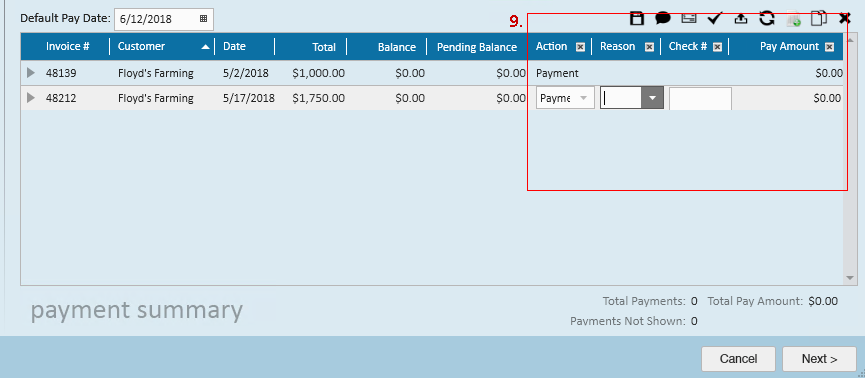
5. If you are not using the icons to make payments, you can enter them manually by putting in the (9.) Action, Check #, and Pay Amount and then saving. You can remove or add columns by right clicking on the column header and selecting the columns you use or need to see. If you are documenting a write off, payment discount, or cash advance, you may need the "Reason" to be accessible. To learn more about write offs, please read this article.
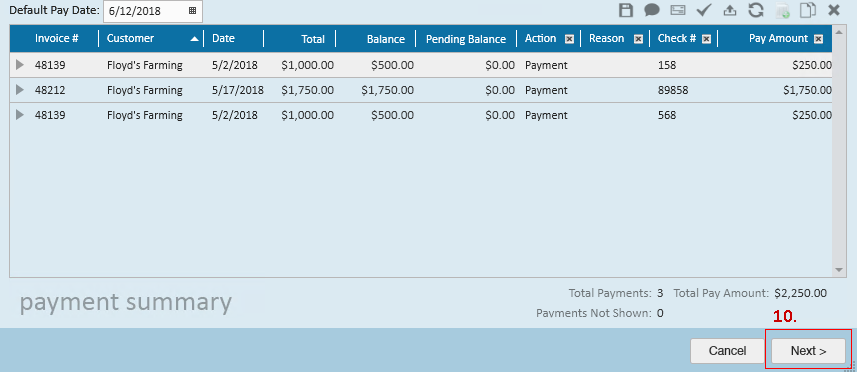
6. Once you are done with your payments for this session, you can select (10.) next and move to the next page where you are able to "Post Payments" which will finish this session, Print Batch Report, which will show all payments in this batch in the order they were paid, and then by customer name. You can also "Print GL Batch Report" which will show you how this will play into you General Ledger. If you do not want to close out this session, you can select 'Cancel' in the bottom of the screen and return to the session at a later time.

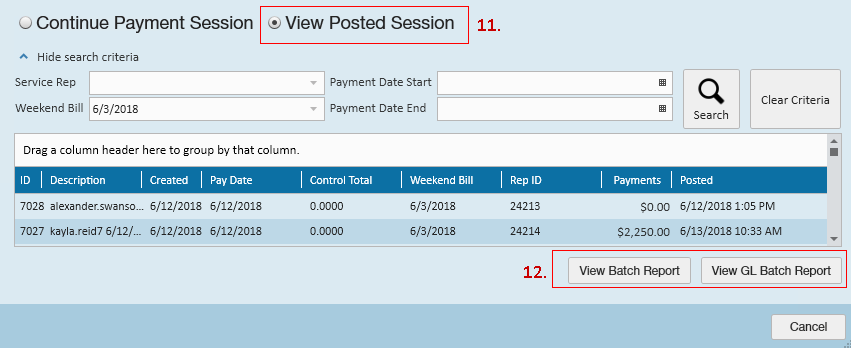
7. Should you post the session, but want to pull the reports at a later time, you can do so by going back to 'Pay Invoices,' and select (11.) "View Posted Session." From here you can find the payment batch you would like a report for, and then select the (12.) report you need to generate.
*Note* In the event a payment has been applied to the incorrect invoice, you can do the following:
- Apply a negative payment of the same amount to the invoice to 'undo' the previous payment.
- Apply the correct payment amount to the correct invoice.