Timecards: WebCenter & Electronic Time Entry
WebCenter Timecards, and timecards entered through timeclocks or the Buzz mobile app are quick and easy because all of the time entry is done for you. The proofing and processing of the time will happen the same way as your manually entered time. This document outlines the steps you'll take to verify, approve and override your Web Time as well as how to pull that time into a Payroll Proofing session.
When a WebCenter timecard is created, you will be able to see the timecard as a transaction within time entry in Enterprise. You will also be able to see which step each WebCenter timecard is in at any moment.
WebCenter Timecard Statuses
1. Within the Time Entry area of Pay/Bill, you will see a column for WebCenter Status:
*Note* If this column is not displayed, right-click on the column header and click on WebCenter Status so it has a check mark in front of it. This will make the column appear.
The status of the WebCenter timecard is represented by a symbol of a globe. As each timecard flows through the process of being created, time being entered, submitted and approved the globe will change.
| Icon | Summary | Description |
 | UnSubmitted WebCenter Timecard | This timecard has been created but has not yet been submitted by the employee to the timecard approver for approval in WebCenter. |
 | UnApproved WebCenter Timecard | This timecard has been submitted to the timecard approver, but has not yet been approved in WebCenter. |
 | Approved WebCenter Timecard | This timecard has been approved by the timecard approver in WebCenter and is ready for payroll. |
 | Overridden WebCenter Timecard | This timecard was approved but was then edited in Enterprise after approval. |
 | Rejected WebCenter Timecard | This timecard has been submitted by the employee and rejected by the timecard approver. |
For more information on timecard icons, see Timecard Icons and Their Meanings.
WebCenter Timecards Life Cycle:
- Time is entered by the employee (or supervisor) & submitted for approval (for more information see Employee: The Timecards Tab)
- Timecard is reviewed by Supervisor (contact must be set as supervisor for the order in order to see submitted timecard)
- Timecard is approved by Supervisor (See Customer: How to Edit and Submit Timecards)
- Timecard is pushed into a WebCenter proofing session by a payroll processor
- Timecard is paid & invoiced with all other timecards by payroll processor/billing clerk
Manual Timecard Updates
In order to proof WebCenter timecards, the timecard must be set to approved. In case the designated supervisor can not approve or reject a timecard or make necessary changes, payroll processors can edit/override WebCenter timecards.
Navigate to Time Entry in Enterprise and double click on a WebCenter timecard to open the detailed timecard view.
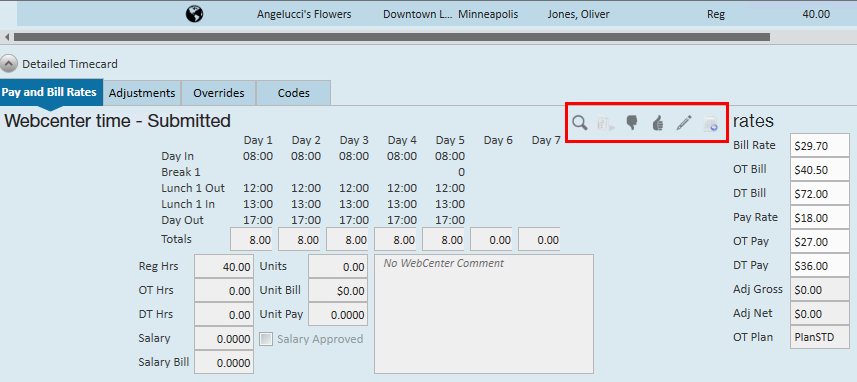
| Icon | Description |
| Updates the timecard from a status of Submitted to Approved | |
| Rejects/resets the timecard to an resubmitted status. Once reset, the employee can update and resubmit hours from WebCenter. | |
| Allows the timecard details to be edited. *Note* Only the daily and weekly totals of the timecard can be overridden. If a Federal timecard format has been used to create this timecard, the individual entries may not be overridden. | |
| Allows users to review edits and updates made to the WebCenter timecard. | |
 | Runs the "Consultant Time Log Verification" report which displays all activity that has taken place on the timecard, including the details within each step. |
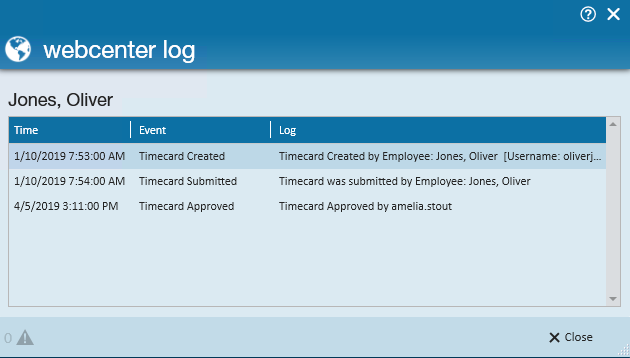
Reviewing Timecard Log:
Because payroll processors can help manually adjust WebCenter timecards as needed, it's important to see who made what changes. Select the ![]() icon under the detailed timecard to see a view of all changes made on a timecard:
icon under the detailed timecard to see a view of all changes made on a timecard:
WebCenter Proofing Session
Once all of the time has been entered, submitted and approved, it is processed like all other timecards. However, WebCenter timecards do not automatically drop into a proofing session. WebCenter timecards must be manually pushed into a proofing session.
*Note* For employees who are utilizing the Mobile Time Punching functionality within the Buzz application, the proofing process is slightly different. These timecards will need to be pulled into a TimeClock Proofing Session.
For more information on this process, please see the article titled Processing TimeClock Timecards.
If you do not see this option, please contact TempWorks Support.
Users have two options that will bring WebCenter timecards into a proofing session.
- You can pull all WebCenter timecards into a proofing session at once
- You can individually pick and choose the transactions you would like to bring into a proofing session
Proofing All Timecards at Once
If you want to push all approved Web Center timecards, click the action's menu and select 'Create WebCenter Proofing Session':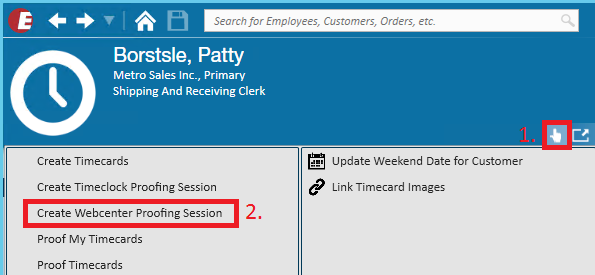
This will create a new proofing session and push all 'Approved' WebCenter timecards into that session.
*Note* If you already have a proofing session open, this method will create an additional proofing session, therefore, a pay clerk may have more than one proofing session.
Proofing Individual Timecards
Proofing individual timecards can be helpful if you are ready to start processing payroll and billing for one group of transactions, but not all.
Select the WebCenter timecards you would like to push into a proofing session by holding down your Shift (or Ctrl key) and clicking to select each transaction with your mouse. Once all desired timecards are highlighted, right-click your mouse and select 'Move Selected into Proofing Session':

This will push ONLY the timecards selected into a proofing session so long as they are approved.
*Note* If you already have a proofing session open, this method will create an additional proofing session, therefore, a pay clerk may have more than one proofing session.
Related Articles
- None