
What is the Education Module?
The Education module is an enhanced set of features in both Enterprise as well as WebCenter, that when used in conjunction with each other, allow a school district or a staffing company to manage their substitute teacher order requests, placement and payroll.
*Note* In order for teachers, admins, or substitutes to use WebCenter, they must be given the correct access. Check out Education Module - WebCenter Setup Overview for more information.
Education Module & Order Request Forms
You can set up your teachers or admins in a school district to be able to request substitutes using WebCenter. Substitutes will then be allowed to review the requests open and accept or reject the assignment.
In this article we will review:
- How to Setup an Order Request Form
- Additional Order Configs to Consider
- How Teachers Submit a Request
- How Substitutes Accept Assignments
Setting Up an Order Request Form
In WebCenter Admin, you will need to first create what the form your Admins or Teachers will be filling out to request a substitute.
Create the Form For Your Admins or Teachers to Fill Out
- In WebCenter Admin, Navigate to the Order Form Tab:

- Select

- Name the form (ex. Use "Generic Form" for the basic request form that most will use or use [company name] for a specific order form for a customer)
- Drag and drop any fields you do not want them to fill out to the inactive side
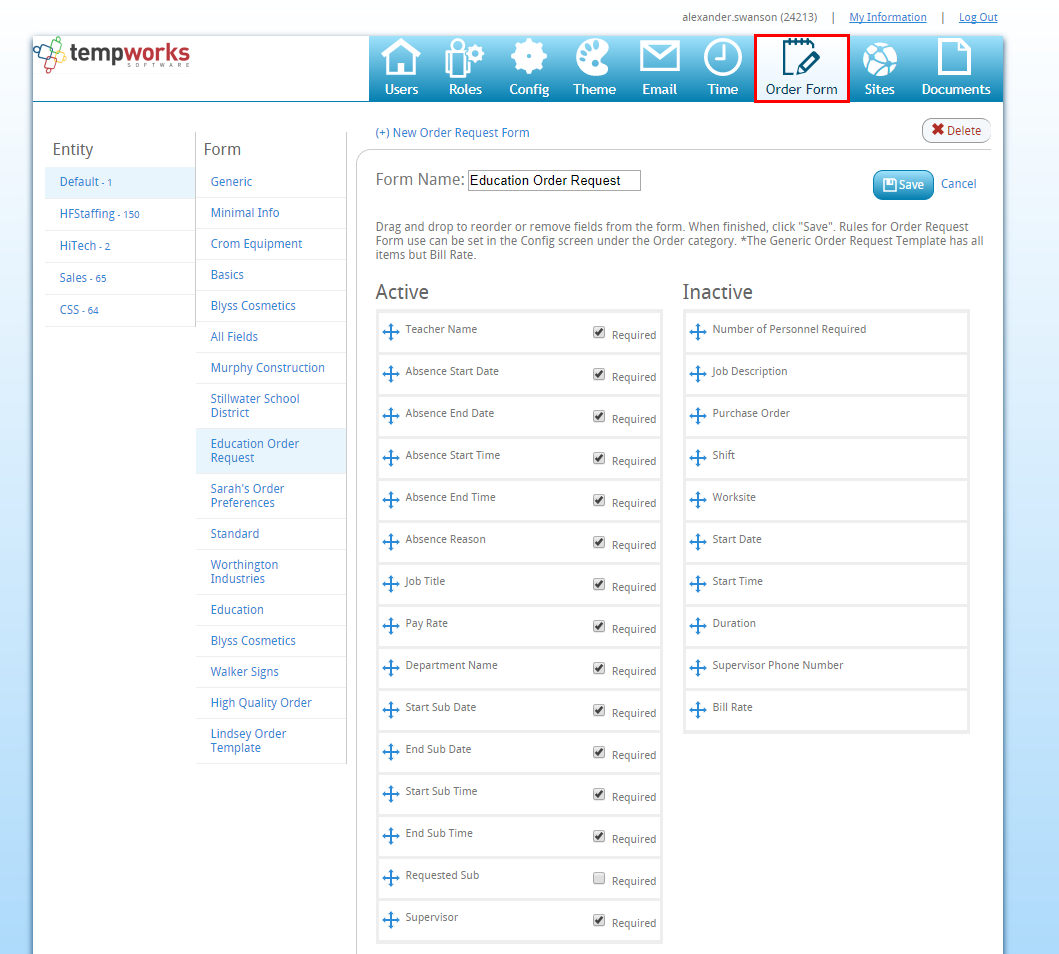
- Uncheck any fields that are not required
- Select


You can create different forms for different school districts, admins, etc. We recommend naming them so they are easily identified by anyone in WebCenter admin.
Choose Which Contacts Use Which Order Form(s)
Now that your order form has been created, you will need to tell WebCenter which admins/teachers/school districts use which form. Remember that Admins/Teachers are considered Contacts and School Districts are considered Customers.
- In WebCenter Admin, navigate to the Config tab
- Select the order category on the left
- Select the show rule option next to Order Request Form
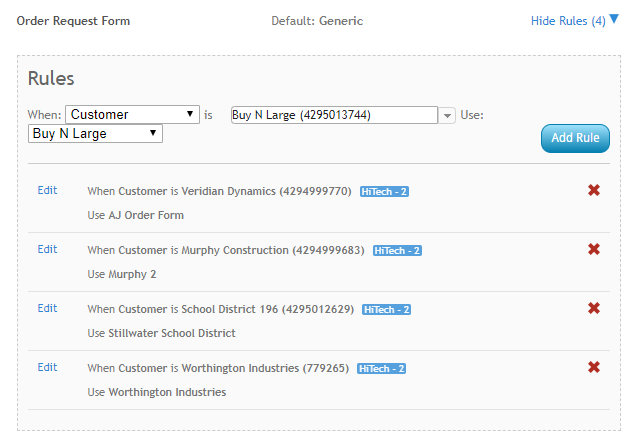
- Create a New Rule
- Select a filter (ex. customer)
- Select a value (ex. customer's name)
- Select the Order Form name (ex. Generic or Customer name)
- Select Add Rule

*Note* Your Teachers will need to have a WebCenter Role that includes the "Customer - Orders" Permission in order to see the orders tab in WebCenter to create a new request. Check out Education Module - WebCenter Setup Overview
Setting Up an Order Request Workflow
In some cases, school districts may want to have teachers fill out the request forms to be approved by one or more admins or supervisors before the request is finalized. WebCenter allows for a few different order request processes.
If you do not need to have any approvals for an order request to be submitted:
- Navigate to WebCenter Admin > Configs Tab > Order category
- Select the "Show Rules" option to the right of "Order Workflow Type"
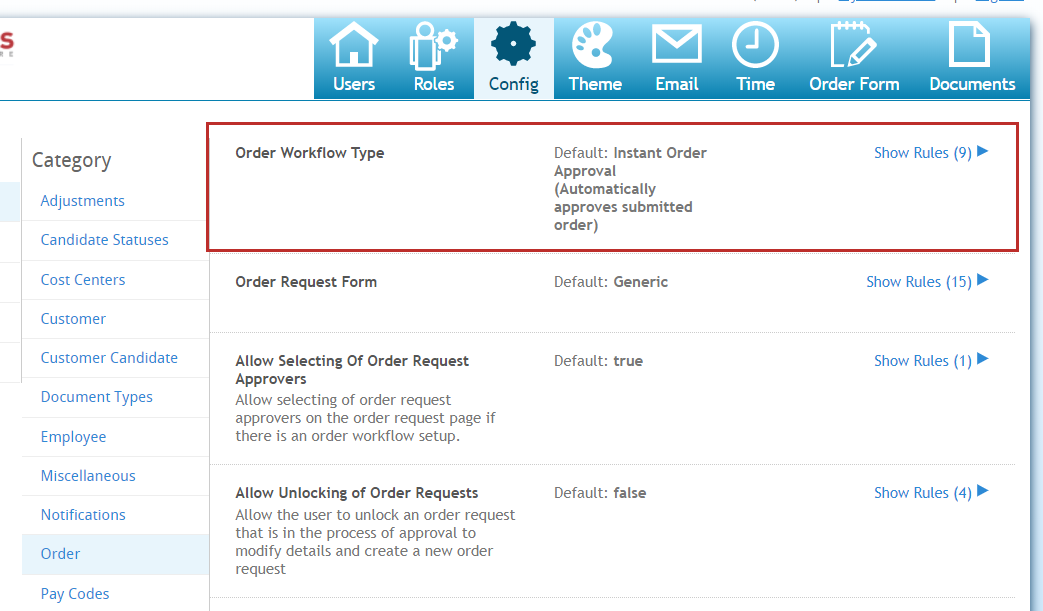
- Select a Filter (ex. customer or user role)
- Enter a Value (ex. specific school district name, etc.)
- Select the Order Workflow Type of "Instant Order Approval"
- Click Add Rule

If you do want to set up a workflow that will require approval from one or more users, you can select a different Order Workflow Type. Check out step one of WebCenter Admin - Configuring WebCenter Order Requests for more information on the order workflows available.
Turning on the Order Request Forms
Once you have the order form and workflow the way you like, you will need to turn on the ability for users to create order requests. This can be turned on based on School District (Customer) or on a case by case basis for Teachers/Admins (Contacts)
Each Teacher or Admin Will Need:
- Web User Account (see Manage Web User Account for more information)
- WebCenter Contact Role with Order tab available (for more information on contact roles see WebCenter Contact Roles)
- Have 'Allow Order Request/Copy' Configuration to be set to 'True'
- In WebCenter Administration, Navigate to the Configs Tab and choose the Customer category
- Select the show rules option under Allow Order/Request Copy
- Create rule by selecting customer or contact, entering customer or contact name and selecting true.
- Select Add Rule
Additional Order Configs to Consider
If you are looking for more ways to customize the order request process, you can check out the following optional configs located under the WebCenter Admin > Configs > Order category
- Associate Orders by Department - This configuration option groups orders by the department they are created in (see Departments vs. Worksites for more information)

- Include Open with Filled - When this configuration is set to 'True' it will show any order with an open status under the filled category for the contact (See Customer: How to Create and Submit Orders for more information on where and how this displays for the contact).

- Allow Unlocking of Order Requests - When this configuration is set to 'True', it will allow a contact to unlock and edit an order request that may be in the process of being approved.

- Check Closure Schedule configuration is setup for our Education Module users only and will provide a message at the bottom of any order that includes a closure date based on the school calendar set up on the customer record in Enterprise. Check out Education Module- Set up in Enterprise for more information on how to set up this calendar.


Submitting a Request for a Substitute
Now that your system is set up to allow teachers/admins to submit requests for substitutes, etc. you can guide your teachers to the Orders tab in their WebCenter portal to create and submit new requests.
- In WebCenter, navigate to the orders tab
- Select the
 button near the top of the page
 - A new window will open, fill out all required information
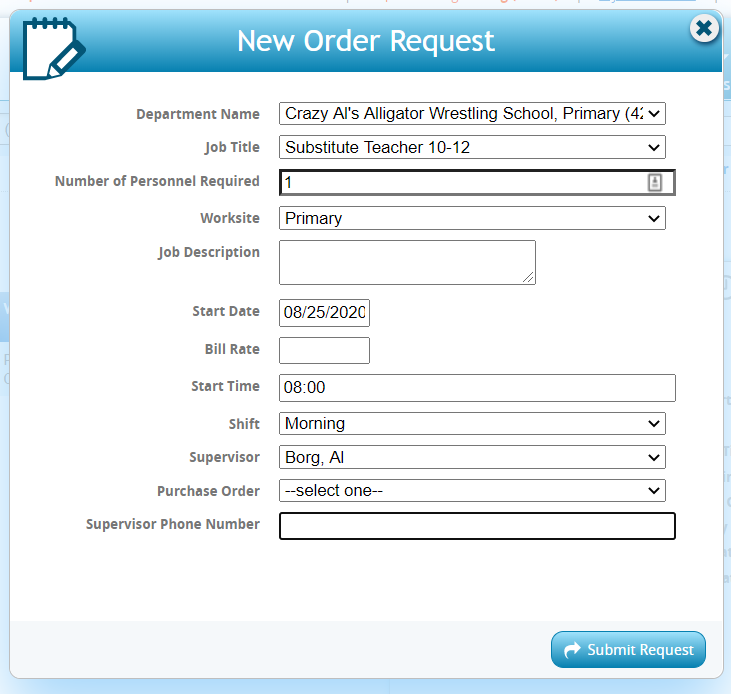
- Select Submit Request when done
 button near the top of the page
For more information on the Orders tab, check out Customer: How to Create and Submit Orders.
Substitute Requests & Closure Dates
If an order request encompasses school closure dates that are setup on the customer/education/calendar, the submitter will receive a message at the bottom of the order request form, and they will need to change the order dates so that the substitute is not scheduled over a school closure date.
Currently multiple orders will need to be submitted if for example the order is for 3 month maternity leave and during that time there is a two week winter break. The requester would need to enter one order for dates before winter break and another order for dates after winter break.
Below is an example of an order that was attempted to be submitted for dates that span a school closure.

Check out Education Module- Set up in Enterprise for more instructions on setting up closure dates.
Accepting an Assignment as a Substitute
When a substitute teacher logs into their WebCenter account they will be able to accept orders that are available to them.
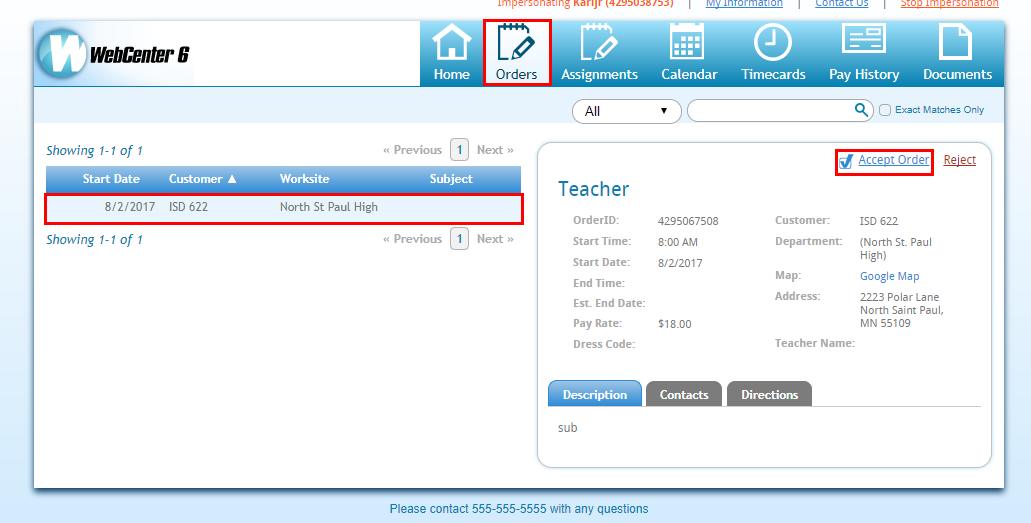
If the order has required documents and/or interest codes, these can be used to determine whether the job is visible to the substitute. If the substitute lacks an interest code/required doc that pertains to the order, the order will not be visible.
After the order has been accepted the substitute may view that assignment from the assignment tab of their WebCenter. Additionally, they will be able to create and submit timecards.
For more information regarding web time card entry check out Employees: How to Enter and Submit Timecards.