When it comes to Affordable Care Act fines and penalties, guesswork can be risky business! Our ACA tool will take the guesswork out of the equation, keeping you in compliance no matter what happens in Washington. It’s flexible enough to adapt to changing regulations in a timely manner.
View the Affordable Care Act webinar here: ACA - The Affordable Care Act Webinar
ACA System Settings - Administration
Prior to using the Affordable Care Act (ACA) functionality there are several settings for which you will need to make selections. These settings are in the administration area of TempWorks Enterprise.
To access the ACA setup in administration, choose all options/administration/employers. Select the employer (FEIN) you are setting up by double clicking on it in the grid list. In the left menu click on the ACA setup option.
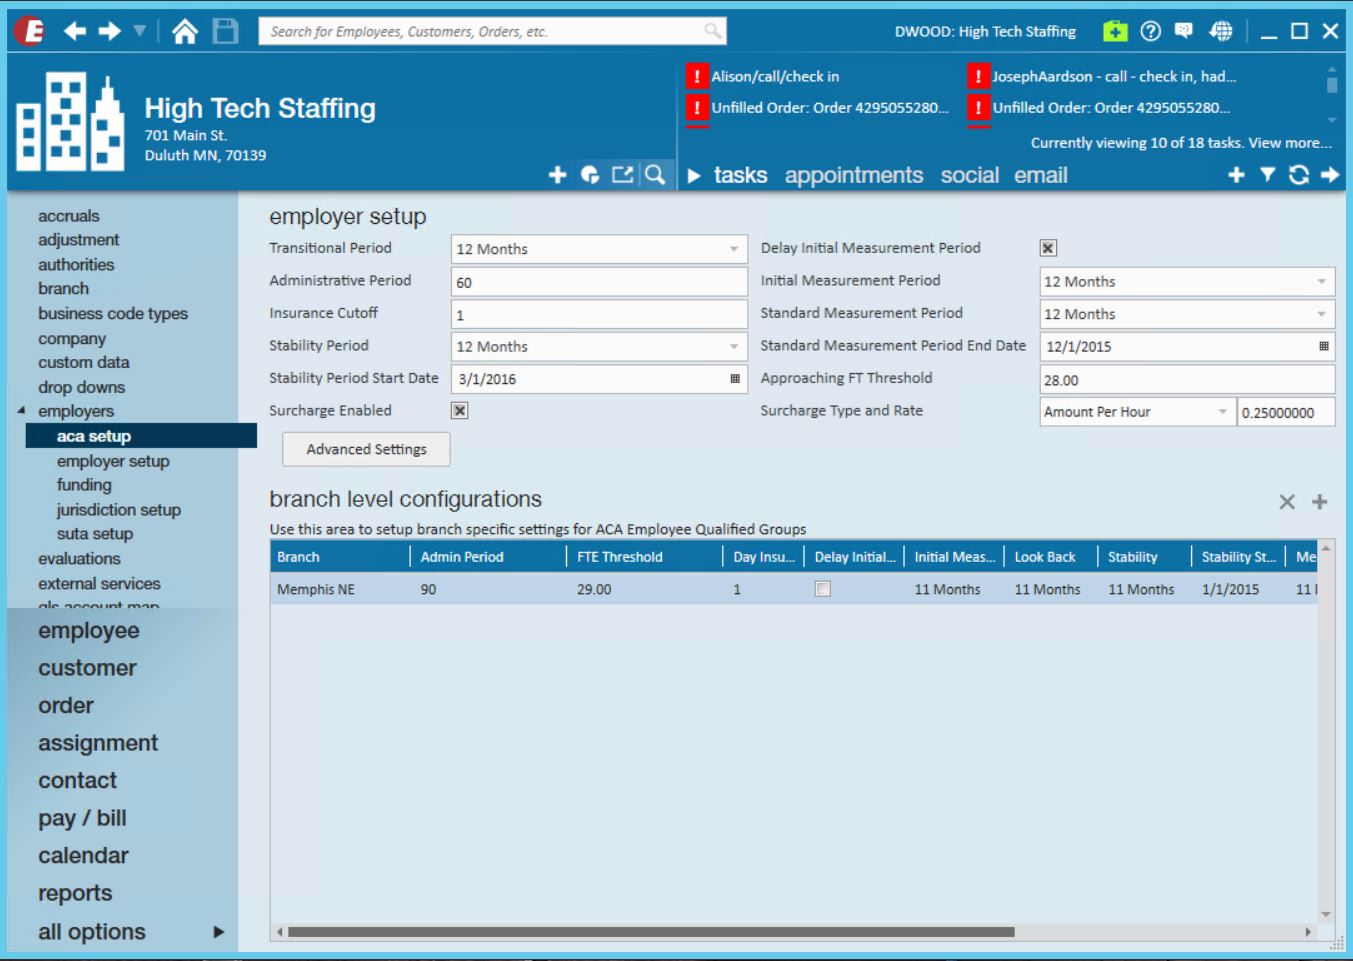
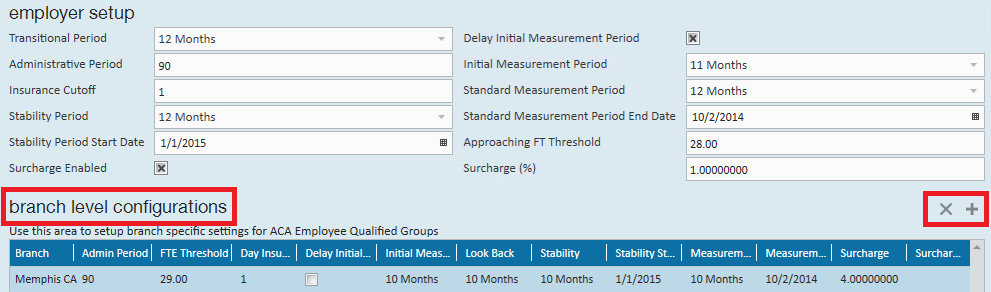
Employer Settings
Following is a list of the fields and what their function/purpose is in regards to ACA behavior in the system:
Transitional Period
Also known as the look back period. Select a length, in months, from the drop down field. Transitional period is used only for the initial start of ACA tracking. The rules for ACA change after the transitional period (sometimes referred to as the look back measurement period)
Things to take into consideration for your transitional period length are: the length of your selected administrative period in conjunction with your insurance plan year start date. After the initial transitional period the rules for the initial measurement period and stability period come into play.
Administrative Period
Enter a number of days in this field. The administrative period is the period of time between when an employee is eligible for insurance and the time that you must have them enrolled in an insurance plan. The maximum length of an administrative period is 90 days, however when selecting your administrative period you will want to take into consideration insurance enrollment dates as they correlate to hire dates. In other words; if your insurance enrollment only allows for beginning of the month enrollments (vs weekly) you may want to consider a 60 day administrative period.
* Note - Employees who are not being offered coverage will still be reflected in the administrative period.
Insurance Cut Off
Enter a number in this field. The insurance cut off is the day of the month that your insurance enrollment is due. This field will be used to calculate approaching non-compliance of enrollment for eligible employees.
Stability Period
Select a length in months from the drop down field. The stability period is the period of time after the start of the insurance requirement that any eligible employee regardless of ongoing ACA status must have insurance available to them. Your stability period may not be less than your transitional period or measurement periods.
Another way of looking at the stability period is it is the period of time between insurance open enrollment periods. So if your insurance enrollment period ends April 30th and reoccurs yearly, then your stability period would be 12 months long and start on May 1st. The significance of this period is if it has been determined that an employee should receive insurance, they may not have their insurance terminated until the end of the stability period unless their employment is terminated as well. E.g. John Doe worked 32 hours per week for the past year and we gave him insurance starting May 1st and have selected a 12-month stability period. On June 30th, John comes to us and lets us know that he is only able to work 20 hours per week due to family reasons. Due to the quality of John's work, we want to keep him around. Despite knowing that John is only going to be working 20 hours per week, we cannot revoke his insurance until May 1st of the following year without incurring penalties.
Stability Period Start Date
Select a date in this field. The stability period start date is the first date following the open enrollment deadline date, or you may look at it as the start date of your insurance plan coverage period.
Surcharge Enabled
Click to put an X in the box if you would like to activate ACA surcharges for your customers. An ACA surcharge is a percentage of billings that will be added to the customer invoices to recoup some of your costs associated with ACA.
Surcharge Advance Settings
If surcharges are going to be billed to help offset the cost of ACA insurance, you can also determine what hours, paycodes, adjustments, and offer statuses will be used to determine the surcharge amount.
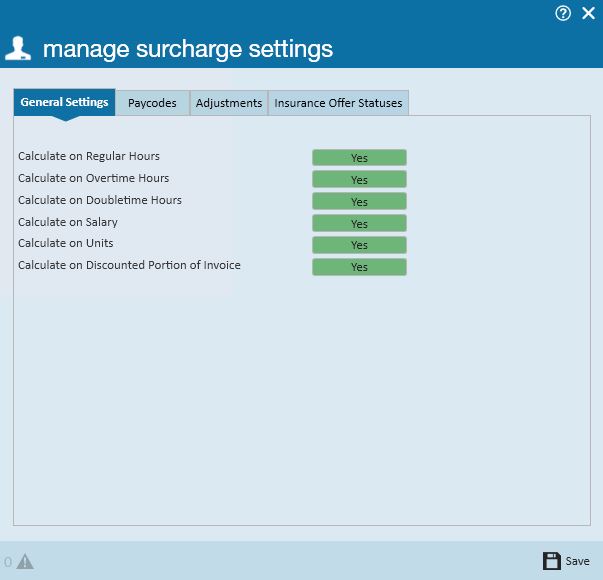
General Settings: Select each type of hours/pay that should be used in calculating the surcharge.
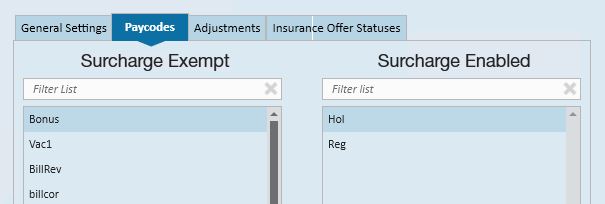
Paycodes: Select the paycodes that should be used in calculating the surcharge.

Adjustments: Select the adjustment codes that should be used in calculating the surcharge.
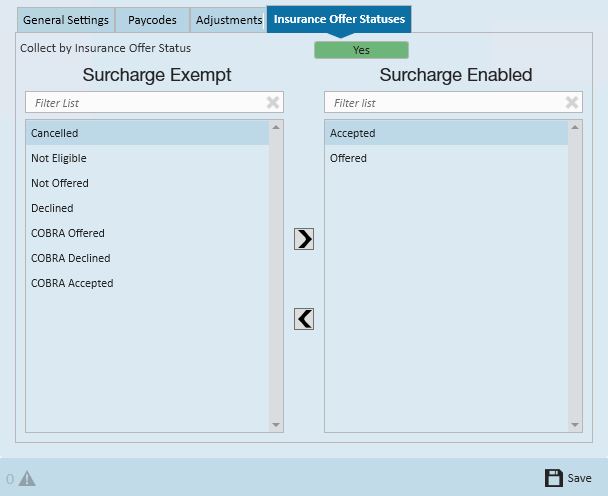
Insurance Offer Statuses: Select the insurance offer statuses that should be used in calculating the surcharge.
*Note - to select the options in the paycodes, adjustments, and insurance offer status forms click to select the options desired on the left (exempt) then click the right facing arrow to move the option to the enabled (right) side.
*Note - for insurance offer status only, if you would like to extend the surcharge based on status, make sure the yes/no toggle to set to yes.
Delay Initial Measurement Period
Click to put an X in the box if you would like the insurance coverage start date delayed to the first day of the following month after enrollment. You will want to check this box if your insurance company does not allow mid-month enrollments for employees. If this box is checked and you have a 90 day administrative period, the system calculations will take this into account when doing the insurance due date calculation. In other words you do not need to modify your administrative period to less than 90 days to accommodate the insurance coverage start date delay.
Initial Measurement Period
Select a length in months from the drop down field. The reason the initial measurement period exists is when a variable-hour employee starts working for you, you don't have any hour's history to determine their insurance eligibility and they might have begun working in the middle of the standard measurement period. Because it wouldn't be fair to you or them to judge simply based off of how much they worked in the remainder of the standard measurement period, the initial measurement period exists to give you time to gather that information before their eligibility is determined and you start facing penalties.
Standard Measurement Period
Select a length in months from the drop down field. The standard measurement period is used for employees who have worked the full number of months of your transitional period or your initial measurement period. When determining whether or not ongoing employees are eligible for health insurance, you look at the hours worked by those employees during the standard measurement period (or transitional period for year one of ACA). In order for an employee's ACA status to be determined based off of the standard measurement period, they must have worked the entire duration of the standard measurement period. In short, it is the period of time that you use to determine insurance eligibility for the next stability period.
Standard Measurement Period End Date
Select a date in this field. This is the date that your standard measurement period ends. The time between the end of your standard measurement period and the start of the next stability period is your administrative period. So, if your stability period starts on January 1st and your administrative period is 90 days, your standard measurement period must end no earlier than October 2nd.
Approaching FTE Threshold
Enter in a number of weekly hours in this field. This number is used in system calculations for any employees not coded with an ACA status of fulltime. This calculation uses the employee's average weekly hours during the current measurement period (either initial measurement or standard measurement depending on which period they are in) to flag the employee as approaching full time equivalent (FTE) status. These calculations will be performed during the daily maintenance procedure that is automatically run on your system.
Surcharge Type and Rate
Select the basis for the surcharge; percentage of payroll cost, amount per hour, flat rate per aIdent or percentage of invoice.
If you select percentage of payroll cost, the surcharge will be calculated based on the percentage of the cost of the payroll.
If you select amount per hour, this is the amount per hour billed (based on the ACA advanced settings selected) that will be added to your customer's invoices.
If you select flat rate per aIdent, the amount billed will be per employee being billed.
If you selected percentage of invoice, this is the percentage of the billings (based on the ACA offer statuses selected) that will be add to your customer's invoices.
Within the rate field enter the percentage or dollar amount appropriate for the surcharge.
*Note - You will have an opportunity on an individual customer and order basis to modify the amount or percentage specific to that customer/order. If the majority of your customers will not be charged this surcharge you may want to enable the surcharge and enter 0 as the percentage amount, then for the customers you will be billing this surcharge to; you may enter the actual percentage on the customer record. Adversely, if the majority of your customers will be charged this surcharge you may want to enable the surcharge, enter your companies' standard percentage in this field, and for any customers you do not wish to apply this surcharge to you may change the percentage to 0 on the individual customer records or uncheck the surcharge enabled box.
Branch Specific Settings
Adding Branch Specific Settings
The ACA settings that you select are applicable to all employee and customer records for the federal employer identification number (FEIN) that they are set up in. TempWorks allows the flexibility to apply a different set of rules for specific branches within the FEIN. This will most commonly be used for the allowable ACA exceptions for specific groups of employees.
To configure ACA setup for a specific branch click the plus sign to the right of configured branches. The following window will display:
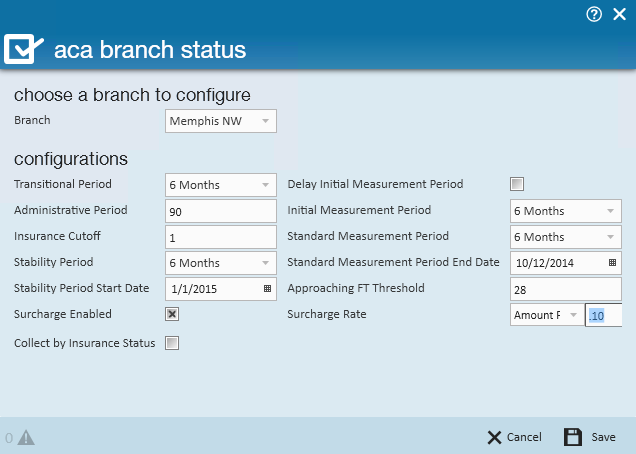
In the branch field, select the branch you would like to change the ACA settings for, then continue to make selections in the fields specific to the branch selected.
Click Save.
After you click Save, the branch specific setting will be displayed in the grid.

Deleting Branch Settings
To delete a branch setting, click to highlight the branch in the grid then click the X to the right of the configured branches settings. Your branch settings will be removed.
*Note - If you make changes to your ACA settings in the future, existing employee calculations will remain with the previous settings until their re-evaluation period at which time the system will apply the new settings.
TempWorks has added some settings validation to assist you in selecting your period lengths and start and end dates. This validation is as follows:
- Standard measurement period end date must be less than stability period start date
- Difference between standard measurement end date and stability start date must not be greater than 90 days
- Stability period to be greater than or equal to measurement period
User Security Roles
To allow users to see employee ACA coding information you must have the ACA security roles associated with the appropriate secroles. There are two security roles for ACA.
ACA general user - This user can see the employee ACA coding section in the employee/paysetup. They may enter hire dates, ACA statuses and insurance statuses. They MAY NOT change the ACA hire date on the employee after it has been saved.
ACA super user - This user can see the employee ACA coding section in the employee/paysetup. They may enter ACA hire dates, ACA statuses and insurance statuses. They MAY change hire date on an employee after it has been saved.
If neither of the ACA security roles are setup for a TempWorks secrole, users associated with that secrole will be unable to see the ACA employee setup information.
*Note - By default the servicerep role will be assigned ACA general user and payclerk role will be assigned ACA super user. Please contact your TempWorks support team to verify the ACA secroles are configured to your requirements.
Adjustments
As part of the ACA insurance regulations, an employee can only be required to pay a certain percentage of their gross pay for their portion of the contribution to the insurance costs. *Note - At the time of the writing of this documentation that percentage is 9.5%.
TempWorks has the ability to setup the employee adjustments and associate them with a corresponding employer adjustment. The system will use the insurance premium amount, the maximum percentage allowed for employee contribution and calculate the remainder as the employer contribution.
Insurance Premium - (Employee Gross Pay * Adjustment %) = Employer Contribution
Setting Up Employer Contribution Adjustments
The first step in setting up your ACA insurance adjustments is to setup your employer contribution adjustments.
To set up the adjustment, click on all options/administration then in the menu on the left, click on adjustments.
Click the plus sign on the right side of the window.
The following window will display:
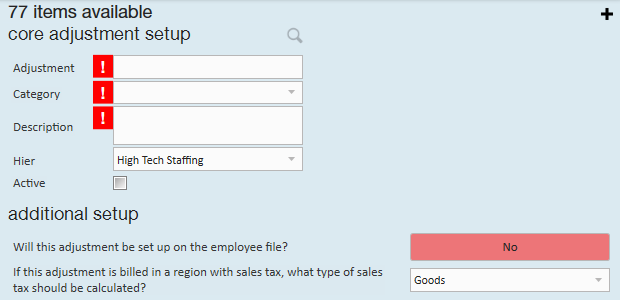
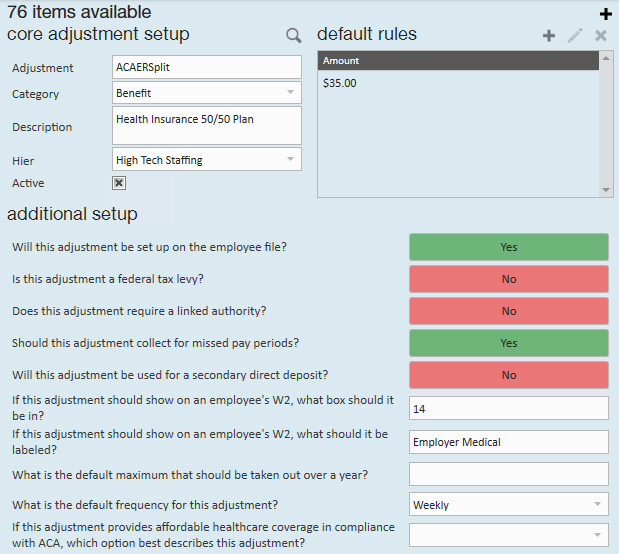
Core Adjustment Setup
Complete the information in the following fields:
Adjustment - Enter up to 10 characters to identify the adjustment.
Category - Select the correct adjustment category from the list. For employer portion adjustments you will need to select an adjustment category that is setup in your system as a benefit. They system will alert you when you save the adjustment if you have select employer portion for the adjustment but did not select a category that is set up as a benefit.
*Note - If you obtained new medical insurance for ACA compliance you may need to have an applicable category added to the adjustments category list.
Description - Enter in a detailed description for the adjustment. You may enter up to 150 characters.
Hier - Select the appropriate hierarchy for the adjustment. Because the adjustments honor the hierarchy; you are able to set up adjustments in a way that will prohibit adjustments from being set up for employees in areas of your hierarchy that do not have that particular adjustment available to them. Example: All of your employees are under one health insurance provider except your employee who work for your New Mexico branch. You may set up a different adjustment specific to the New Mexico health insurance provider and associate that adjustment to the New Mexico branch in your hierarchy.
Active - Check the Active box to make the adjustment active in the system. If you need to deactivate the adjustment at a later date you may deselect the checkbox.
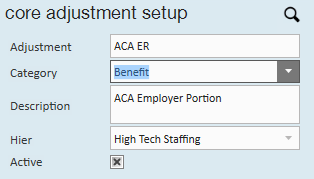
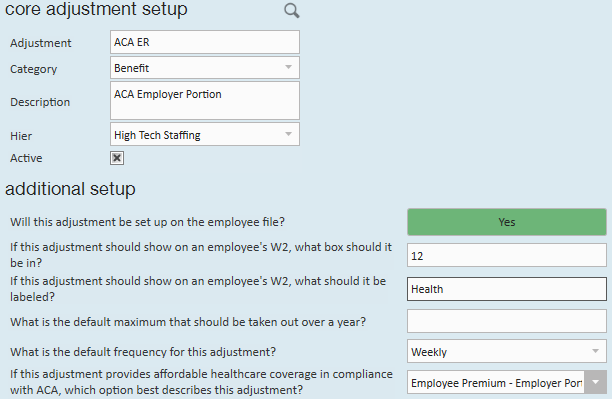
Following is an example of the setup for an employer portion medical adjustment for the core adjustment section of the window:
Additional Setup
After you select the active checkbox, you will need to complete the additional setup section of the window.
The first field in the additional setup section is will this adjustment be setup on the employee file? Click to display Yes in the answer field.
After selecting Yes, additional fields will display:
Go to the last field labeled if this adjustment provides affordable healthcare coverage in compliance with ACA, which option best describes this adjustment. Select employee premium, employer portion.
After selecting this option many fields will be removed.
Complete the remainder of the fields based on which box on the W2 you would like the Adjustment to show in and what W2 label you would like.
In the what is the default frequency for this adjustment field select from the dropdown field menu options.
Click the save button in the upper left: ![]() .
.
In the example below, the adjustment is an employer portion adjustment for employees who are paid weekly and their insurance will be deducted with each weekly paycheck.
Setting Up Employee Contribution Adjustments
The second step in setting up your ACA insurance adjustments is to setup your employee contribution adjustments.
To set up the employee contribution adjustment click on all options/administration then in the menu to the left click on adjustments.
Click the plus sign on the right to add the employee contribution.
The following window will display:
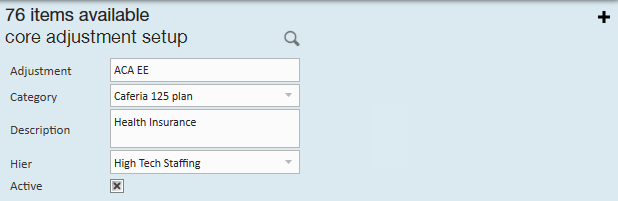
Core Adjustment Setup
Complete the information in the following fields:
Adjustment - Enter up to 10 characters to identify the adjustment.
Category - Select the correct adjustment category from the list. If you obtained new medical insurance for ACA compliance, you may need to have an applicable category added to the adjustment category list.
Description - Enter a detailed description for the Adjustment. You may enter up to 150 characters.
Hier - Select the appropriate hierarchy for the Adjustment. Because the Adjustments honor the hierarchy, you are able to set up Adjustments in a way that will prohibit Adjustments from being setup for employees in areas of your hierarchy that do not have that particular Adjustment available to them. Example: All of your employees are under one health insurance provider except your employee who work for your New Mexico branch. You may set up a different Adjustment specific to the New Mexico health insurance provider and associate that Adjustment to the New Mexico branch in your hierarchy.
Active - Check the Active box to make the adjustment active in the system. If you need to deactivate the adjustment at a later date you may deselect the checkbox at that time.
Following is an example of the setup for an employee portion medical adjustment for the core adjustment section of the window:
After you select the active checkbox, you will need to complete the additional setup section of the window.
Additional Setup
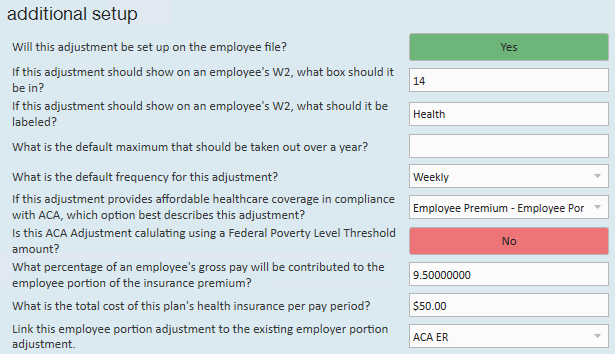
The first field in the additional setup section is will this adjustment be set up on the employee file? After selecting yes, additional fields will display.
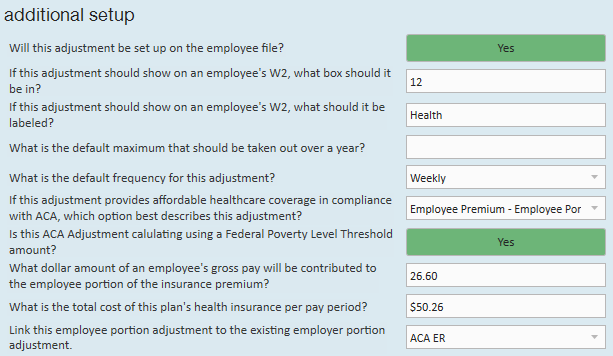
Go to the last field labeled If this adjustment provides affordable healthcare coverage in compliance with ACA, which option best describes this adjustment? Select employee premium, employee portion.
After selecting this option some fields will be removed and some will be added:
Enter in the W2 box and label information.
If there is a default yearly maximum for the adjustment enter that amount in the what is the default maximum that should be taken out over a year field.
In the what is the default frequency for this adjustment field, select the appropriate frequency for the adjustment.
Is this ACA adjustment calculated using a federal poverty level threshold amount?
If yes, you will prompted for the flat amount which has been calculated.
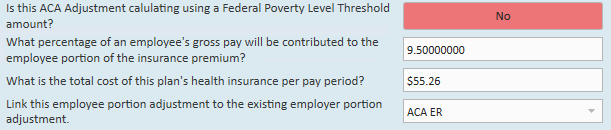
If no, you will be prompted for the percentage, which, at the time of this writing is 9.5%:
In the what percentage of an employee's gross pay will be contributed... OR what dollar amount of an employee's gross pay will be contributed... field, enter the percentage or rate. For the percentage calculation, at the time of the writing of this documentation, the maximum allowable deduction is 9.5% of gross pay. The dollar amount, if using the federal poverty level threshold, needs to be calculated for the pay period amount.
In the what is the total cost of this plan's health insurance per pay period field, enter a dollar amount based on your per employee insurance premiums. For example, if you are setting up an adjustment for weekly pay frequency you will enter the weekly insurance cost. If you pay weekly but your insurance premiums are quoted to you by your insurance company as a monthly premium, consult with your insurance provider for the weekly amounts to be deducted. Depending on the insurance provider, your premiums may be based on calendar month or may be based on a 4 week increment.
In the link this employee portion adjustment to the existing employer portion adjustment field select the corresponding employer portion you previously set up.
When done, click the save button in the upper left.

In the example below the adjustment is an employee portion adjustment for employees who are paid weekly and their insurance will be deducted with each weekly paycheck.
Based on the setup examples above, when the Employee ACA adjustment is setup on an employee, TempWorks will look at the employees' gross pay, deduct the $50 weekly insurance premium from their pay. If however the employees earnings are low enough where $50 represents more than 9.5% of their gross pay, the system will deduct 9.5% of their gross pay for the employee portion of the insurance premium and the remainder of the $50 insurance premium will be placed under the Employer ACA adjustment.
Tip: An ACA report is available which will allow you to report on the ACA employer portion contributions. This report can be found in the reports sections of TempWorks titled ACA Employee Adjustments.
*Note - If your insurance provider has different premiums for different groups of employees (by age, different levels of plan, etc) you can either setup one adjustment for the insurance and then adjust the rates on a per employee basis, or you can set up one adjustment for each group of employee/premium combinations.
*Note - At the time of the writing of this document, the ACA regulations require that insurance be offered to employee dependents 25 years of age and younger. However, the employer does not need to contribute to the insurance premium regardless of the cost to the employee vs. their gross pay. You may also, as an employer, offer insurance to employee spouses but it is not required For both cases you will want to have a separate adjustment code set up for dependent/spousal insurance. For the dependent/spousal adjustment code you will not associate it with an employer portion adjustment and therefore you will not incur any employer cost for this insurance offering.
*Note - if you are using a general ledger feed from TempWorks, you may need to adjust your general ledger account mapping to accommodate the new adjustments you are setting up for ACA insurance.
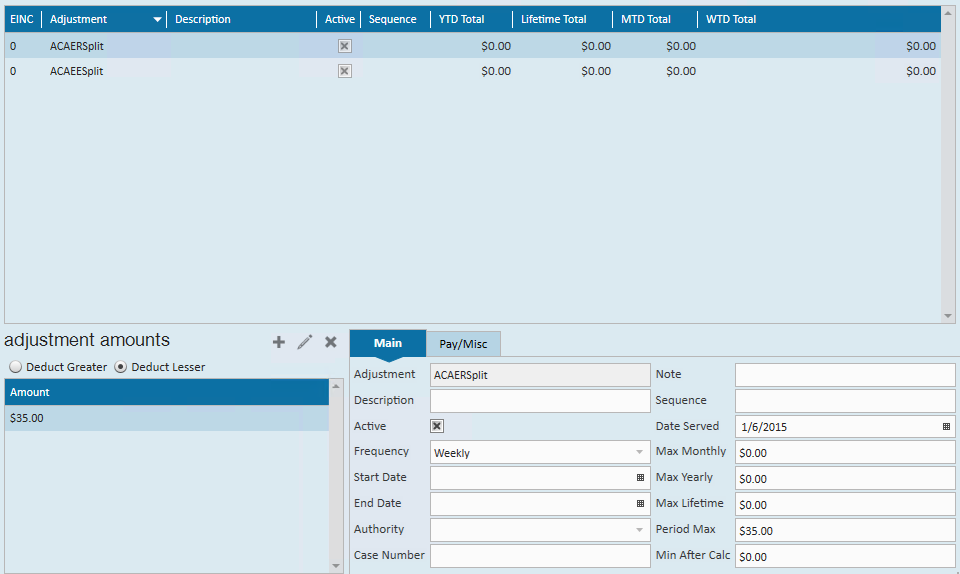
*Note - Additional adjustment scenario: If you are calculating a premium split but you still need to not deduct an amount over the 9.5% from the employee's gross wages.
For instance: The total of the premium per week may be $70.00 You may want to share the cost with the employee where you each contribute $35.00. In this scenario, the employee would be responsible for $35.00. You would pay the additional $35.00. However, if the $35.00 employee portion is greater than the 9.5% maximum limit of the gross for the employee for a given week, the employee would be responsible for less than $35.00.
Example:
Employee earns $9.00/40hours = $360.00
9.5% of employee gross wages = $34.20
In this case the employee cannot be asked to contribute the additional $.80
To handle this you will set up the employee adjustment and link it to the employer benefit adjustment as usual.
Using the example above, when setting up the employee adjustment, you will identify it as an ACA employee adjustment with a maximum of 9.5% with the total cost to the employee of $35.00 and should be linked to the employer benefit adjustment.
This combination will track the employee's responsibility and, if the dollar amount exceeds the 9.5%, it will track the overage which you will need to pick up because this adjustment is linked to the employer ACA benefit adjustment.

*Note- An additional benefit adjustment must be set up and added to the employee's record to track the employer's original benefit responsibility. This adjustment should NOT be linked to the ACA employer adjustment.
*Note- When setting up the ACA insurance adjustment on the employee's record, the employee's portion and the additional benefit adjustment must both be set.
Related Articles
- None