Within TempWorks users will have the ability to setup journal entry exports by charting accounts, mapping bank accounts, running reports and more. This will guide you through a step by step process to setup a Journal Entry export.
In order to export your GL journal entries, you must first setup your accounts and map the correct items, as applicable.
Use the following steps to setup or update your GL Journal Entry Export:
- Create Your Chart of Accounts File
- Import Your Chart of Accounts
- Run the GL Journal Entry Report
- Locate & Update GL Account Mappings
- Export the finalized GL Journal Export Report
Step 1: Create Your Chart of Accounts File
To properly import your accounts, a consolidated chart of accounts will need to be created utilizing the template linked below.
*Note* If you have multiple entities and require different mappings for each, please fill out one template for each entity.
*Note* For the template, please open the following: COA TEMPLATE.xlsx.
Step 2: Import Your Chart of Accounts
Once a consolidated chart of accounts has been created, these accounts will then need to be imported into Enterprise.
- Navigate to Enterprise > Pay/Bill.
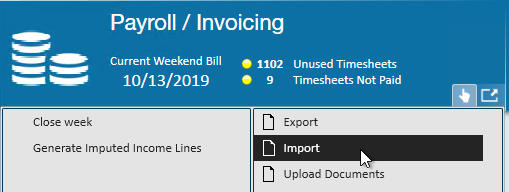
- Select the "Actions Menu" at the top of the page:
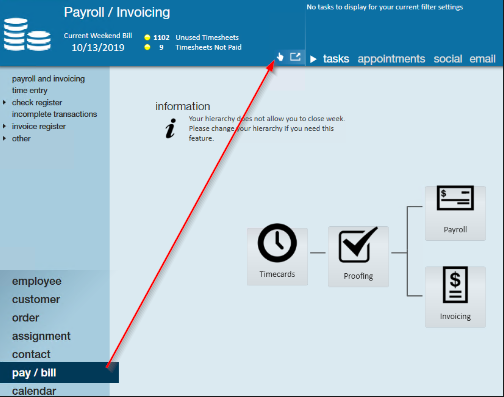
- Select "Import":
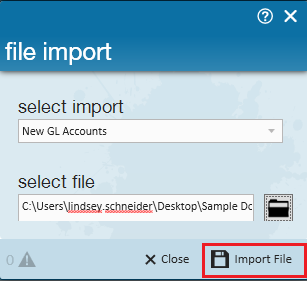
- Select the "New GL Accounts" option from the "Select Import" drop down menu.
- Select the
 under "Select File" to choose the CSV file you created and saved from Step 1.
 - Once selected, choose the "Import File" option:


 under "Select File" to choose the CSV file you
*Note* If an error window populates, something is incorrect within the COA list you are trying to import.
Please read the error message and make the corrections to the file as directed.
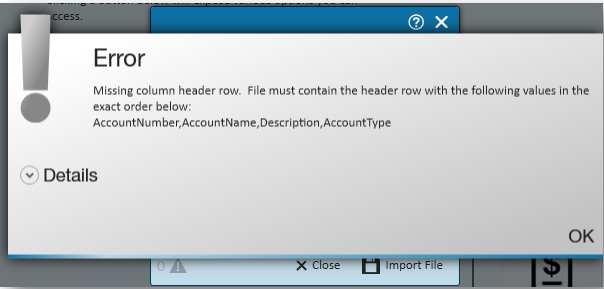
If no error message has populated, this indicates that the COA list imported successfully.
If you need to add additional GL accounts at a later time, you can use this same import to create those in Enterprise.
Step 3: Run GL Journal Entry Export Report
This report will be what is exported out of Enterprise and into your accounting software. When this report is executed, it will generate mappings for any new taxes, adjustments, paycodes, worker comp codes, etc that were used within the date range used to run the export. At this time, please disregard the results as these will not be automatically mapped to your accounts. The mapping correction will be handled in the next step.
*Note* Running this report is required before you are able to map your accounts in Enterprise.
- Navigate to the Reports > GL Journal Entry Export report located within the Exports report group.
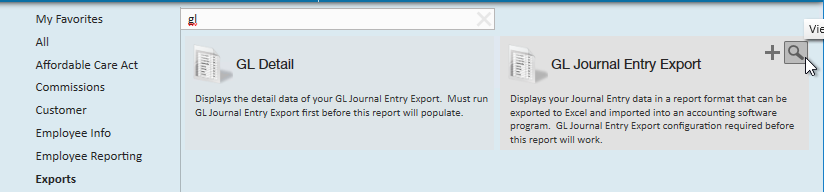
- Click "View Report". This will cause the report to open up on a new window.
- Enter the weekend bill date for a closed week:

- Select View Report.


*Note* The system will only setup mapping for an item that has been processed. This means that the system will not create a a GL account mapping for a payroll tax or a worker comp code that is setup in the system but has never been used.
Step 4: Locate & Update GL Account Mappings
At this point in the process, your accounts will have been successfully imported. The next step in the process is to map your accounts to the items available within Enterprise.
Please follow the below instructions on how to locate these mappings in Enterprise.
To Locate the Chart of Accounts:
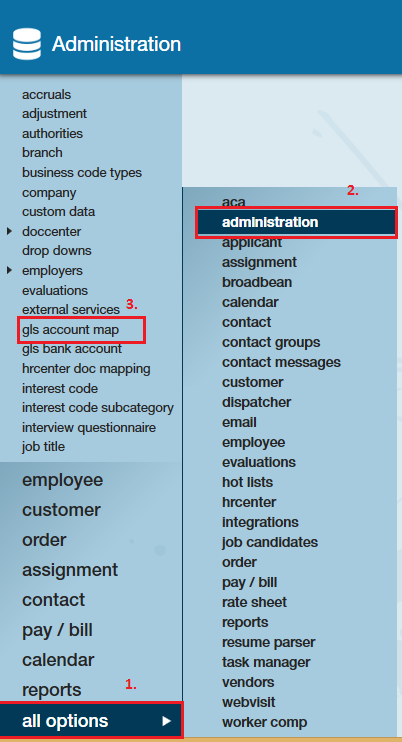
- Navigate to Enterprise > All Options > Administration
- Select "GLS Account Map" on the left:

How to Map Bank Accounts
Now that you have located your accounts, you may need to update some of the account settings in Enterprise Administration.
- Navigate to Enterprise > All Options > Administration.
- Select "GLS Bank Account" on the left.
- Select one of the bank accounts listed.
- Set the "GLAccount" information at the bottom:
- GLAccount- Net Check: This is the GL Account that the system will use to book all of the net check amounts to
- GLAccount- Invoice Payments: This is the GL Account that the system will use to book all of your cash receipts/invoice payments that you enter into TempWorks with an action code of "Payment"
- Select "Save".
Because each company's General Ledger is unique, we leave both options available to accommodate those that map to separate accounts.
If you only have one account, select the same account for both "Net Checks" and "Invoice Payments".

Now that you have populated your GL account mappings by running the GL Journal Entry Export, it is time to update/configure them to use your GL accounts instead of the system default accounts.
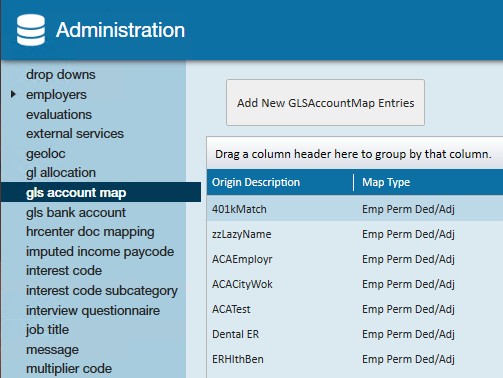
- Navigate to Enterprise > All Options > Administration.
- Select "GLS Account Map" on the left:
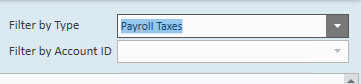
- Optionally, use the filters on the right to narrow down the fields you are looking for:
- For each item that pertains to your general ledger, select the correct GL debit and/or credit accounts:


*Note* For clarification on these listed map types, please reference the following article for the GL Map Type List.
Notes on Clearing Accounts
- For Adjust Payroll account mappings:
- Since some taxes/adjustments have both an expense and a liability account (employer paid taxes/adjustments) you will adjust the GL Debit Account ID to adjust the expense account and the GL Credit Account ID to adjust the liability account that the tax is going to.
- For taxes/adjustments that do not have an expense account, only adjust the Credit account.
- Adjust Sales account mappings:
- For the sales side of things, we also use a wash account just like the CLEARING - Payroll Summary account on the Payroll side.
- The Sales wash account is “CLEARING - Uninvoiced Revenue”, account number 9992. Therefore, whenever you see a mapping sent to the “CLEARING - Uninvoiced Revenue” account, you will only be able to change the account mapping on the other side.

*Note* If a mapping has a branch associated with it, that is a specific branch override mapping, meaning any items for that branch will go to the accounts specified on the branch GL account mapping record instead of using the system wide GL account mapping. If you need to setup branch specific GL account mappings, please make a note of the accounts that need to be broken out by branch so they can be discussed with TempWorks Support or TempWorks GL Technicians in a call that will occur at the beginning of Phase 3 of the GL process.
Once you believe that you have mapped all of the items in the GLS Account map section to your accounts, we recommend that you go back and re-run your GL Journal Entry Export report to confirm that all items have been mapped to your accounts.
At this point, if any items are still mapped to default accounts, you will need to go back and ensure they are mapped to your accounts.
*Note* Please validate the last page of the GL export report to confirm the accounts are completely mapped and your GL is in balance:

Step 5: Export the Finalized GL Journal Entry Export Report
Now that everything is mapped to the GL account(s) of your choice, it is time to export the journal entry and import/enter it into your accounting system.
- Navigate to Enterprise > Reports > GL Journal Entry Export report located within the "Exports" report group:
- *Note* If you are exporting to QuickBooks or have a custom Journal Export, you will want to select that report instead.
- Select "Run Report". The report will open in another window.
- Enter the weekend bill date for a closed week:
- Select "View Report".
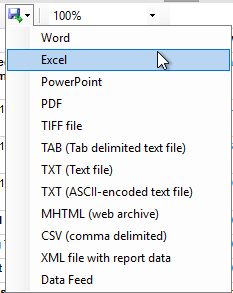
- Choose the "Export" option in the report view to save as an Excel, CSV, etc:

Now that you have your file exported and saved on your computer, you can either manually key in or import the file into your accounting software.
*Note* If you are exporting to QuickBooks, please follow the link to access our online guide on how to export your report and import the information into QuickBooks using the Transaction Pro Importer here.
Once you have finished mapping your GL accounts, you are ready to begin Phase 3 of the GL install process. At this point, please reach out to your TempWorks Support team or TempWorks Account Manager to begin the process of adding in customizations to your General Ledger if needed. Please come prepared with a list of accounts that you need customization added to, including but not limited to:
- Adding branch specific mappings
- Conditional mappings
- Notating sub-accounts