Order Requests in WebCenterTM
WebCenter can be configured to allow customer contacts to submit their job order requests directly to your team through WebCenter making it faster for your sales or recruiters to review, accept and finalize order information which gives the recruiters more time to fill the order. This article walks through a few configuration options you have to utilize this functionality while staying true to your processes.
For an overview of what the customer sees check out Customer: How to Create and Submit Orders.
There are 3 steps to customize Order Requests for you:
- Setting up Order Request Configurations
- Customizing Your Order Form
- Turning on Order Requests for Contacts
Step 1: Setting up Order Request Configurations in WebCenter
*Note* You must be set up as a WebCenter Admin in order to configure the order requests functionality.
Before we turn on order request option in WebCenter, it's important that it is configured the way you want it.
To Find Order Request Configurations:
- Log into WebCenter Administration
- Navigate to the Configs tab
- Select the Order Category

All the config options in this article will be in green.
Setting up Order Workflow Type
Order workflow types decide if additional approval is needed before an order can be accepted by the staffing company. You can set up a single or multiple contacts that are considered "approvers" for an order. These contacts will need to review and approve any orders that are created/submitted in WebCenter. 
*Note* These workflow types may be customized to fit your needs. For more information talk to our support team.
Order Workflow Types Available:
- Instant Order Approval - Automatically approves submitted order
- Single Order Approval - Only 1 contact is set to approve the order
- Simple Multiple Order Approval - Multiple contacts are set up as approvers, all receive an email and any one of them can approve the order.
- Priority Multiple Order Approval - All approvers are sent an email but must approve in order.
- All Multiple Order Approval - Multiple contacts are set up as approvers, all receive an email and all have to approve the order.
- Priority Order Approval - Email is sent to the first approver, once they approve the order an email is sent to the second, etc.
Each customer you work with may want to utilize a different workflow type so identify which customers would like to use which workflow first.
Set up the Order Workflow Type Rules:
Once you have worked with a customer and decided which workflow type you wish to use, you need to create rules for when a workflow type will apply. You can different workflows for each customer.
- In WebCenter Admin, navigate to the Configs tab
- Select the Order category on the left
- Select the "Show Rules" option to the right of "Order Workflow Type"
- Select a Filter (ex. customer or user role)
- Enter a Value (ex. specific customer name)
- Select the Order Workflow Type
- Click Add Rule
*Note* Any rule change or addition can take up to 15 minutes to apply to WebCenter.
Choosing Order Approvers
Once you have selected your order request workflow type, you may need to determine who needs to approve these orders (If you are utilizing the instant order approval, than there is no need to set up approvers). Depending on the workflow type selected, more than one contact may need to be setup . You have two options for choosing approvers.
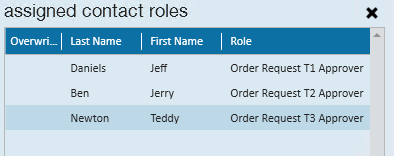
Anyone set as an approver will be able to review orders in the pending category and approve/reject the request:

You have two options for choosing approvers:
Option 1: Manually Setting up Approvers
If approvers will always be the same or you want to have approvers set up for a customer, you will need to setup contact roles for the contact approver(s). Make sure all approvers have their own contact record (see How to Add a Contact to a Customer vs. How to Add a Contact Role for more instructions).
- In Enterprise, navigate to the customer record details page
- Select the
 icon next to contact roles.
 - Select the contact
- Select the + next to the available role
- For approving orders, use Order Request T1 Approver.
- If you are adding multiple contacts utilize the Order Request T2 & T3 for the additional approvers
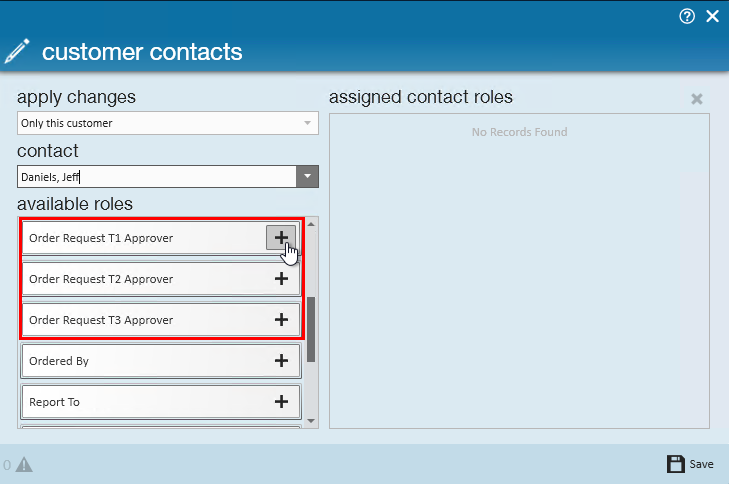
- Repeat until all necessary approvers have been added
- Select Save
 icon next to contact roles.

Option 2: Allow Selecting of Order Request Approvers
This option is best for when the approver is always changing depending on the order request. It will allow the contact that is creating the order request to choose the correct contact to approve each time.
To turn this option on:
- In WebCenter, navigate to configs tab and choose the Order category
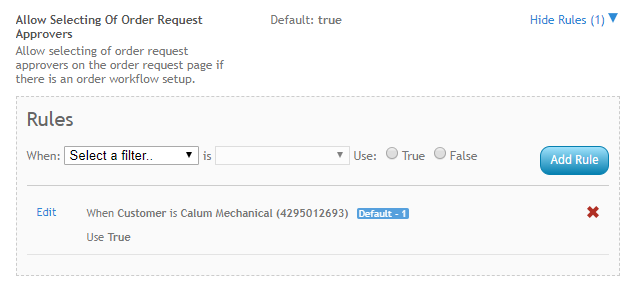
- Find 'Allow Selecting of Order Request Approvers' and show rules
- If this is set to false by default, you will want to add a rule to turn this option on
- Select a Filter (ex. customer or user role)
- Enter a Value (ex. specific customer name)
- Select 'True'
- Click Add Rule
When a contact creates an order request they will be able to select the Order Request Approvers:

Additional Configurations to Consider:
There are a lot of additional options that you can choose to customize by customer, contact or user role that can change the orders tab in WebCenter. Here are a few additional configs to consider when setting up orders:
- Associate Orders by Department - This configuration option groups orders by the department they are created in (see Departments vs. Worksites for more information)

- Include Open with Filled - When this configuration is set to 'True' it will show any order with an open status under the filled category for the contact (See Customer: How to Create and Submit Orders for more information on where and how this displays for the contact).

- Allow Unlocking of Order Requests - When this configuration is set to 'True', it will allow a contact to unlock and edit an order request that may be in the process of being approved.

- Check Closure Schedule configuration is setup for our Education Module users only.


Step 2: Customizing Your Order Form
Now that you have determined the order workflow, you need to set up what is included on the order form that contacts are submitting. You can have as many order forms as you need and they can be customized for each customer.
Create Order Request Form
- In WebCenter Admin, Navigate to the Order Form Tab

- Select

- Name the form (ex. Use "Generic Form" for the basic request form that most will use or use [company name] for a specific order form for a customer)
- Drag and drop any fields you do not want them to fill out to the inactive side
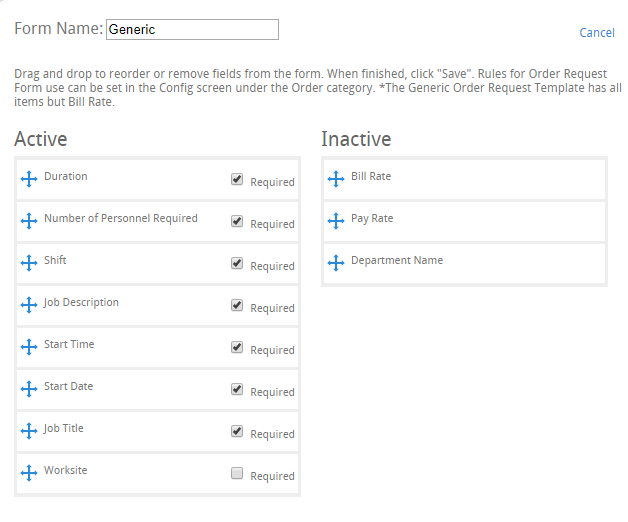
- Uncheck any fields that are not required
- Select


*Note* You may have different fields to select from depending on your database.
Choose Which Contacts Use Which Order Form(s)
Now that your order form has been created, you will need to tell WebCenter which contacts/customers use which form.
- In WebCenter Admin, navigate to the Config tab
- Select the order category on the left
- Select the show rule option next to Order Request Form
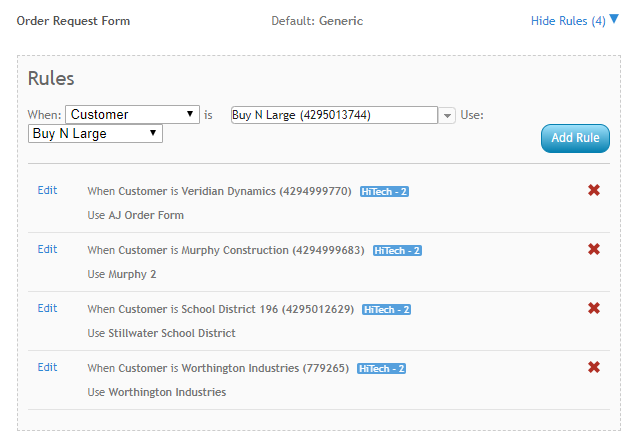
- Create a New Rule
- Select a filter (ex. customer)
- Select a value (ex. customer's name)
- Select the Order Form name (ex. Generic or Customer name)
- Select Add Rule

Configuration Alert:
There is one additional order config that can effect your order form. Some of the order fields will be listed as a drop down menu for a contact to choose from (ex. shift or job title). If you want to limit the options that a customer has to choose from you may have different custom procedures set up and selected under the Customer Order Request Drop Down Procedure rule. These procedures will need to be set up by our support team.
Step 3: Turning on Order Requests for your Contacts
Once all your options have been configured to your liking, it's time to turn the configuration for contacts to utilize.
Each Contact Will Need:
- Web User Account (see Manage Web User Account for more information)
- WebCenter Contact Role with Order tab available (for more information on contact roles see WebCenter Contact Roles)
- Have 'Allow Order Request/Copy' Configuration to be set to 'True'
- In WebCenter Administration, Navigate to the Configs Tab and choose the Customer category
- Select the show rules option under Allow Order/Request Copy
- Create rule by selecting customer or contact, entering customer or contact name and selecting true.
- Select Add Rule