
What is the Zipwhip Integration?
Zipwhip’s texting-for-business integration allows you to text candidates and employers directly from TempWorks and automatically archive conversations to the relevant employee or contact record.
*Note* This integration requires additional setup and an existing account with Zipwhip. For more information, please contact your TempWorks Account Manager.
Setting Up the Zipwhip Integration
Once you have your account with Zipwhip and have worked with your TempWorks Account Manager to set up this integration, use the following steps to get you and your users ready for Zipwhip.
This Article Includes:
Giving Users Access to Zipwhip
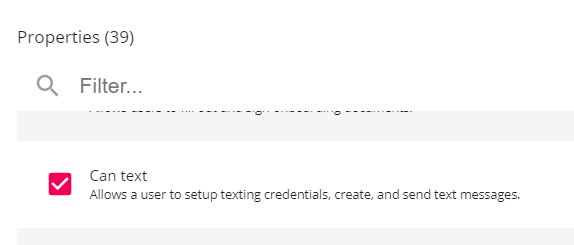
Each user that you want to be able to text in the system will need the "Can Text" Permission in order to set up their credentials and text in Beyond. This permission is typically set up by an Admin.
- Navigate to B Menu > System Settings > Security > Permissions
- Either:
- Add users to any group that already has this permission OR
- Create a new group with the Can Text permission checked and add users to it (remember that users can only be part of one permissions group and will inherit all the permissions that you check.
Looking for more information? Check out Beyond - Managing Security Groups
Users will also need to be apart of a message action security type to see the messages on employee records.
Entering Credentials
Once you have the correct permissions, each user will need to enter their Zipwhip credentials in user settings. Admins can manage Zipwhip accounts in Zipwhip administration. Having each user have their own credentials will allow the system to track who is sending the text messages and allow them to continue the conversation in Zipwhip.
Each user will need to have their own unique Zipwhip username in order to accurately track in Beyond which user sent which message.
There will be two types of credentials that will need to be entered for Zipwhip:
Entering Credentials at System Level (Admins only)
Each system will need one set of credentials set at system level before users can set up their own accounts.
- Navigate to B Menu > System Settings > External Service > Texting:
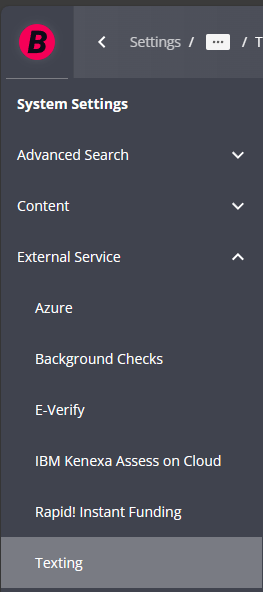
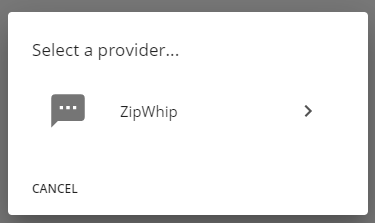
- Select the "+" in the upper right
- Select "Zipwhip" as the provider
- Enter credentials provided by Zipwhip (including username, phone number, and password)
*Note* When entering in a username, it must not include special characters including "@", parenthesis, dashes, hyphens, etc.
- Select "Submit"
- The credentials will be saved for you to view
- Select the "Test" option to make sure your credentials are up-to-date with Zipwhip
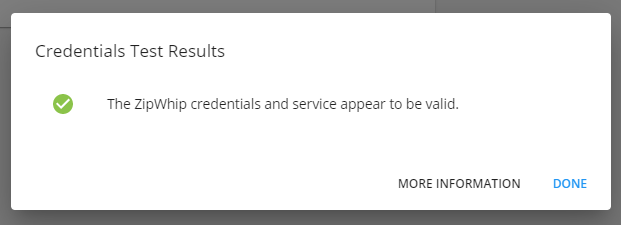
- Select the "Test" option to make sure your credentials are up-to-date with Zipwhip


Entering Credentials at User Level (For All Users)
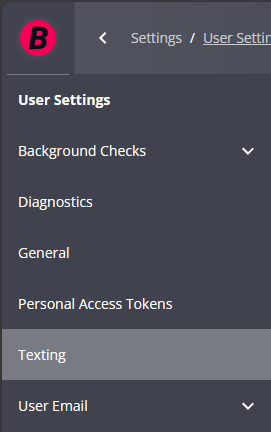
Each user with the texting permission will be able to add their own Zipwhip account under user settings.
- Navigate to B Menu > User Settings > Texting:
- Select the "+" in the upper right
- Select "Zipwhip" as the provider
- Enter credentials provided by Zipwhip (including username, phone number, and password)
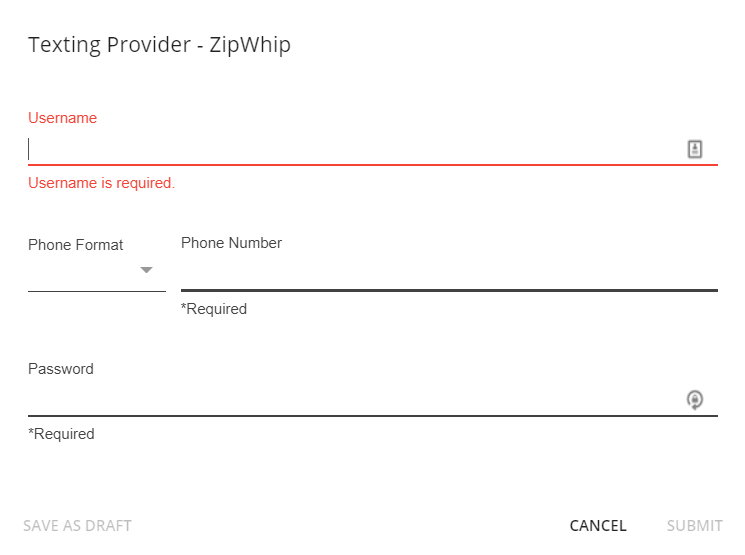
*Note* When entering in a username, it must not include special characters including parenthesis, dashes, hyphens, etc.
- Select Submit
- The credentials will be saved for you to view
- Select the Test option to make sure your credentials are up-to-date with Zipwhip
- Select the Test option to make sure your credentials are up-to-date with Zipwhip

