Overview
Single Sign On (SSO) allows you to control access to Beyond using your own Identity Provider instead of having users log in with their TempWorks credentials.
This allows you to use your Identity Provider to enforce whatever sign in requirements you see fit, including things like multi-factor authentication, password strength requirements, or requiring the user to be logging in from a certain IP range or corporate network using corporate credentials.
Currently, SSO works with Beyond and the Outlook Add-In, and the same settings are applied to both products.
*Note* This integration does require initial setup by TempWorks.
For more information about getting this setup, and pricing inquiries, please contact your TempWorks Account Manager.
This article covers the following:
Prerequisites
Before being able to complete the setup of SSO in Beyond, you must have completed the following:
- Initial setup finished by TempWorks.
- Configure your chosen Identity Provider to enable SSO and gather information to be entered into Beyond.
Once those items are complete, the setup is able to be finalized within Beyond using the instructions outlined below.
*Note* While you have the ability to use any major Identity Provider that utilizes the OAuth 2.0 protocol using OpenID Connect, TempWorks clients have seen immediate success using Azure AD (Active Directory).
The following is a basic setup example within Beyond, using Azure AD as the Identity Provider.
Setting Up SSO in Beyond
To setup SSO within Beyond, you will need the following Identity Provider information:
- Identity Provider URL: “https://login.microsoftonline.com/{YourAzureTenantId}” with the [YourAzureTenantID] being the "Directory (Tenant) ID" from Azure AD.
- Client ID: This is the "Application (Client) ID" from Azure AD.
- Client Secret: This is the "Client Secret" from Azure AD.
- Claim Name: This is "upn" for setups using Azure AD.
*Note* If you have not completed the initial setup with TempWorks, you will see the following banner when navigating to B Menu > System Settings > Security > Authentication > Methods:

Permissions
In order to setup SSO within B Menu > System Settings > Security > Authentication, access must be granted to this page via the "Can Administrate Authentication" along with the "Can Administrate" permissions.
By default, these permissions have been added to the "TempWorks Default - Administrator" Security Group.
For users utilizing custom Security Groups, the above permissions will need to be added to your intended Security Groups.
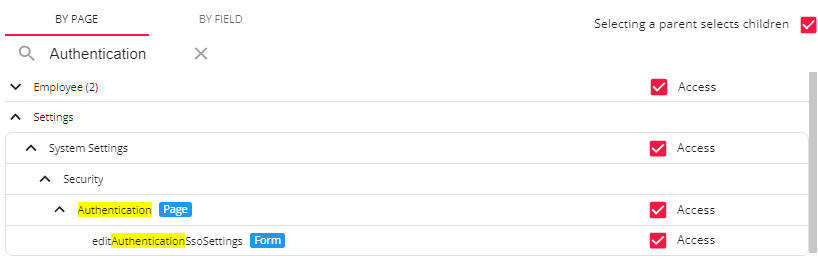
*Note* For users utilizing Security Groups with Advanced Permissions, please add access to the "Authentication" page and "editAuthenticationSsoSettings" form to the Security Groups that require the functionality:
For more information on creating custom Security Groups with Advanced Permissions, please see the following article titled Beyond - Creating Security Groups with Advanced Permissions.
Authentication
Once the proper permissions have been granted to the intended users, SSO is able to be setup within B Menu > System Settings > Security > Authentication > Methods:
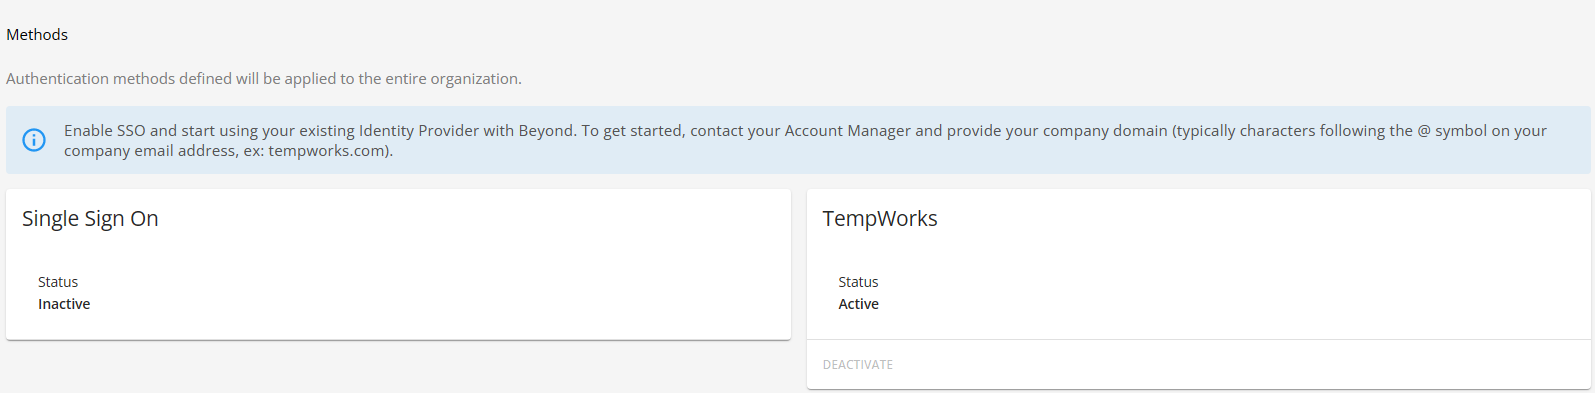
Within the "Single Sign On" card, select "Edit" to open the "Edit SSO" window:
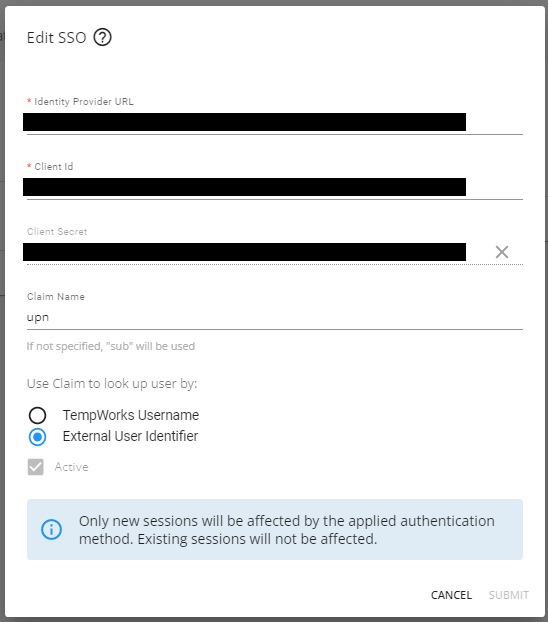
Within the "Edit SSO" window, you will need to add the following information from your Identity Provider:
- Identity Provider URL: “https://login.microsoftonline.com/{YourAzureTenantId}” with the [YourAzureTenantID] being the "Directory (Tenant) ID" from Azure AD.
- Client ID: This is the "Application (Client) ID" from Azure AD.
- Client Secret: This is the "Client Secret" from Azure AD.
- Claim Name: This is "upn" for setups using Azure AD.
*Note* If you have not gathered the above information during the setup of the Identity Provider, please do so by following the instructions outlined within the article titled Single Sign On (SSO) Identity Providers.
Once the information from the Identity Provider has been added within the intended fields, select "External User Identifier" for how the claim is being used to look up the user:

*Note* These options are used as a link between the TempWorks user and the user within the Identity Provider and are NOT used as credentials when logging into Beyond using SSO.
Depending on the Identity Provider selected, the following must be considered:
- Can the Identity Provider tell TempWorks what the TempWorks Username is?
- If yes, select "TempWorks Username"
- If no, select "External User Identifier"
For our example using Azure AD, the answer to the question is "no", so we select "External User Identifier".
*Technical Note* So how can the Identity Provider tell TempWorks what the TempWorks Username is?
- After the user signs in, the Login Server requests the "openid" and "profile" Scopes from the Identity Provider.
- The TempWorks Username needs to be included in one of the Claims returned by the Identity Provider for these Scopes, as in, the value of the Claim needs to be the exact TempWorks Username.
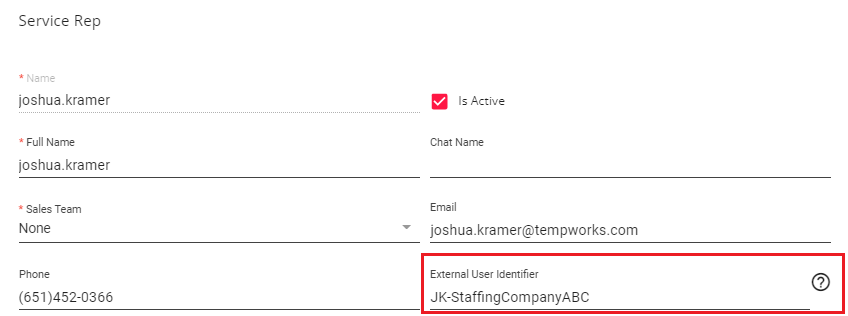
This identifier will need to be configured on a per-service rep basis within B Menu > System Settings > Service Representatives > External User Identifier:
*Note* In this example, the "External User Identifier" will need to be the company specific username for that service rep, NOT the TempWorks username.
Once all the information has been added/verified within the "Edit SSO" window, select "Submit" to save the changes and complete the setup of SSO.
Utilizing SSO in Beyond
Once the setup is complete, your users are now ready to sign into Beyond using SSO.
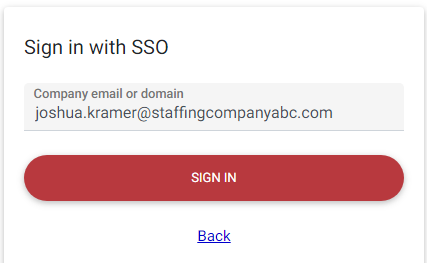
Begin by navigating to Beyond and selecting "Sign In With SSO":
Within the "Company email or domain" field, enter your company email (e.g., joshua.kramer@staffingcompanyabc.com) or domain (e.g., staffingcompanyabc.com) and select "Sign In":
*Note* This is going to be your specific company email or domain. For example, "joshua.kramer@staffingcompanyabc.com" for the email or "StaffingCompanyABC.com" for the domain.
You will now be navigated to the sign on page related to your company.
Enter your company provided username and password and select "Submit":
*Note* This is going to be your specific company username and password.
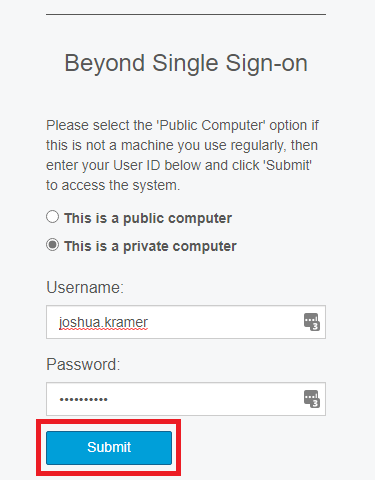
Upon selecting "Submit", you will be navigated directly into your instance of Beyond.
Additional Information
Activating/Deactivating Login Methods
As an Administrator, you have the ability to allow only logging in via SSO, only logging in via TempWorks credentials, or both.
To deactivate the ability to log in using TempWorks credentials, please do the following:
- Log into Beyond using SSO
- Navigate to B Menu > System Settings > Security > Authentication > Methods
- Select "Deactivate" within the "TempWorks" card
- Select "Deactivate" within the confirmation prompt
To deactivate the ability to log in using SSO, please do the following:
- Log into Beyond using TempWorks credentials
- Navigate to B Menu > System Settings > Security > Authentication > Methods
- Select "Deactivate" within the "Single Sign On" card
- Select "Deactivate" within the confirmation prompt
To activate logging in using TempWorks credentials and/or SSO, please do the following:
- Log into Beyond
- Navigate to B Menu > System Settings > Security > Authentication > Methods
- Select "Activate" within the "TempWorks" and/or "Single Sign On" card(s)
- Select "Activate" within the confirmation prompt