How to Manage Billing Setup
When setting up billing on a customer record in Beyond there are a few questions one might ask themselves. How often is a customer invoiced? What do the invoices look like? Who are invoices sent to? Is this person mailed a physical copy of the invoice or do they receive it by email? All of these can be answered from the 'Billing Setup' expanded page on the customer record beside 'Invoice Setup' in Beyond.
This article will walk users through understanding the different cards located in the 'Billing Setup' expanded page.
Navigate to Customer > Invoice Setup > Billing Setup:
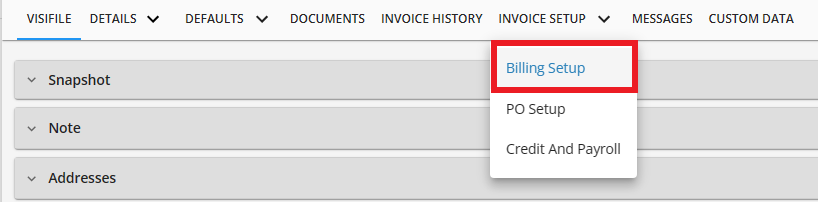
Cards
There are six distinct cards that make up the billing setup area on a customer record.
Actions
This card will display information regarding the relationship of the record to the invoicing it will receive. This is most relevant when working with customers that utilize departments, as it will control which record will receive invoicing for the record you are setting up.
For example, will this department be billed separately or will it apply it to it's parent customer record.
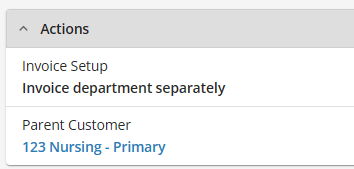
*Note* A primary record will never be able to apply its billing to another record as it is the parent of all its departments records.
Invoicing

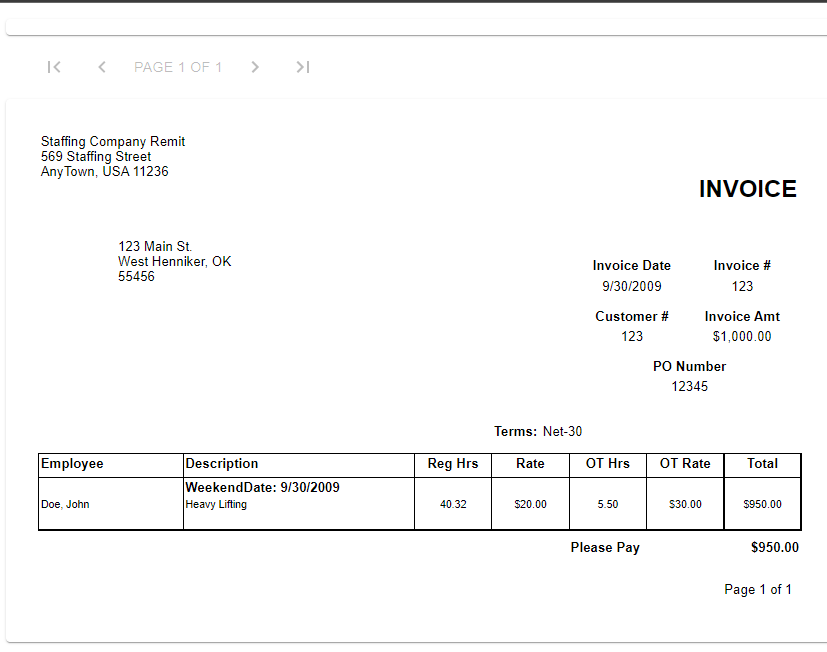
Style: The general invoice design that the customer will be receiving. Each TempWorks client has a unique invoice style drop-down containing specific invoice designs.
If you are using our generic style types:
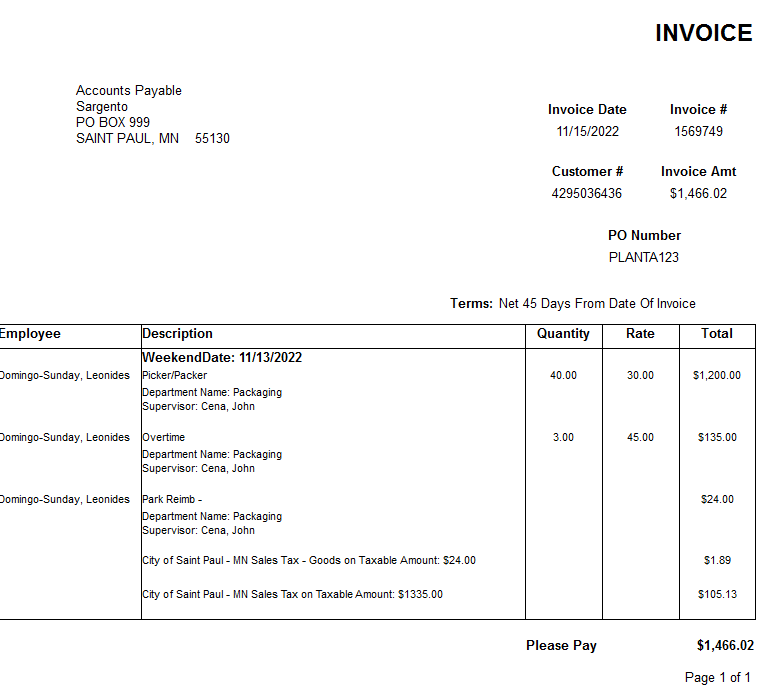
- Invoice S Type: (Single Pass) Will have everything for one transaction in one line
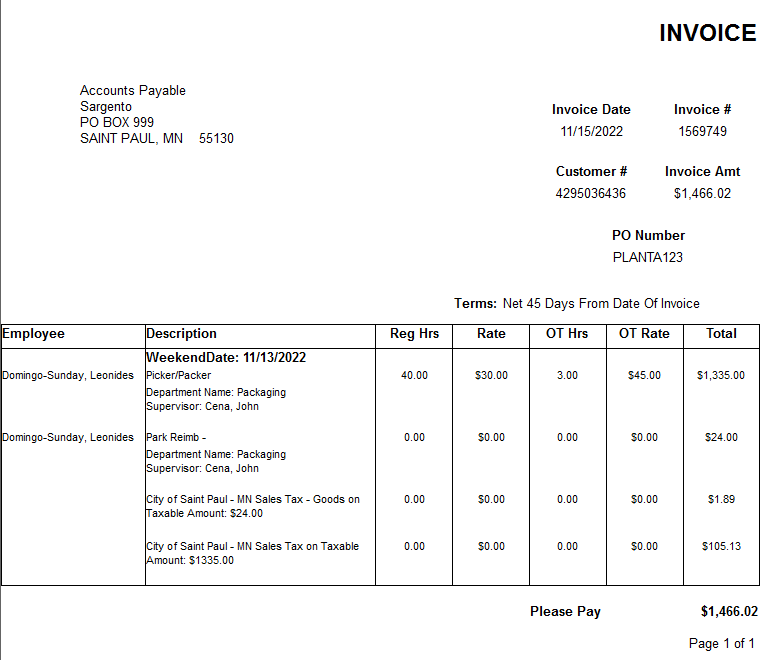
- Invoice T Type: (Triple Pass) Will separate out Regular, OT, and DT on separate lines


*Note* The invoice style is the look and feel of the invoice, it may include different logos, fonts and graphics. Please consult with your administrator to become more familiar with your styles.
You may also have an invoice style labeled "Invoice WebCenter - Approver" which will show the name of the supervisor who approved the time on each line. This should only be used if you are utilizing WebCenter timecards and are having customer contacts approve the time.
By selecting the  icon within the "Invoicing" card, you can preview the selected invoice style:
*Note* Only standard invoice styles are able to be previewed, including "Invoice T Type", "Invoice S Type", and "Invoice - WebCenter Approver". Selecting a non-standard/custom invoice style will result in the preview icon stating the following:

If you would like your custom invoice style(s) to be able to be previewed within Beyond, please contact TempWorks Support.
*Note* There are no additional permissions required to preview the invoice style. As long as the user has access to the "Invoicing" card, they will also have access to preview the invoice style.
*Note* Invoices can also be previewed within the "Invoice History" tab of the customer record.
Selecting the invoice within the "Invoice History" will show a preview that utilizes the invoice style currently selected within the "Billing Setup" of that customer record:


If the customer record has an invoice style selected that is not able to be previewed, the invoices within the "Invoice History" will not be able to be previewed.
Invoice Method: Determines how the customer will be receiving the invoice.
*Note* When a method is selected that includes emailing the invoice, users will be prompted and required to add an invoice recipient. This can be added to the 'Invoice Recipients' card. Once one is added you may change the invoice method to one that includes email.
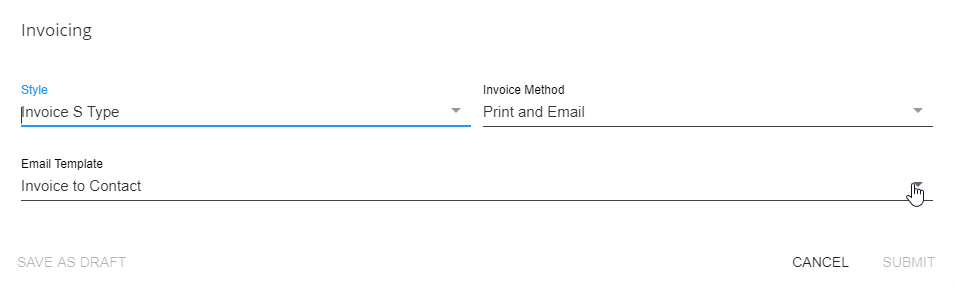
Email Template: If/when an email invoice method is selected, the email template determines what will be included in the body of the email on a recurring basis.
Invoice Recipients

To add an invoice recipient, select the  button.
This will open a wizard where you can add invoice recipients from a list of contacts on the customer record:
*Note* This drop-down will only include all active contacts that belong to the customer you are currently viewing.

Once selected, decide which email address the invoice will be sent to in the "Method Type" drop-down:

Next, select the appropriate attachment type that will be included within the invoice email:
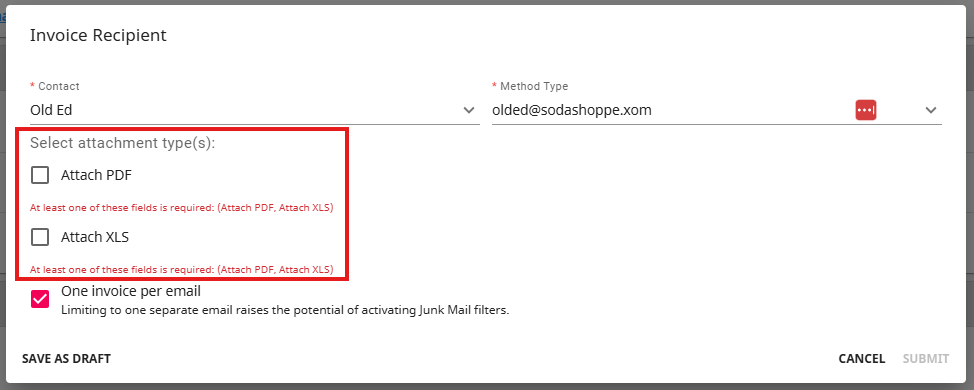
Select whether each invoice will be sent out with individual emails or if all invoices will be attached to a single email via the "One invoice per email" checkbox:
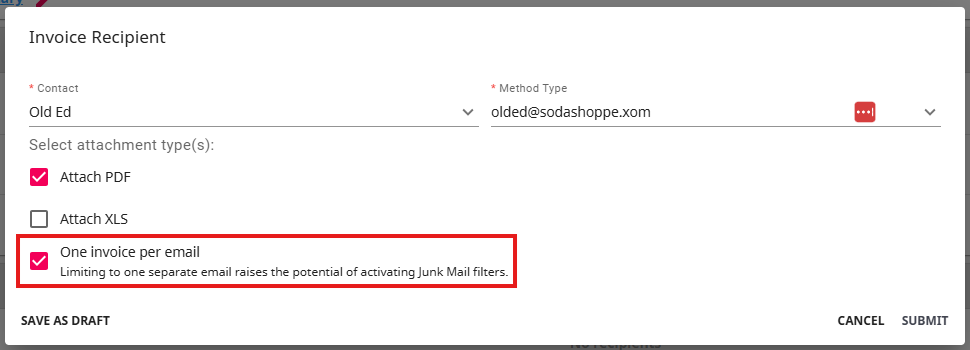
Select "Submit" to complete the setup of the invoice recipient.
*Note* Once the setup is complete, you have the option to either "Edit" or "Delete" the invoice recipient after selecting the  to the right:

Billing Schedule
This card shows billing frequency (weekly, biweekly, or monthly) and any additional invoice notes. If users select biweekly or monthly, they will be asked to specify at what point in the cycle the invoice should be created.

Select the  icon in the upper right to edit the options.
*Note* Selecting a billing frequency of monthly will prompt for which week of the month the invoice should be sent. If the invoice should be sent at the end of the month, ignore billing cycle should be selected since there are sometimes 4 weeks, sometimes 5 weeks in a month.
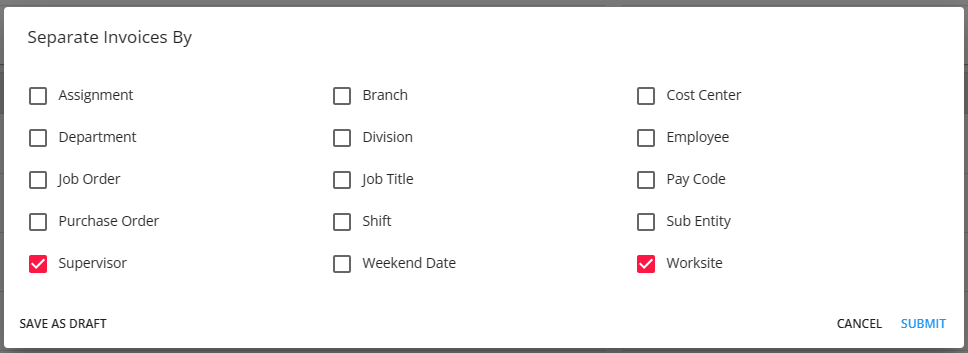
Separate Invoices
This card displays/controls if there is an instance where a separate invoice should be created for a customer.
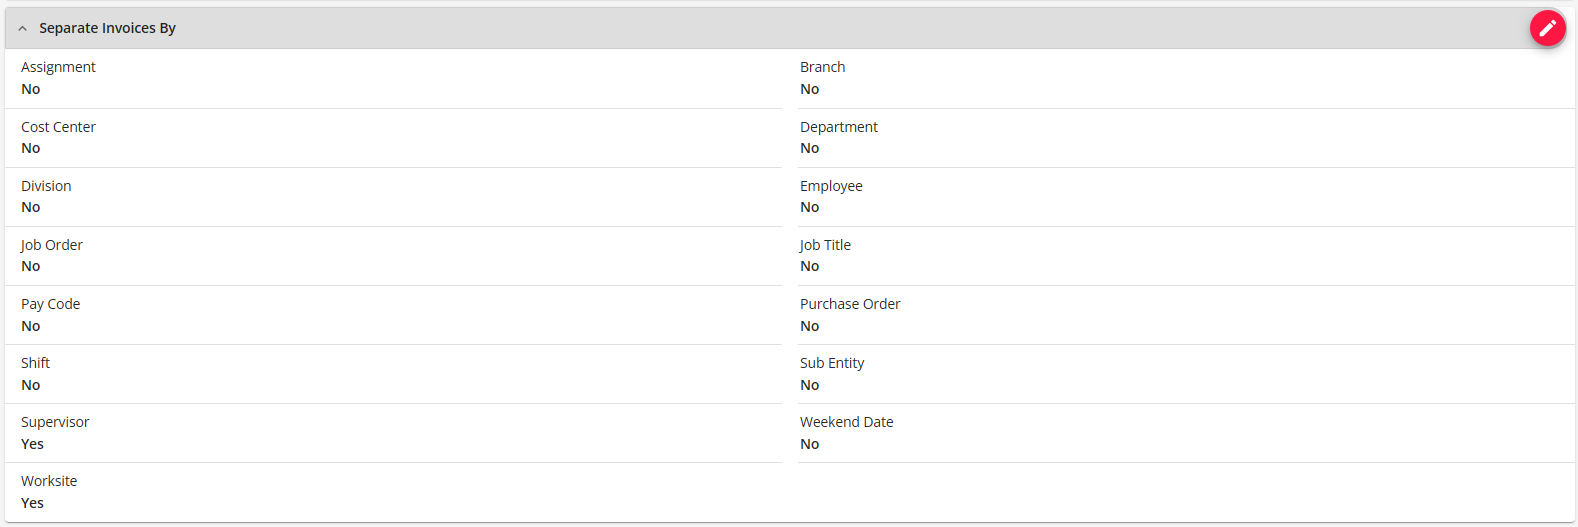
By editing this card, you may simply note how the invoices should be divided by selecting the check box(s) beside each category.
For example, in the image below, we've selected to have the invoices separated by supervisor and worksite, every time the customer is invoiced for a different supervisor and/or worksite they will receive a separate invoice:
With this in mind, consider the following...
Let's say we are billing for the company "Real Steel" and they have two different supervisors for their orders. Each of those supervisors are in charge of assignments for their two worksites. How many invoices will this customer receive? The correct answer is four, one for each worksite and supervisor combination. If we were only creating separate invoices for each worksite, we would have two invoices.
- Assignment - Selecting assignment will create a different invoice for each assignment created for that customer.
- Department - Selecting department will separate invoices for each department of the customer we are tracking.
- Job Order - Selecting order will create a different invoice for each order called in.
- Purchase Order - Selecting PO will create a different invoice number for each PO number used.
- Supervisor - Selecting supervisor will give you a different invoice per supervisor identified on the order of each assignment.
- Branch - Branch refers to the number of branches (or offices) your staffing company has. Please consult your administrator for any questions regarding your branches.
- Division - The division refers to the type of job. For example, clerical vs. industrial vs. health care vs. hospitality. Please consult your administrator for any questions regarding the divisions of your job titles as these are managed by your company.
- Job Title - Selecting job title will create a different invoice for each job title filled.
- Shift - Selecting shift will create a different invoice for each shift among orders in the customer record.
- Weekend Date - Selecting week end will produce a different invoice for each different week ending being billed (late timecards).
- Cost Center - Separate by different cost center codes (if your company uses cost center).
- Employee - Selecting employee id will create a different invoice for each employee assigned to the customer.
- Sub-entity - If your company is using sub-entity codes, selecting this option will give you a different invoice per sub-entity code used.
- Worksite - Worksite refers to the different physical locations you would be sending people to work.
*Note* Here is an example of the difference between separating by Assignment vs. Employee ID:
We send Joe to ABC Company on Monday, he does a great job, but his job ends on Monday. ABC Company asks for Joe to come back to a different job on Thursday.
If you are separating by Assignment, you will have two invoices. If you separate by Employee ID, you will have one invoice with both jobs billed on that one invoice.
Invoice Line Items
Adding an invoice line item will include the type selected with each listing on the invoice.
For example, if you had selected PO Number the PO Number would also be included with the employee's name, job title, hours worked, etc., per transaction listed.
