When you hire a new service rep or when an existing service rep changes roles, locations, job functions, etc. you may need to update their access in Beyond. Your service reps include anyone using Beyond.
This article will review the different security information located in system settings to help manage your users as an admin.
*Note* In order to see system settings or manage users you will need to have the "can administrate" permission. If you are missing this functionality and you are the Admin for your team, reach out to your TempWorks' Account Manager or our TempWorks' Support Team.
Managing Service Representatives
The first step to managing your users is to find your user list and all their security information. Before navigating there, we recommend setting your Hierarchy level to system, subsystem, or whatever your highest level is in order to be able to see and interact with all users.
- Navigate to
 > System Settings
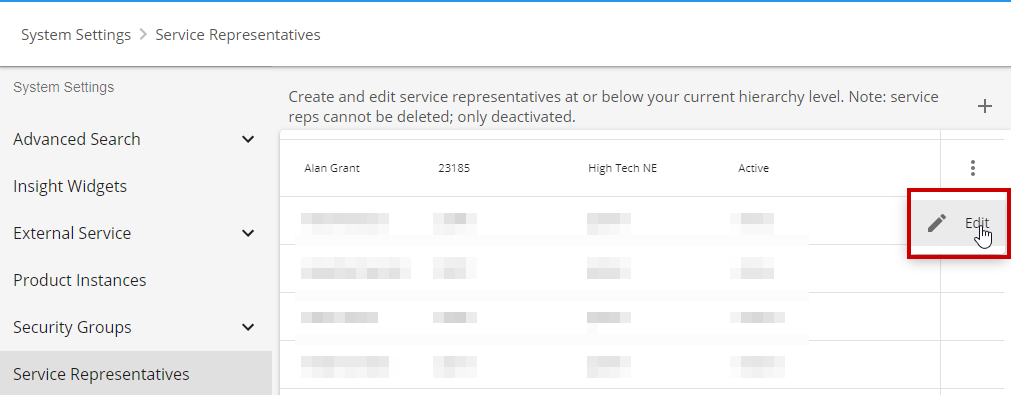
 - Select Service Representatives on the left
 > System Settings
This will display a list of all your users. You can edit any users whose hierarchy is under your current hierarchy level.
Looking to Add a New User?
If you are a hosted client (meaning your software is not on your own server), then always make sure to add your users via Bridge. This will make sure the user is added to the TempWorks' full system and sets the user up with an active directory log in. Once your user is added, then you can fine tune their security and information in Beyond.
To Edit a User:
Select the  to the right of the rep you wish to edit. This will show all their service rep information.
We will break down the options for each service representative into four groups:
Basic Information
The basic information section at the top of the service rep page will give you a quick snapshot of which user you are editing.
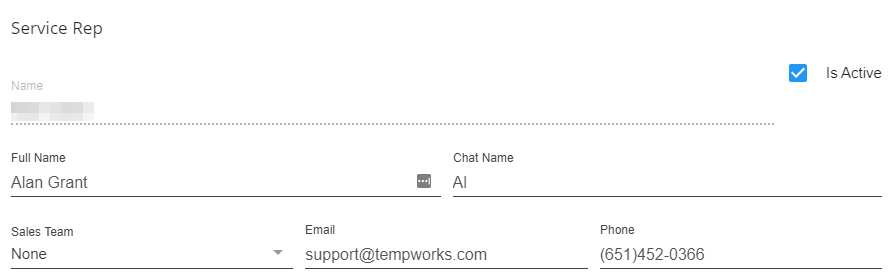
- Name - this is the username they use to log in with and must not contain spaces.
- Is Active - this checkbox in the upper right will determine if the user is active and able to sign into Beyond. If you are a hosted client, we recommend deactivating users from Bridge.
- Full Name - the full name of the service rep. This will be shown when logging messages, etc. in Beyond
- Chat Name - if you are using live chat functionality, this will be the name displayed to the employee you are chatting with.
- Sales Team - if they are part of a sales team in your system, you can set it as a default here for commission and reporting purposes.
- Email & Phone Number - Files contact information for your admin purposes. May have additional custom functionality.
Hierarchy Settings
Hierarchy is our first set of security, managing what records users can or can not view or interact with. Every system, just like every staffing company, is unique. Check out Beyond - Hierarchy for more information on hierarchy options.
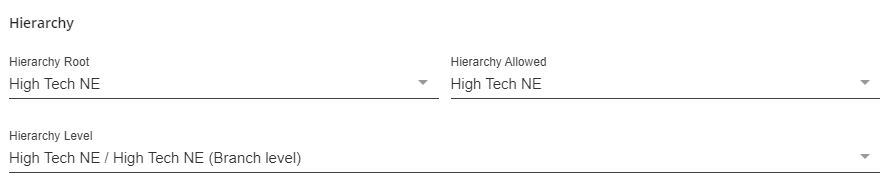
- Hierarchy Root - This field determines when your name is an option in drop downs such as staffing specialist or account manager. For example, if I set my Hierarchy Root to the High Tech NE branch then reps set to a hierarchy where they do not see records in the NE branch (ex. SW branch) then they will not be able to set this rep as the staffing specialist, interviewed by, account manager, etc.
- Hierarchy Allowed - This is the highest level the rep can get to in your hierarchy. Some people you may want to limit to just one branch while others might need to see all of one entity or even the whole system. Keep in mind internal vs. external branches when making these choices.
- Hierarchy Level - This will be the set level the rep is currently viewing the next time they log in. In the example above, the rep would be set to High Tech NE branch at branch level so they could only see records for that particular branch.
*Note* If you change hierarchy settings for a user who is currently logged in, it can affect what they are currently working on. We recommend letting the user know you are making the change and have them log out and log back in once the changes have been made to ensure their system is up to date.
If you change their hierarchy level, you may also be prompted to re-select their security groups if their current security groups are outside their new hierarchy allowed.
Security Groups
Security groups breaks up permissions related to what a user can see and interact with in Beyond. This includes reports, documents, fields, messages, and more. In the service rep section, you can see which security groups your user is a part of and quickly change the groups from here or by navigating to the Security Groups section in system settings. 
Security groups are broken up into types to make permission setting easier for you:
- Permissions
- Advanced Permissions
- Custom Data
- Customer Status
- Document Type
- Message Action Type
- Reports
- Insight Widgets
You can select a security group this user should be a part of using the TempWorks defaults or creating your own. Each user should be a part of one security group for each security group type. For more information on security groups, check out Beyond - Managing Security Groups.
*Note* The "Advanced Permissions Security Group" dropdown is populated by custom Security Groups that have been created using the "Advanced Permissions" options within System Settings > Security > Advanced Permissions.
Be default, all users will have "None" listed within the "Advanced Permissions Security Group" dropdown.
For instruction on how to create and customize Security Groups using forms, please see the article titled Beyond - Creating Security Groups with Advanced Permissions.
Teams
Teams allow you to divide your users into various teams. An individual service rep may be associated with more than one team. Teams allow you to share searches, look for tasks, and can be a qualifying factor in some reporting. 
This area will show you which teams this rep is currently a part of. You can select the + in the upper right to add them to a new team or click the trash can next to any team listed to remove this user from that team.
Remember that teams can also be managed in system settings. Check out Beyond - Creating & Managing Service Rep Teams for more information.