Why You Should Create Departments and Worksites
Why bother taking the time to create departments and worksites for a customer when you can create orders, assignments, and invoices through one primary record? There are lots of reasons, actually!
- The customer would like invoices for a particular department sent to a different location than the billing address on the main customer record.
- The customer requires different invoicing criteria for different departments.
- Departments have different worker comp code defaults.
- The customer would like specific reporting by department.
- There are multiple branches or multiple sales teams servicing the customer.
- Customer terminology- a customer calls to place an order for the "Human Resources" department.
Also, let's look beyond the customer's needs--perhaps you want to track financials, gross profit, order fill ratio, etc. for different areas of the customer. That would be nearly impossible to accomplish if you were creating all orders and assignments under the same primary department. By having departments, you are essentially creating an organizational chart for that customer where you can run reports, searches, and track metrics by individual department or for the entire customer. The list of benefits goes on and on!
How to Setup Departments
Step 1: Begin by navigating to the departments page within the customer details section.
Things to know about departments:
- There is no limit to the number of levels (departments) that can exist within a customer record. When dealing with departments, the terms 'primary' and 'root' are interchangeable. The primary/root record is always at the top of the customer tree.
- When creating a department, the department record will inherit all of the properties of the parent record (i.e. the customer record that exists one level above and they can be modified at each department level). Remember, creating a department creates an additional customer record underneath the customer record that is currently selected/in view (keep in mind that the customer hierarchy as a whole is your organizational chart). All data entered at the primary level will flow into departments that are created but can be modified at each department level.
- If departments have been created for a customer, it is unlikely that orders would/should be created under the primary customer record.
- Changes to a primary customer record will not be reflected in departments which already exist for that customer.
Step 2: Select the 'add department' button to open the 'add new department' wizard: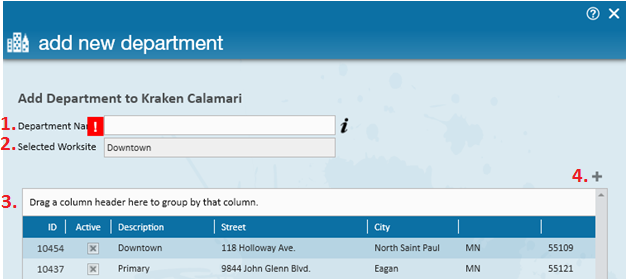
- Department Name: Should generally describe the type of work/positions within the department--such as Manufacturing, Legal, Payroll, etc.
- Selected Worksite: The actual physical location where the department is located and where employees will be sent to work. It is crucial that the selected worksite/worksite information is accurate as this address information is used in determining what taxes should be applied to the employee's paycheck. General selected worksite details can be viewed on this same page in the worksite table. If the department is located at an address/worksite not currently listed in the table, simply select the '+' icon to add a new worksite.
How to Setup Worksites

- Worksite Details:
- Worksite: A unique name used to describe the location. Ex. Downtown, 2nd St., South Shipping, etc.
- Attn To: Allows users to specify the contact who is the recipient of invoices sent to this worksite.
- Other Information:
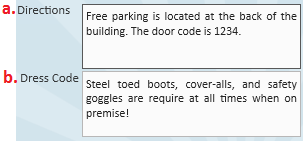
- Directions: Free text field allowing users to input directions to the worksite. Text entered here will also display/pre-fill into orders that are created for this worksite and will also post out to WebCenter for employees to review.
- Dress Code: Free text field allowing users to input dress code information related to the worksite. Text entered here will also display/pre-fill into orders that are created for this worksite and will also post out to WebCenter for employees to review.

Once you have completed the worksite setup, select ![]() to complete the worksite creation. You will then be brought to the 'add new department' wizard one final time to confirm details for the new department and worksite:
to complete the worksite creation. You will then be brought to the 'add new department' wizard one final time to confirm details for the new department and worksite:
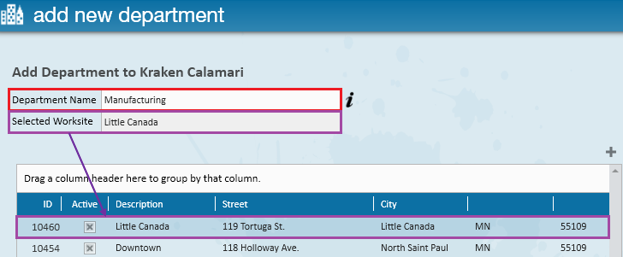
Select 'Save' to create and navigate to the new department record.
Reviewing the New Department Record
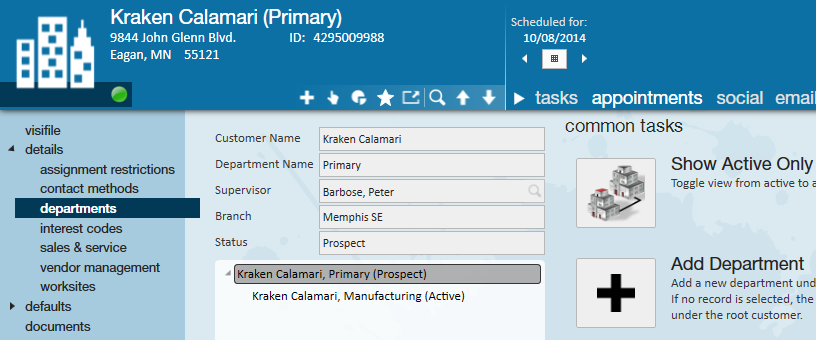
Within the customer information section of the details page, note that the customer name remains as Kraken Calamari and the department name will display as Manufacturing, following our example. Selecting the jump button will navigate users directly to the customer record one level above the manufacturing department (in our example, this would be the primary department).

Reviewing the Updated Customer Hierarchy
Navigate to the departments form within the details page of the customer record to view/review the updated customer hierarchy:
Department Specific Items to Consider Setting Up:
- Contacts: Who is the supervisor for this department? Who calls out the order requests for this department? These questions are answered by setting up contacts (via the visifile) and divvying out contact roles (via the details page).
- Interest Codes (via the details section): What unique skill sets and qualifications does this department typically look for in its employees? For example, if you were creating a clerical department, maybe they routinely seek candidates with data entry & Excel experience.
- Multiplier Codes (via the defaults section): Does the new department have a uniquely different markup compared to the parent department? If it does, be sure to save a new multiplier code.
- Shifts (via the defaults section): Does the new department have different start times compared to other departments in the same customer? If yes, waste no time in saving the new shift information.
- Worker Comp Codes (via the defaults section): What type of work will be done through this department? Establish specific worker comp codes so that your orders, assignments, and reports are correct.
- Invoice Setup: If this department has unique invoicing rules, such as their billing schedule (weekly, bi-weekly, monthly), style, the invoice recipients, etc., be sure to establish these setting within the billing setup and credit and payroll section of invoice setup.
Related Articles
- None