What is an Order Record?
In Beyond, an order is the need of the customer. When the customer communicates to your staffing agency that they are looking for employees, an order should be created to document that request. Once an order is created and populated with details service reps can begin to make assignments.
This article includes:
How to Create an Order
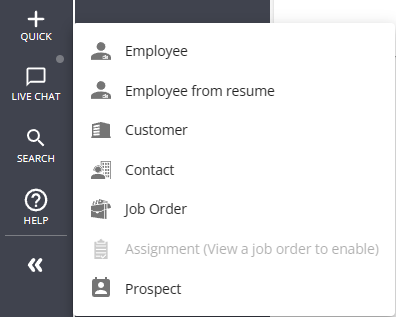
To create an order record in Beyond, select the "+ Quick" icon in the lower left, then select "Job Order":
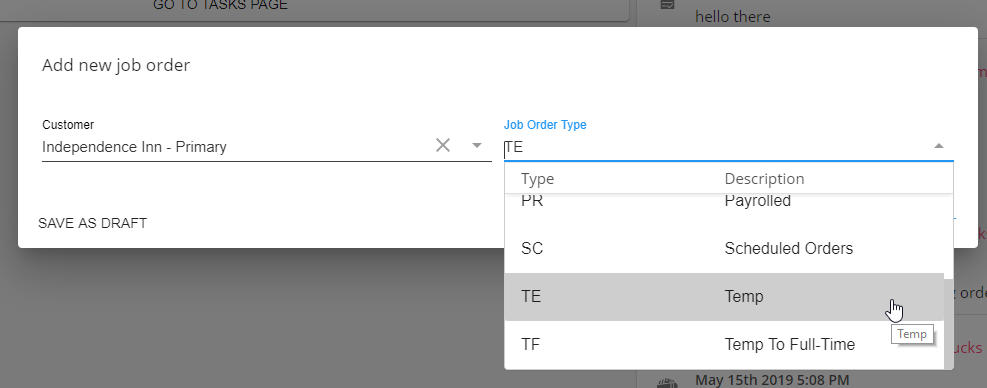
This will open an 'Add new job order' wizard prompting you to select which customer and/or department you would like to create the order for.
- Type or select the customer's name from the drop down
- Select the job order type (ex. Temp or Direct Hire)
- Select Submit
Once you have submitted the order, you will be redirected to the new order record. From here, it's important to fill out the order information for your records. Order information including worksite, start & end time, and financials will flow down to any assignment records attached to this order.
Filling out the Details
The 'DETAILS' tab is where users will enter important job information including the job title, start date, bill and pay rates, contact roles, such as the Supervisor or Hiring Manager, and order status (unfilled, closed, cancelled).
This information can be found within several different cards:
- Customer Information
- Job Information
- Job Board Options
- TimeClock
- Financials
- Contact Roles
- Interest Codes
- Other Information
Customer Information
The 'Customer Information' card displays relevant information relating to the customer record that flows into the order. 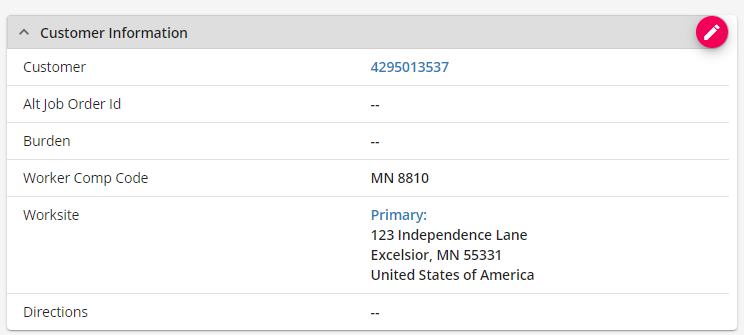
- Alt Job Order ID: This is a field that is utilized to store any out of Tempworks order I.D. that you wish to record.
- Burden: This field is used by our Commission Module and can be used to apply overhead burdens you have created when calculating commission.
- Worker Comp Code: A field where you can select whichever default worker comp codes you would like to apply to the order.
- Worksite: The worksite information is pulled based on the default worksite setup within the related customer/department record and can be modified by selecting different worksites from the drop-down.
*Note* It is important that customer worksites are set up correctly as Beyond uses worksite information to determine how taxes are applied to an employee's paycheck. For more information, see Beyond - Departments vs Worksite.
Check out Beyond - Customer Defaults to see how you manage the default worker comp codes, etc. for each customer.
- Directions: This is a blank field where any additional worksite information may be added.
Job Information
The 'Job Information' card is where the number of required employees, job title, description, start date, estimated end date and shift times are entered. Depending on what users have setup within the customer defaults section, fields may already be populated when the order is created.

- Job Title: All job title codes must be set up in the administration section. If there are any job description defaults this will flow in based on the job title chosen.
- Job Order Type: This is where the job type can be manipulated from temp to direct hire, temp to hire, etc.
- Position Required: This is where the number of employees required may be entered. The 'Positions Filled' space on the main page of the order will be tallied based on the number of assignments made on this order.
- Start Date: This determines the beginning of the assignment and when it becomes 'Active.' This is important because it affects a time card being generated for the assignment.
- Estimated End Date: This is a field that will flow into the assignment record that is simply an estimate of when the assignment ends. This will NOT affect the actual end date on the assignment record.
- Shift or Start & End Times: Select a default shift to automatically have start & end times populate for you or enter the unique start and end time for this job. This information will also be displayed on any assignments tied to this order.
- Job Description: Enter any job details you have including requirements (ex. must be able to lift 50 lbs), education level needed, job responsibilities, and amount of experience necessary.
- Dress Code & Safety Notes: Optionally, add any specific dress code or safety notes needed. (ex. business casual or hard hat required)
- Shift Notes: Optionally, add any additional notes about this particular shift.
- VMS Positions Count: To be used by an upcoming integrations partner, JobRobotix.
Job Board Options
Fields here determine how this order record will appear on the job board if your company is using the TempWorks Job Board.
Select the  to edit the Job Board options:
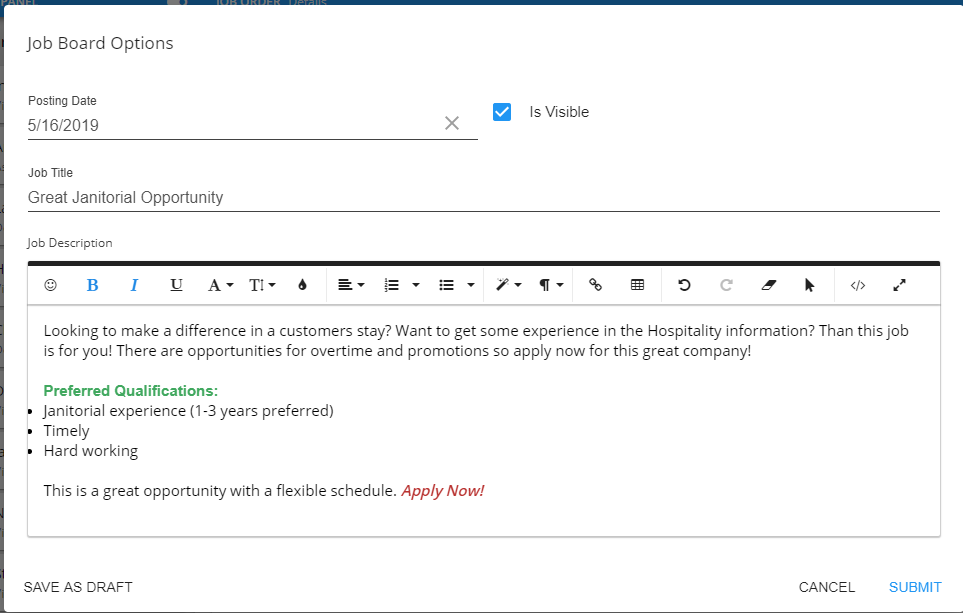
*Note* Job Title and Job Description here will override what is presented on the job board from the job information block.
TimeClock
This block houses the selection wizard where you can select whether to utilize a TempWorks TimeClock if your company uses this integration.
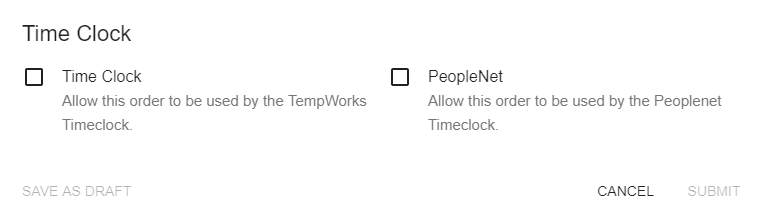
For more information on this integration, check out TimeClock Prime.
Financial Details
The 'Financial details' card will flow into newly created assignments so it is important to set up the financial details on the order first.
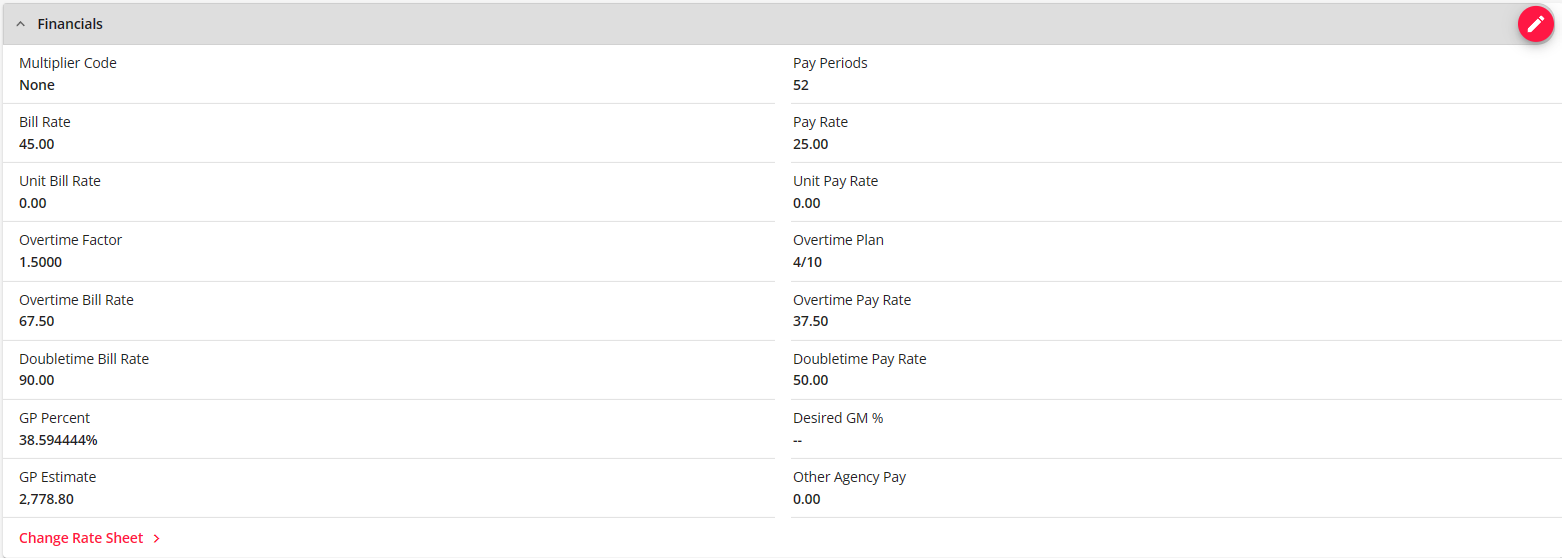
- Multiplier Codes: Within the financial details section, users can either manually enter the pay and bill rate information or utilize any multiplier codes (i.e. mark up) listed to have the bill rates automatically calculated against the pay rate entered.
- Pay Periods: Defines the payroll schedule that employees are on. The pay period that is selected will be used to accurately calculate taxes during payroll processing. The pay period that defaults into the order is driven by the pay period that was set on the related customer record.
- OT Factor: If overtime should be paid at a rate other than time and a half, you can use the OT factor. The factor entered will multiply against the pay rate to calculate the overtime rates.
- GP Percent: The gross profit percent that displays is what has been calculated for the order. Beyond will include SUTA, FUTA, worker comp, FICA and Med when calculating for GP percent
- GP Estimate: The gross profit calculation generation based off a 20-day work month and a 40-hour work week.
Contact Roles
Contact roles allow you to denote which customer contacts are related to this particular order. Contact roles can have additional functionality including who approves timecards or TempWorks TimeClocks. 
Any contact roles that exist on the customer record will flow into any new order. For more information see Beyond - Contact Roles.
Additional or order specific contact roles may be added to an existing order:

Interest Codes
This card houses any interest codes that have flown in from the customer record. These can help make searching easier for orders and also give relevant information to your recruiters. You may also add any additional interest codes that are relevant to this specific order.
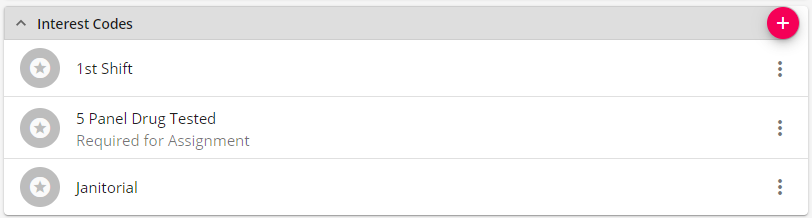
Check out Beyond - Managing Order Interest Codes for more information.
*Note* When adding interest codes, if you select required for assignment, the employee will need to have the same interest code on their file to be assigned. For more information see Beyond - Assignment Restrictions.
Other Information
The 'Other Information' card contains information pertaining to the state of the record:

- Status: This field displays the current status of the order and may be manipulated manually or may be triggered to change based on how the order is filled.
- Branch: This is the branch where the order record is located.
- Service Rep: This is the current user that is responsible or will be credited for the order. This will default to the user that creates the order.
- Sales team: This is the sales team responsible or will be credited for the order. This will default to the sales team assigned to the customer.
- Prevent from Auto Closing: This field currently has no function as the system will not auto close orders regardless if this box is or is not checked.