What are Drop Downs?
Administration Drop Downs allow you to create status defaults and options in different drop down fields throughout Enterprise. These statuses are searchable and reportable so they can help you and your team keep track and customize select status options.
*Note* Not all systems have access to the drop down section in Enterprise Administration.
Where can you find the Drop Down options?
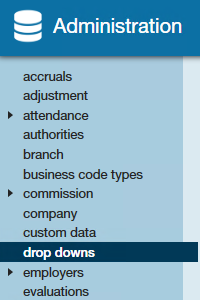
Drop Down settings can be found under All options > Administration > Drop Downs. This is where you can add and edit existing statuses and other drop down menus.
*Note* The drop downs screen may take a minute or two to load depending on the number of statuses, etc. Take a look in the lower right for a loading status.
*Note* The Administration and Drop Down sections are tied to security roles. If you do not see the Administration section or the Drop Downs area, then you may not have the security role required. Reach out to your administrator or TempWorks Support for more information.
*Note* For all these options, you must keep in mind what Hierarchy level you are using and what Hierarchy level you want to set for different drop down options. We recommend being at system hierarchy to be sure you are seeing all the drop down information. For more information on hierarchy, see Hierarchy KB article.
Drop Down Overview
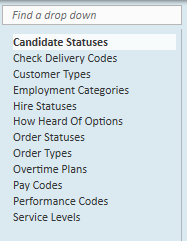
The Drop Down section of Administration is separated into two columns. The left column shows you all your different drop down tables. For example, How Heard of Options or Hire Statuses:
Every client who uses Enterprise is going to have a different list of what drop downs are available.
Once you select a drop down table from the left column, the table will appear in the right column to add, delete, or edit.
 To Add a Drop Down Option:
- Select the + icon in the upper right corner. (A new row will be added to the table).
- Enter all the applicable information in the different columns of the table. (the table works a lot like an excel document) .
- Select Save to save your changes.
*Note* The following are important notes when adding or editing drop down options:
- Columns with ID or GUID titles are generally not editable and should not be changed. These help call up the options in reports and throughout the Enterprise database.
- For columns with "Default" in the title, do not select more than one check box. There should only be one default status for each default column.
- If you are unsure about any column options, reach out to TempWorks Support for more information.
To Edit a Drop Down Option:
Drop down tables are editable. Think of the table like an excel spreadsheet.
Keep in mind that whatever changes you make will impact any record that currently have this status. If you change any defaults, than it can impact records created in the future. Remember to only select one option for each default type.
 To Delete a Drop Down Option:
*Note* We do not recommend deleting a drop down option. Instead, uncheck the box under the Active column to have it not appear as an option for users to select.
Should you want to delete a row completely, you can do so following the two steps below. Please keep in mind that you will not be allowed to delete an option if it has been used and is currently connected to a record in the system.
- Select the row with the option you wish to delete.
- Select the X icon in the upper right to remove it .
Please remember that once something is deleted, it cannot be undone.
*Note* You can also rename options that aren't being used or were accidentally created instead of removing them.
Drop Down Examples
Below are a few common drop down table options. You may not have all the options shown.
This section contains the following:
- Candidate Statuses
- Check Delivery Codes
- Employment Categories
- How Heard of Options
- Order Statuses
- Order Types
- Overtime Plans
- Pay Codes
- Performance Codes
- Service Levels
This area allows you to customize the status options for an employee who is in the candidate sheet for an order.
*Note* For more information on Candidate Worksheets, see How to Create and Manage Candidate Worksheets.

To add a new Candidate Status:
- Select the + icon in the upper right corner.
- A new line will appear at the top of the table.
- Fill in the following information:
- Status – Name of status as you want it to appear in Enterprise.
- Description – Full description of what the status means.
- CandidateStatusId – This field is not editable and can be ignored. It will default to 0 and will change to the next available number once saved.
- ImpliesActive – When looking at the candidate area you can choose to see only “active” candidates. Checking this box implies that this status means the candidate is still active or viable for this position. In the screenshot above, you will see statuses such as ‘rejected’ or ‘refused’ have the ImpliesActive checkbox unchecked because they are used to show that the candidates are no longer active.
- DefaultStatus – If this box is checked, when an employee is made a candidate for an order, this is the status that will be set.
- *Note* Keep in mind that there should only be one default for any hierarchy.
- CustomerChoiceItem – Adds the candidate status choice for WebCenter customers.
- VendorChoiceItem – Adds the candidate status choice for WebCenter vendors.
- AllowToAssign – Allows an assignment to be created for the employee.
- ImpliesPlaced – If this box is checked, when this status is set for a candidate it will imply that this candidate is placed.
- IsResumeSubmitted – If this box is checked, it implies that the resume has been submitted for this candidate.
- Hierarchy – What hierarchy level can see this/set this status?
- CandidateStatusGuid – This field is system generated and should not be edited.
- IsWebApplicant - Applicant that came from the Web.
- Message Action – Is there a specific message type that should be logged when this status is set?
Check delivery codes are found under the employee record under pay setup. These codes are helpful if your company does bulk check runs but it is not necessary for all employees.

To add a new Check Delivery Code:
- Select the + icon in the upper right corner.
- A new line will appear at the top of the table.
- Fill in the following information:
- DeliveryCode - Enter the Delivery code you want displayed (in our example above we use letters as our codes).
- DeliveryDescription – Enter what the delivery code means.
- DelId - This field is not editable and can be ignored. It will default to 0 and will change to the next available number once saved.
- Hierarchy – What level of hierarchy do you need to be to see/set this status (we recommend system).
- isDefault – If this box is checked, that status will be the set default for new employees added.
This option allows you to tag an employee with a specific employment category or profession. This field is searchable and reportable. To set an employment category for an employee navigate to the Employee record > Details and choose a profession from the drop down.

To add a new Employment Category:
- Select the + icon in the upper right corner.
- A new line will appear at the top of the table.
- Fill in the following information:
- Category – Enter how you want the category to appear in Enterprise.
- Active – Check the active box to be able to see this status in the profession drop down.
- EmploymentCategoryID – This field is system generated and should not be edited.
- Hierarchy - What level of hierarchy do you need to be to see/set this status (we recommend system).
- IsDefault - If this box is checked, it means this status is the default status for employment categories when a new employee is added. Keep in mind that there should only be one default for any hierarchy.
This field is found on the Employee, Customer, or Contact record under details. The goal is to be able to track how employees heard of your company. This field is searchable and reportable.

To add a new How Heard Of option:
- Select the + icon in the upper right corner.
- A new line will appear at the top of the table.
- Fill in the following information:
- HowHeardOfId - This field is not editable and can be ignored. It will default to 0 and will change to the next available number once saved.
- HowHeardOf – Enter the how heard of option as you want it to appear in Enterprise.
- IsEmployeeRelevant – If this box is checked, then this option can be selected under the Employee Record.
- IsContactRelevant – If this box is checked, then this option can be selected under the Contact Record.
- IsCustomerRelevant – If this box is checked, then this option can be selected under Customer Record.
- Hierarchy - What level of hierarchy do you need to be to see/set this status (we recommend system).
- Active - When this box is checked it means that this option can be selected from the How Heard Of drop down. If inactive, it means that it can be a current status but cannot be chosen from the drop down menu.
- IsWebPublic – If this box is checked, then this option is Visible option for JobBoard/HRCenter/WebCenter.
- PromptForDetails – Ask for details when this status is selected through JobBoard/WebCenter/HRCenter.
- RequireDetails -Make the Details field required when this option is selected.
Order status field is found under an order on the details page. This drop downs allow you to tag with the current status of this order (ex. Unfilled or filled). This field is searchable and reportable.

To add a new Order Status:
- Select the + icon in the upper right corner.
- A new line will appear at the top of the table.
- Fill in the following information:
- OrderId - This field is not editable and can be ignored. It will default to 0 and will change to the next available number once saved.
- OrderStatus – Enter the Status as you want it to appear in Enterprise.
- Hierarchy - What level of hierarchy do you need to be to see/set this status (we recommend system).
- Explanation – Longer description of order status.
- ImpliesActive – If checked, this status is within the category of Active. When searching for Active orders, orders with this status will be included.
- ImpliesUnfilled – If checked, this status is within the category of Unfilled. When searching for Unfilled orders, orders with this status will be included.
- ImpliesDeleted – If checked, this status is within the category of Deleted. When searching for Deleted orders, orders with this status will be shown.
- *Note* While you can select multiple boxes for the different imply options, keep in mind that some options may not make sense together. Ex. If a status implies that the order is Active it probably isn’t also Deleted or Lost.
- ImpliesLost – If checked, this status is within the category of Lost. When searching for Lost orders, orders with this status will be shown.
- ImpliesPending – If checked, this status is within the pending category. When searching for pending orders, orders with this status will be shown.
- ImpliesClosed – If checked, this status is within the closed category. When searching for closed orders, orders with this status will be shown.
- IsDefaultClosedStatus – If checked, When an order is closed it will default to this status.
- *Note* There should only be one default status for any hierarchy.
- IsDefaultExpiredStatus – If checked, when an order expires, it will default to this status.
- *Note* There should only be one default status for any hierarchy.
- AutoClose – If checked, when this status is selected, the order will be closed automatically.
- AutoExpire – If checked, when this status is selected, the order will be set as expired automatically.
- IsDefault – If checked, this will be the default status when an order is created.
- *Note* There should only be one default status for any hierarchy.
- IsDefaultFilledStatus – If checked, this will be the default status when an order becomes filled.
- *Note* There should only be one default status for any hierarchy.
- OrderStatusGuid - This field is system generated and should not be edited.
- IsDefaultWebStatus – If checked, this will be the default status for an order created in WebCenter.
- *Note* There should only be one default status for any hierarchy.
Order type field can be found under an order record under the details screen. This field is searchable and reportable.

To add a new Order Type:
- Select the + icon in the upper right corner.
- A new line will appear at the top of the table.
- Fill in the following information:
- OrderTypeId – This field is not editable and can be ignored. It will default to 0 and will change to the next available number once saved.
- OrderType – Enter the short version of the Order Type.
- Hierarchy – What level of hierarchy do you need to be to see/set this status (we recommend system).
- Description – Enter the full description of the Order Type.
- GPCalcMethod - If it is set to CalcGM, then it will update Gross Margin estimates for Order. ManualGM is used for Order types where you would not be estimating GM such as Direct hires.
- IsDirectHire – If this is checked, it indicates that an order with this status is for a direct hire.
- IsDefault – If checked, when a new order is created this will be the default.
- *Note* There should only be one default status for any hierarchy.
- NeedGLByOrderType - If this box is checked, then it will map GL sales by order type.
- Ordertypeguid - This field is system generated and should not be edited.
- IsDailyPay – This field only applies if you use dispatcher. If checked, then any order with this status will appear in Dispatcher.
- IsDailyPayDefault – This field only applies if you use dispatcher. If checked, then any order created in Dispatcher will default to this status.
- DefaultPayPeriods – Number entered here will default the pay period for an order with this status. Typical pay period options include 12 = monthly, 24 = bi-monthly, 52 = weekly, etc.
Overtime plan field can be found in an order record under details. This field indicates what is considered overtime for this position.

To add a new Overtime Plan option:
- Select the + icon in the upper right corner.
- A new line will appear at the top of the table.
- Fill in the following information:
- OTPlanId – This field is not editable and can be ignored. It will default to 0 and will change to the next available number once saved.
- OverTimePlan – Enter the title of this overtime plan option as you want it displayed in Enterprise.
- Hierarchy - What level of hierarchy do you need to be to see/set this status (we recommend system).
- PlanType – Enter Daily or Weekly option.
- OTAfter – Enter how many hours an employee has to work before it is considered overtime.
- DTAfter – Enter how many hours an employee has to work before it is considered double time.
- MaxRHours – Enter the maximum number of regular hours an employee can have.
- MaxOHours – Enter the maximum number of overtime hours an employee can have.
- OTPlanRootGuid - This field is system generated and should not be edited.
- IsDefault - If checked, when a new order is created this will be the default.
- *Note* There cannot be more than one OTPlan with the "IsDefault" toggle for all hierarchies within a database.
- DTRule – This field is specific to California regulation. Double time rule is any hours worked past 8 hours on the 7th consecutive day of work. Check this box to apply the double time rule to this option.
- PayPeriods - Number entered here will default the pay period for an order with this status. Typical pay period options include 12 = monthly, 24 = bi-monthly, 52 = weekly, etc.
Pay codes are applied when filling out time cards in the time entry section of Pay/Bill in Enterprise. Each pay code has a different set of options for tax information, accrual, etc. Examples of pay codes include regular, holiday, bonus, etc.
*Note* We recommend that you do NOT delete pay codes because removing pay code options can also create problems with pay history.
*Note* Because pay codes calculate taxes, we recommend that you use the default options and change PayCode name and description if changes are needed. Always consult a tax expert if you have questions about how pay should be taxed. Contact TempWorks Support if you are unsure of how to create a new pay code for a specific reason.
Performance Codes in Administration drop downs relate to the "Status" field of the Assignment record in Enterprise. Changing an assignment status can trigger the assignment to become inactive, close, or autocomplete. These assignment statuses are reportable.

How to add a Performance Code:
- Select the + icon in the upper right corner.
- A new line will appear at the top of the table.
- Fill in the following information:
- PerformanceCodeID - This field is not editable and can be ignored. It will default to 0 and will change to the next available number once saved.
- Perf – The short version of the code displayed in Enterprise.
- Explanation – The description of the performance code.
- *Note* Information entered within this field will display within the "Status" field of the Assignment record.
- Hierarchy - What level of hierarchy do you need to be to see/set this status (we recommend system).
- DoNotGenerateCtxns – If checked, when this status is set on an assignment a timecard will not be automatically generated for this assignment (this is good for closed or completed assignments where there will not be a reason to generate a timecard).
- DoNotCountAsAssigned – If checked, when this status is set on an assignment the assignment will not count as assigned on the order.
- EmployeeCancelled – If checked, when this status is set it will count as an employee cancelling the assignment.
- CustomerCancelled – If checked, when this status is set it will count as an customer cancelling the assignment.
- FlipOrderStatus – If checked, this status can affect an order status (when you check this box enter the Flip From and/or Flip To order status fields to reflect what you want it to switch to).
- Customerpositive – If checked, this status is a positive response from the customer.
- Customernegative – If checked, this status is a negative response from the customer.
- Employeepositive - If checked, this status is a positive response from the Employee.
- Employeenegative - If checked, this status is a negative response from the Employee.
- Staffingsupplierpositive - If checked, this status is a positive response from the staffing supplier (you).
- Staffingsuppliernegative - If checked, this status is a negative response from the staffing supplier (you).
- Isratechange – If checked, this status means that a rate is being changed for this employee assignment.
- IsDeleteMistake – If checked, this status means that the assignment was mistakenly created and should be removed.
- ESort - If this option is set to 1 then this code is tagged as being excellent.
- IsDefaultOpen – If checked, this status becomes the default for any new assignment that is opened
- *Note* There should only be one default status for any hierarchy.
- IsDefaultComplete – If checked, this status becomes the default for any assignment being closed.
- *Note* There should only be one default status for any hierarchy.
- Flip From Order Status – Use this option, and the next, if this status affects the order status. Enter here the status the order should have before this status affects the order.
- Ex. Mistakenly entered performance code should take Order status from being filled to being unfilled because the assignment was created in error. So in the Flip From field enter unfilled and the Flip to field enter filled.
- Flip to Order Status – Use this option and the previous if this status affects the order status. Enter the status the order to change to when this status is set.
- PerformanceCodeRootGuid – This field is system generated and should not be edited.
- IsDefaultDirectHire – If checked, this will be the default status for an assignment made for a direct hire order.
- *Note* There should only be one default status for any hierarchy.
- Active – When this box is checked it means that this option can be selected from the Performance Code drop down. If inactive, it means that it can be a current status but cannot be chosen from the drop down menu.
- IsLeaveOfAbsense – If checked, this status will mean employee is on a leave of absence and not currently reporting to work.
- AWRRuleType – Leave blank for most performance codes. This field allows you to select a type of leave associated with that code. You can select the correct type of leave from the drop down (ex. Maternity or Indefinite hold).
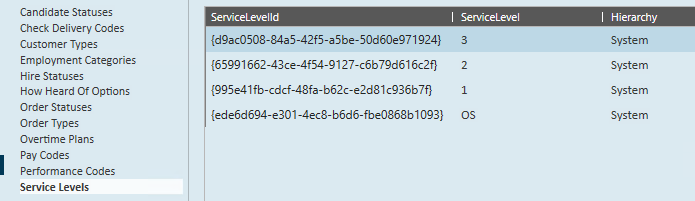
Service Level information is located on the Customer Record under Details > Sales & Services > Service Information. This field allows you to denote priority level for this customer ex. 1 = high priority, etc. types of customers or client contracts. OS = onsite
To add a Service Level:
- Select the + icon in the upper right corner.
- A new line will appear at the top of the table.
- Fill in the following information:
- ServiceLevelId - This field is system generated and should not be edited.
- ServiceLevel – Enter Service level number.
- Hierarchy - What level of hierarchy do you need to be to see/set this status (we recommend system).