What are Hotlists?
Hotlists allow you an opportunity to place employees, customers, and/or contacts within given static lists in order to easily access and locate them, without having to run a search.
Hotlists may commonly be used to group employees who have been pre-qualified for a specific customer or skill set, or to track your key or target customers. The hot list section of Beyond can be accessed directly from via B Menu > Hotlists.
*Note* Hotlists are created at the hierarchy level you are currently located within.
Ensure you are at the proper hierarchy level before creating/editing hotlists.
*Note* Employee and Customer hotlists created in Enterprise will also appear in Beyond, and vice versa.
Contact hotlists are new functionality that has only been added to Beyond.
This article covers the following:
- Setting Up Permissions
- How to Create a Hotlist
- Add Employees, Customers, or Contacts to an Existing Hotlist
- Searching for Hotlists
- Editing or Deleting a Hotlist
- Functionality Available Within a Hotlist
Setting Up Permissions
The ability to create hotlists within Beyond is a standard feature and therefore does not require additional standard Security Group permissions.
*Note* Users have the ability to create "Private" hotlists which make the hotlist viewable by only the user who created that hotlist.
If you or other users should have access to view "Private" hotlists, the "Can Bypass Hotlist Private Flag" permission will need to be added to your intended Security Group:

*Note* If you utilize custom Security Groups with Advanced Permissions, you will need to add the Access to the "Hotlists" pages and forms to the Security Groups that require the functionality:
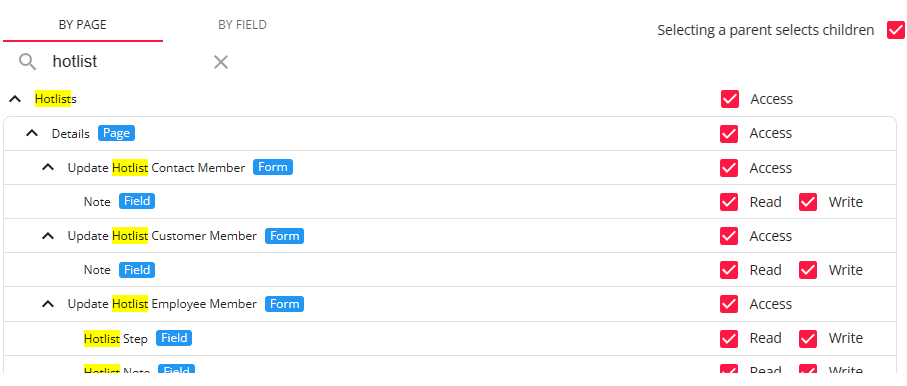
For more information on created custom Security Groups with Advanced Permissions, please see the following article titled "Beyond - Creating Security Groups with Advanced Permissions".
How to Create a Hot List
Hot lists can be created from three different areas:
- Within B Menu > Hotlists
- Via an Employee/Customer/Contact search
- Via the "Add to Hotlist" charm on the Employee/Customer/Contact record
Create a Hotlist from B Menu > Hotlists
Hotlists are separated by record type and can be created for employees, customers, or contacts.
To create a hotlist, navigate to B Menu > Hotlists > "+" icon to the right of the record type you would like to create the hotlist for:

This will open the "New Hotlist" window where you will enter the following:
- Enter the name of the hotlist.
- Enter the description of the hotlist.
- Mark the hotlist as either "Private" (default) or select how you would like to share the hotlist.

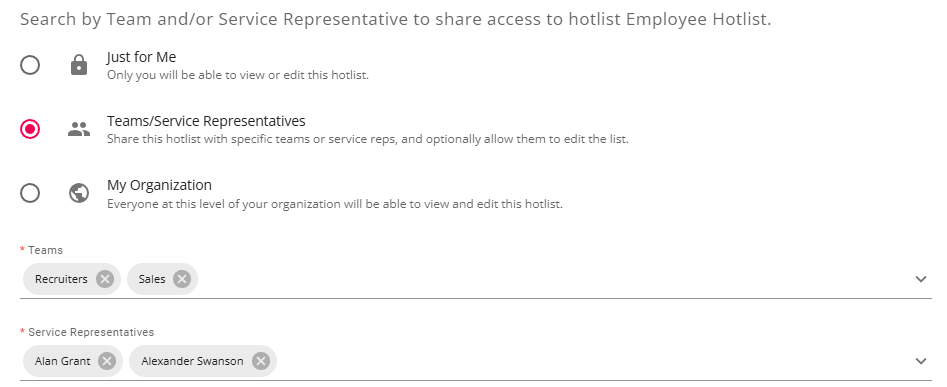
*Note* When you want to share a hotlist, you can select the option for "Teams/Service Representatives" or "My Organization":
- Selecting "Teams/Service Representatives" allows you to select complete Service Rep Teams and/or individual Service Representatives to share your hotlist with:
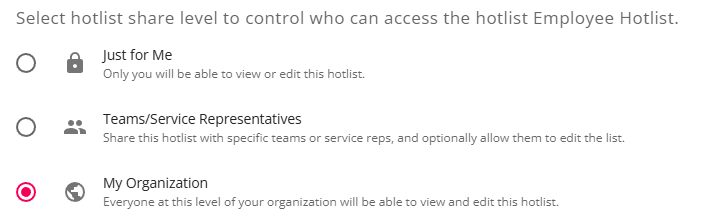
- Selecting "My Organization" will share the hotlist with everyone at the hierarchy level the hotlist is created within:


If the "Teams/Service Representatives" option is selected, you will also have the ability to allow editing by anyone the hotlist is being shared with via the checkbox at the bottom of the window:

If the "My Organization" option is selected, this checkbox is checked by default and will not be able to be deselected:

Once the information has been entered, select "Submit" for the hotlist to be created and for it to appear within the "My Lists" tab:

Create a Hotlist via an Employee/Customer/Contact Search
If you have completed an employee, customer, or contact search, and wish to add all, or some of those results to a new hotlist; you can create a hotlist directly from the search result.
To do so, select the "Actions" dropdown and select "Add to Hotlist" within the search results:

This will open the "Add to Hotlist" window where you can do the following based on the tab selected:
If you want to add the records to an existing hotlist, select the "Existing" tab, and enter the following information:
- Select the appropriate existing hotlist from the "Existing Hotlists" dropdown menu.
- Select the position the records will appear within the hotlist (either top or bottom of the list).

If you want to add the records to a new hotlist, select the "New" tab and enter the following information:
- Enter the name of the hotlist.
- Enter the description of the hotlist.
- Mark the hotlist as either "Private" or select how you would like to share the hotlist.

*Note* When you want to share a hotlist, you can select the option for "Teams/Service Representatives" or "My Organization":
- Selecting "Teams/Service Representatives" allows you to select complete Service Rep Teams and/or individual Service Representatives to share your hotlist with:
- Selecting "My Organization" will share the hotlist with everyone at the hierarchy level the hotlist is created within:
If the "Teams/Service Representatives" option is selected, you will also have the ability to allow editing by anyone the hotlist is being shared with via the checkbox at the bottom of the window:
If the "My Organization" option is selected, this checkbox is checked by default and will not be able to be deselected:
Once the information has been entered, select "Submit".
Create a Hotlist via the "Hotlists" Charm on the Employee/Customer/Contact Record
While on an employee, customer, or contact record, you can create a hotlist for the employee by selecting the "Hotlists" charm and selecting "Add to Hotlist:

This will open the "Add to Hotlist" window where you can do the following based on the tab selected:
If you want to add the record to an existing hotlist, select the "Existing" tab, and enter the following information:
- Select the appropriate existing hotlist from the "Existing Hotlists" dropdown menu.
- Select the position the record will appear within the hotlist (either top or bottom of the list).

If you want to add the records to a new hotlist, select the "New" tab and enter the following information:
- Enter the name of the hotlist.
- Enter the description of the hotlist.
- Mark the hotlist as either "Private" or select how you would like to share the hotlist.

*Note* When you want to share a hotlist, you can select the option for "Teams/Service Representatives" or "My Organization":
- Selecting "Teams/Service Representatives" allows you to select complete Service Rep Teams and/or individual Service Representatives to share your hotlist with:
- Selecting "My Organization" will share the hotlist with everyone at the hierarchy level the hotlist is created within:
If the "Teams/Service Representatives" option is selected, you will also have the ability to allow editing by anyone the hotlist is being shared with via the checkbox at the bottom of the window:
If the "My Organization" option is selected, this checkbox is checked by default and will not be able to be deselected:
Once the information has been entered, select "Submit".
Add Employees, Customers, or Contacts to an Existing Hotlist
Once you have created the hotlist you can add employees, customers, or contacts to a hotlist at any time from either a search result, or from within the specific record via the "Hotlists" charm.
Adding from Search Results:

Adding via the "Hotlists" Charm:

Both options will open the "Add to Hotlist" window where, within the "Existing" tab, you will select the following:
- Select the appropriate existing hotlist from the "Existing Hotlists" dropdown menu.
- Select the position the record will appear within the hotlist (either top or bottom of the list).

*Note* The hotlists that appear within this dropdown include:
- Your hotlists that pertain to the specific record type.
- Other users' hotlists that have been made "Public" that pertain to the specific record type.
- Other users' hotlists that have been shared with you and have editing allowed.
- All "Private" hotlists as long as you have the security permission to view other users' "Private" hotlists.
Once the intended hotlist has been selected from the dropdown, and the position of the records has been chosen, select "Submit" to add the records to the hotlist.
*Note* Records that are visible within any given hotlist are dependant on what the user can view within their hierarchy.
Searching for Hotlists
To locate the hotlist you wish to utilize, navigate to B Menu > Hotlists.
You can then search for your desired hot list by using the available search and filter options:
- List Name or
- List Description
- List Type (All, Static List, Saved Search)

You can also filter between viewing your lists or viewing all hotlists shared with you. Viewing all shared hotlists includes the following:
- All hotlists that have been made public.
- Hotlists that were made private by the original user, but you have the associated permission to view them.

Editing or Deleting a Hotlist
Hotlists can be edited or deleted by navigating to B Menu > Hotlists.
To edit a hotlist, select the  icon to the right of the hotlist and select "Edit":

To delete a hotlist, select the  icon to the right of the hotlist within record type dropdowns and select "Delete":

Select "Confirm" within the prompt to delete the hotlist.
*Note* If you have been given access to shared hotlists with editing permissions, you will also have the ability to delete those hotlists.
Functionality Available Within a Hotlist
Within the hotlists, different functionality is available for employees, customers, and contacts.
For all hotlists you have created, you can do the following:
- Export the hotlist by selecting the
 icon to the right of the hotlist record.
 - Edit the hotlist by selecting the
 icon to the top right of the hotlist record.
 - Share the hotlist by selecting the
 icon to the top right of the hotlist record.
 - Bookmark the hotlist by selecting the
 icon to the top right of the hotlist record.
 icon to the right of the hotlist record.
 icon to the top right of the hotlist record.
 icon to the top right of the hotlist record.
 icon to the top right of the hotlist record.
Employee Hotlist Functionality
Navigate to B Menu > Hotlists > Select a hotlist that contains records.
Select multiple records from the hotlist and select the "Actions" dropdown for the following options:
- Text Employees (if a texting integration is enabled and you have texting credentials setup)
- Log Message
- Make Candidates
- Make Job Offers
- Assign
- Edit Hotlist Members
Additionally, you can select the  icon to the right of the record within the hotlist for the following options:
- Edit
- Remove
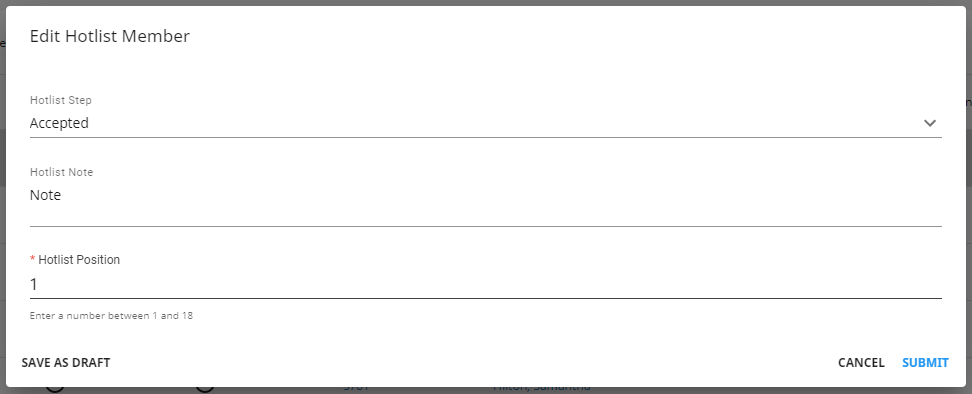
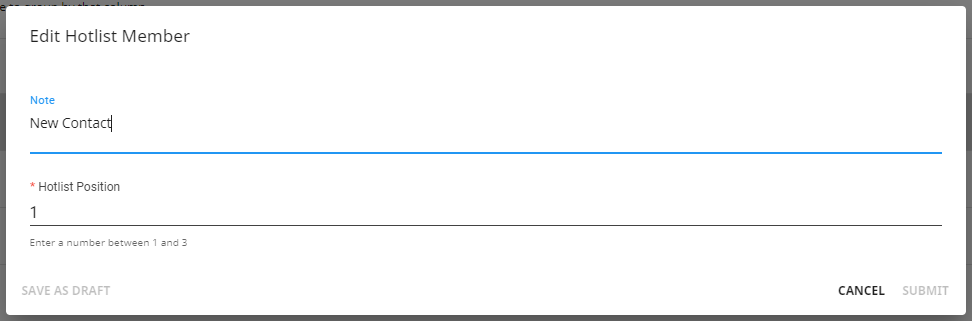
By selecting "Edit", the "Edit Hotlist Member" window will open with the following options:
- Hotlist Step: This column allows you to track the status of an employee in relation to this specific hot list. This is not correlated to a candidate status (tied to an order) nor is it logged, or visible, on the employee's record.
- Hotlist Note: A note for the record of the hotlist.
- Hotlist Position: The position the record will appear within the hotlist.
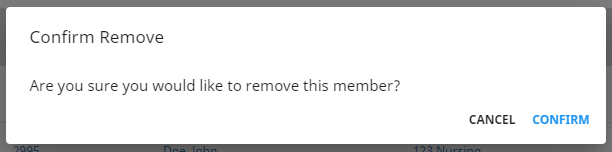
By selecting "Remove", you can select "Confirm" within the prompt to remove the record from the hotlist:
Customer Hot List Functionality
Navigate to B Menu > Hotlists > Select a hotlist that contains records.
Select multiple records from the hotlist and select the "# Selected Items" dropdown for the following options:
- Log Message
Additionally, you can select the  icon to the right of the record within the hotlist for the following options:
- Edit
- Remove
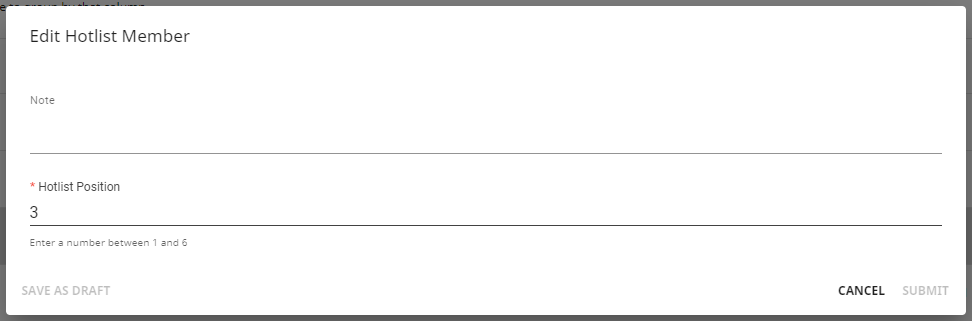
By selecting "Edit", the "Edit Hotlist Member" window will open with the following options:
- Note: A note for the record of the hotlist that will also update on the customer record.
- Hotlist Position: The position the record will appear within the hotlist.
By selecting "Remove", you can select "Confirm" within the prompt to remove the record from the hotlist:
Contact Hot List Functionality
Navigate to B Menu > Hotlists > Select a hotlist that contains records.
Select multiple records from the hotlist and select the "# Selected Items" dropdown for the following options:
- Log Message
- Text Contacts (if a texting integration is enabled and you have texting credentials setup)
Additionally, you can select the  icon to the right of the record within the hotlist for the following options:
- Edit
- Remove
By selecting "Edit", the "Edit Hotlist Member" window will open with the following options:
- Note: A note for the record of the hotlist that will also update on the contact record.
- Hotlist Position: The position the record will appear within the hotlist.
By selecting "Remove", you can select "Confirm" within the prompt to remove the record from the hotlist: