What is Ignore Bill Cycle?
Users will select to "Ignore bill cycle" when a Customer requires to be invoiced by calendar month (the 1st - 30th/31st). Since there are special circumstances for this invoicing schedule, let's examine it in depth.

What is the process?
For the majority of any month, entering and proofing hours will be the same as those transactions processed weekly. Depending on the month, 3 or 4 of the weeks you will enter the hours in time entry the same as normal. However, because your customer wants the invoices by calendar month, and because more often than not the last day of the month is unlikely to match-up with the Customer's Weekend Date, an additional step will need to be taken. The additional step is to separate the final week's transactions for the month into two different weeks.
First we will walk through the steps for weeks that need to be split, then we will cover steps that need to be taken for weeks that are not split.
Entering Hours for Split Weeks
Split Weeks: Occasions when the last day of the month does not fall of the Customer's Weekend Date.
In other words, when this is the case you need to split up the transaction to invoice some of the hours on this month's invoice, and some of the hours on next month's invoice.
For example, let's say an Employee worked 40 hours during the week of 12/29/14-1/4/15. This is a Monday-Sunday week schedule. Twenty four of the hours were worked on 12/29, 12/30, and 12/31.
These hours need to be placed on the December invoice, and the remaining sixteen hours the employee worked on 1/1/15 and 1/2/15 need to be placed on a separate January invoice.
For this to work correctly the hours will need to be split into two separate transactions within Time Entry and processed separately in invoicing.
Step 1--Time Entry: In Time Entry locate and right click on the transaction (timecard) and select Create Duplicate Timesheet. This will create a duplicate timesheet for that employee and assignment.
Timecard One: Enter the hours for the last days of the month, in this case (1-1.) 24 hours were worked between 12/29/14 and 12/31/14. You now need to change the (1-2.) week ending date to the last date of the month for those 24 hours--AKA 12/31/2014.
 Timecard Two: Enter the remaining hours, in this example the employee worked (1-3.) 16 hours between 1/1/15 and 1/4/15. There should be no need to change the week ending date for this transaction as by default is should be set to the first Weekend Date of the following month, in our example this is a Sunday and falls on (1-4.) 1/4/15.
 Now that you've entered the hours and changed the week ending dates respectively you will have two line items, both with the same pay and bill rates, etc., but with different Weekend Dates. One of the Weekend Dates will be the last day of the month.
Step 2--Proofing: Save and Proof the transactions/timecards as normal.
Step 3--Complete the 'Hold Off Monthly' Invoice Run: Create a New Invoice Run and select the Run Type of 'Hold Off Monthly'. This is marking the transactions as complete (i.e. "invoiced") for the week, but does not actually create the invoice yet. This way, when you are ready to create the invoice it will group all 'held' transactions together on one invoice.
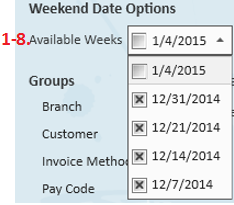
After selecting next, you will need to specify through the use of the filters and (1-5.) grouping options which (1-6.) transactions you are ready to mark as invoiced:
In this invoice run it is acceptable to select all (1-7.) available weeks, including January since the invoice is not actually being made at this point.
Step 4--Process the Monthly Invoice: When you are ready to process the monthly invoice create a new Invoice Run, input your Invoice Date, and select a Run Type of 'Monthly'. Selecting 'Monthly' will pull in all transactions that you have previously "processed" in 'Hold Off Monthly' runs.
After selecting next, you will need to specify through the use of the filters and grouping options which transactions you are ready to invoice.
To ensure you are only invoicing for those transactions within the respective month (in our example, December 1st - December 31st) utilize the Available Weeks dropdown and select the week ending dates that fall within that month. Be sure to (1-8.) uncheck the transaction(s) for the advanced week ending date (the one for the following month--in our example this is January 4th). Once you've selected the week ending dates you want to process, click next and complete the invoice process as normal.
Entering Hours for Non-Split Weeks
Non-Split Weeks: Occasions when the last day of the month also falls on the Customer's Weekend Date.
For example, November 30th 2014 falls on a Sunday, in our example the WeekEnd Date is Sunday so therefore you would not need to split up the week's hours into two transactions.
Step 1--Time Entry: Enter the hours in Time Entry for that week as normal.
Step 2--Proofing: Complete the Proofing process as normal.
Follow Steps 3 and 4 from above. Note that the only difference between Step 4 in split weeks vs. non-split weeks is that you will not need to uncheck transaction(s) for the advanced week ending date (i.e. the following month) because if it is a non-split week, there will not be any.