What are WebCenter Notifications?
WebCenter, our online web portal for your employees, customer contacts, and vendors, allows you to set up email notifications for all your users. These emails are sent out automatically based on certain WebCenter, or HRCenter, situations or events.
In order for these notifications to work, you first need to set them up in WebCenter Administration.
This Article Covers:
Step 1: Setup Your Email
The first thing you need to do is decide what email these notifications are sending from. We recommend having a "Noreply" or other generic email that these notifications are sent from.
In order to set up your email for WebCenter notifications, you will need to have some technical information about the email address you want to use.
Gather the following information from your IT team or email provider:
- Email Address
- Host Name
- Port
- Do they require a username and password?
Below are common advanced SMTP settings for different email accounts:
| Mail Service | SMTP Server | Outgoing Port | SMTP SSL/TLS | SMTP Auth Method |
|---|---|---|---|---|
| Gmail | smtp.gmail.com | 587 | True | Auth Login |
| Office 365 | smtp.office365.com | 587 | True | Auth Login |
| GoDaddy | smtpout.secureserver.net | 3535 | False | Auth Login |
| Yahoo! | smtp.mail.yahoo.com | 465 | True | Auth Plain |
| Mandrill | smtp.mandrillapp.com | 587 | True | Auth Login |
| Outlook (AKA Hotmail / Live) | smtp-mail.outlook.com | 587 | True | Auth Login |
| Rackspace | secure.emailsrvr.com | 465 | True | Auth Login |
*Note* We recommend that you consult with your IT team or email provider for the correct SMTP settings for your particular email.
To Setup a Notification Email in WebCenter
- In WebCenter Admin, navigate to Config > Notifications

- Add your email address
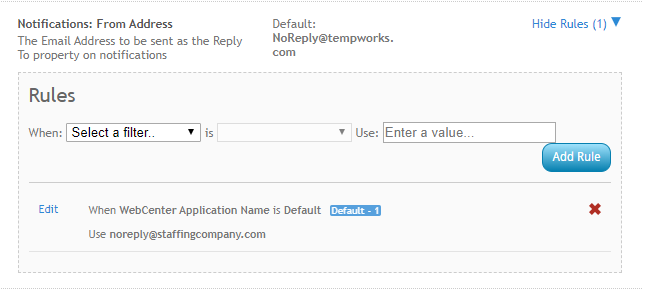
- Navigate to "Notifications: From Address" & select show rules
- Add a New Rule to specify when this email address should be used
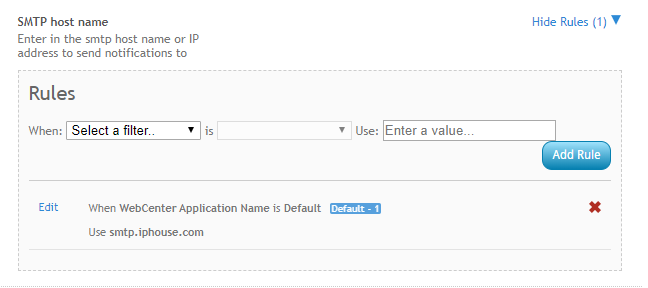
- Enter your Host Name
- Navigation to "SMTP Host Name" & select show rules
- Add a New Rule to specify when this host name should be used (should be the same criteria as from address above)
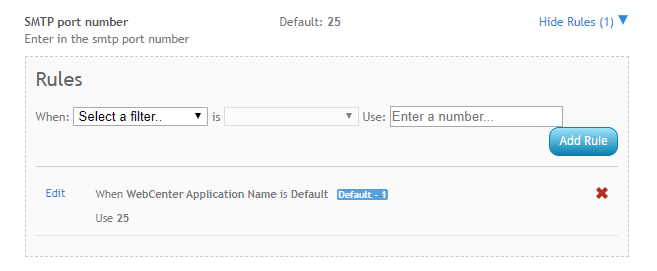
- Select Your Email Port
- Navigation to "SMTP Port Number" & select show rules
- Add a New Rule to specify when this port should be used (should be the same criteria as from address above)
- Optionally, add the following:
- If your email provider requires a username and password to send an email, navigate to "SMTP Credentials: Username" and "SMTP Credentails: Password" and add a rule to specify the username/password that must be used
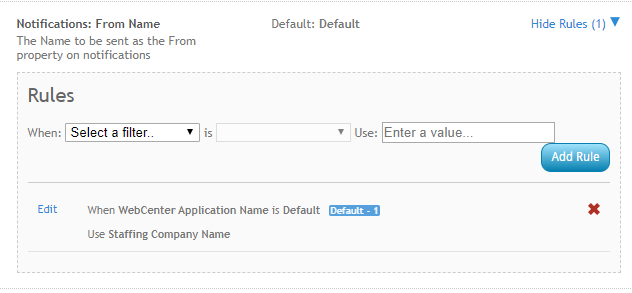
- If you want a specific display name to appear when sending emails, select "Notifications: From Name" and add a rule to specify the sender name
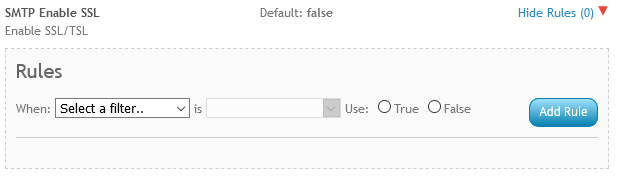
- If your email uses SSL, set the "SMTP Enable SSL" configuration to true:


Now that you have set up your email to be used for notifications in WebCenter, you need to specify which notification events will prompt an email.
Step 2: Enable Notification Events
WebCenter has a number of notification events that you can enable or disable for users.
*Note* Keep in mind that enabled notifications can be turned off by the individual employee or customer contact (see Employee: WebCenter Notifications or Customer: WebCenter Notifications for more info)
Notification events are found in WebCenter Admin under Config > Notifications.

For Each Notification Event, you can create a rule to enable or disable it. The default setting will be listed next to the event name.
- True = Notification Enabled
- False = Notification Disabled
Example Rules:
Enable a Notification for the Entire Application:
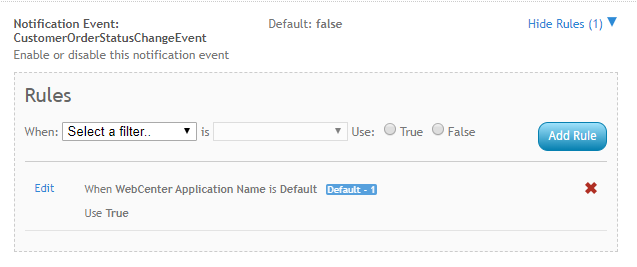
The WebCenter Application name option allows you to change the default to True in this case.
Enable a Notification for a Specific Branch: 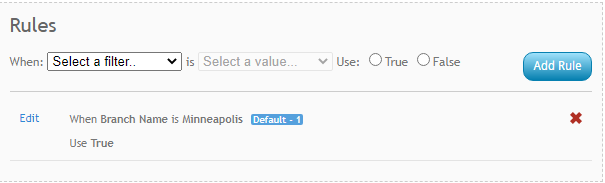
Here is the full list of notification events:
| Notification Event | Description | Default | Email Recipients |
|---|---|---|---|
| Added Order Candidate | Sent when a candidate is added to an order through the Job Board, WebCenter, or Enterprise | False | Branch, Contact |
| Candidate Message | Sent when there is a candidate for a customer to review | False | Branch |
| Candidate To Review | Sent when there is a candidate for a customer to review | False | Contact |
| Create Order Request | Sent when a customer contact submits a new order | True | Branch, Contact |
| Customer Order Status Change | Sent when an order status has been changed | False | Contact |
| Customer Update Candidate Status | Sent when a customer contact changes a candidate status | True | Branch |
| Employee Accept Order | Sent when an employee accepts an order | True | Branch |
| Employee Update Address | Sent when an employee updates their address | True | Branch |
| Enable Emails for Automatic TimeCard Approval | Emails when system automatically approves a timecard (if TimeCard Approval is disabled, this will have no effect) | True | Employee, Contact |
| Evaluation Assignment Finished | Sent when an assignment ends | False | Employee, Contacts |
| Evaluation Thank You | Sent when a user completes the evaluation | False | Contact, Employee |
| EW2 Invite | Sent to invite an employee to sign up for electronic W-2s - this requires help from the TempWorks support team to set up | True | Employee |
| HR Order Distribution | Sent to HR Contacts on an order when a candidate status changes to s-HRnotify | False | Contact |
| Order Request Approved | Sent when a customer contact approves an order request | True | Contact |
| Order Request Notifications to Account Managers | Sends Order Request notifications to Account Managers instead of to the Branch | False | Account Manager |
| Order Request Rejected | Sent when a customer contact rejects an order request | True | Contact |
| Order Request Review | Sent when a customer contact submits an order request and another customer contact needs to review (see Configuring WebCenter Order Requests for more info) | True | Contact |
| Password Request | Sent when a user requests to change their password | True | Applicant, Contact, Employee, Service Rep, Vendor Contact |
| TimeCard Approved | Sent when a timecard is approved | True | Contact, Employee |
| TimeCard Rejected | Sent when a timecard is rejected | True | Contact, Employee |
| TimeCard Submitted | Send when a timecard is submitted | True | Contact, Employee |
| Update Candidate Status | Send when a candidate status is updated | False | Vendor Contact |
| User Message Service Rep | Sent when an employee, contact, or vendor sends a message from WebCenter. Will show/hide the option for Employees, Customer Contacts, or Vendors to message a service rep from WebCenter | True | Service Rep |
| Vendor Order Distribution | Sent when a service rep sends a vendor an order from Enterprise | True | Vendor Contact |
| Vendor Order Status Change | Sent when a vendor accepts or rejects an order or the order status is changed by a service rep in Enterprise | False | Branch, Vendor Contact |
| W2 Posted | Sent when a W2 has been posted and is availabe to be viewed in WebCenter | True | Employee |
| WebCenter Invitation For Customer | Sent when a customer contact or vendor is given WebCenter login credentials by a service rep in Enterprise | True | Contact, Vendor Contact |
| WebCenter Invitation for Employee | Send when an employee is given WebCenter login credentials from a service rep through Enterprise | True | Employee |
Step 3: Modifying Email Templates
Each email notification has a default email template that will determine what the email looks like to the recipient. You can customize these email templates to work best for your processes.
Navigate to WebCenter Admin > "Email" to see all available email templates: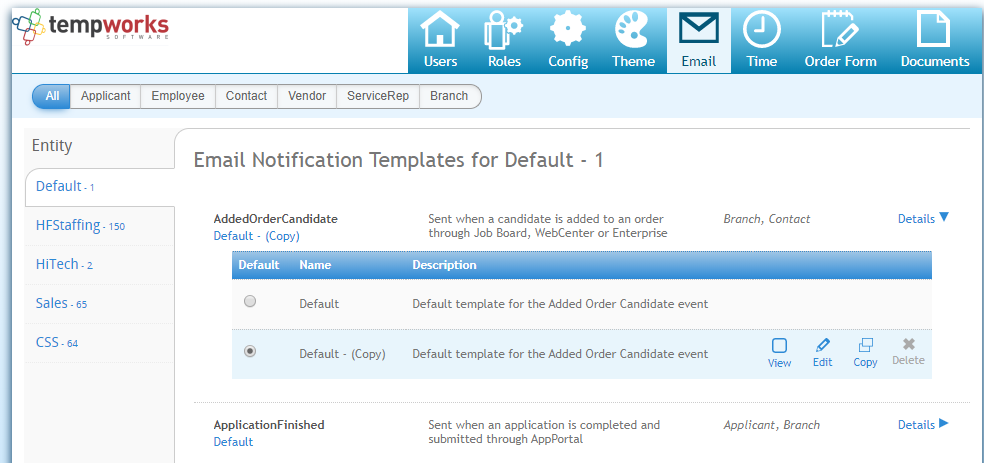
You can select a recipient along the top to see only email notifications related to that recipient:

If you have multiple Entities with separate HRCenter/WebCenter options, you can select the entity along the left:
For each notification template, select details to open up more options including editing and copying templates: 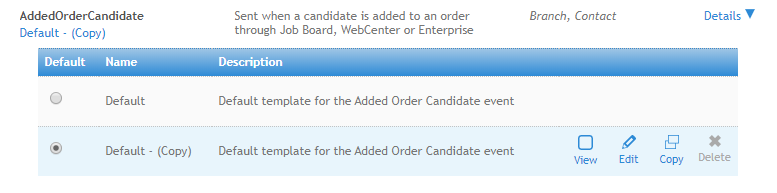
Customizing an Email Template
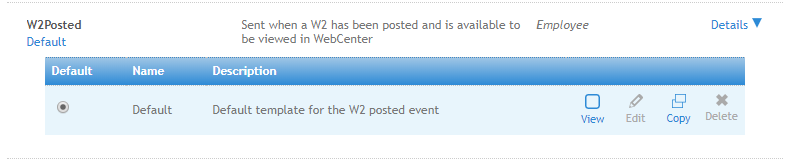
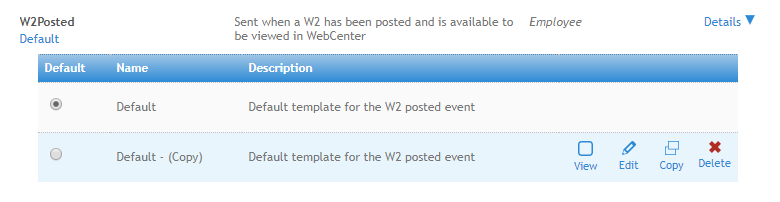
Each notification event will have a default template that you can view but not edit:
To create your own email template, select the "Copy" option & select "Edit" on the new copy to change or update the template:
Each template will have the following:
- Title
- Description
- Subject
- Body

You can utilize the formatting options to customize what the format will look like for the email: 
You can add and edit a table using the table options: 
You can enter dynamic fields that will change. For example, "FirstName" and "LastName" will be different for each recipient or "Year" will be different based on the date (each template may have different dynamic fields):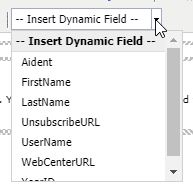
Once you have made changes and chosen "Save", you will need to select the template you want to use:
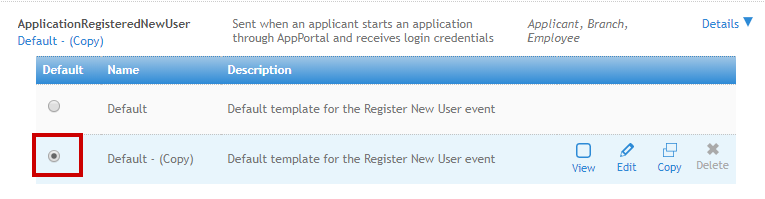
*Note* For each notification type, only one template can be used.
Changing Templates Based on Recipient
Even though you can only have one template per notification type, there are still options if you want to personalize an email for an employee, customer contact, branch, etc.
For example, the template for "Register New User" may be different for the employee and the branch.
You can use the dynamic fields "If--IsEmployee", "Else---IsEmployee", and "EndIf--IsEmployee": 
First use the "If--IsEmployee" field before the template you would like to use for the employee. This field says everything after "If--IsEmployee" and before "Else---IsEmployee" will be what the employee is sent via email: 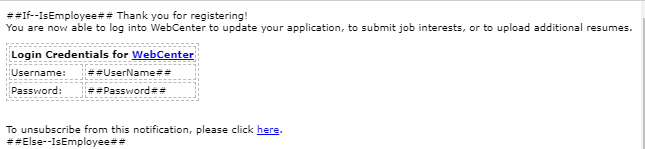
After you have made your template for what the employee should see, enter "Else---IsEmployee". This says for anyone not an employee, use the following information. Then create the template as you want the Branch (or not employees) to see: 
The last step is to enter the "EndIf--IsEmployee". This signifies that the template ends here and wraps things up.