Our Partners

To learn more about Asurint, check out Asurint Overview

To learn more about Crimcheck, check out Crimcheck Overview

To learn more about First Advantage, check out First Advantage Overview

To learn more about AccuSourceHR, check out AccuSourceHR Overview

To learn more about Universal Background Screening, check out Universal Background Screening Overview
Ready to Get Started?
*Note* In order to utilize background checks in Beyond, you will need to first contact your TempWorks Account Manager. After the initial setup is completed on the back end, you will be able to complete the following steps to complete your setup.
To complete the setup process, you will want to setup the following:
Setting Up Provider Credentials
Depending on which background check provider(s) you will use, you will need to add your account to Beyond to allow Beyond to send the necessary information to the background check provider.
Credentials can be added by any admin who has access to the System Settings section in Beyond.
To Find Background Check Credentials:
- Navigate to the
 Menu
Menu - Select System Settings
- Select External Services > Background Checks
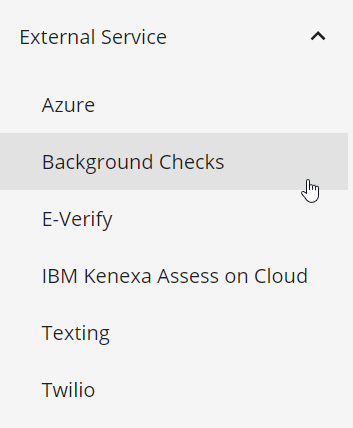
- Select the + to add background check credentials
 Menu
Menu
Check out the providers sections below for more information on what credentials you will need to enter.
*Note* How Hierarchy Affects Background Check Credentials:
Regardless of which provider you choose, you will be asked what account level you want to add your credentials to. This is related to Beyond Hierarchy. Most systems will allow any user in the system to use the same provider credentials. This is when you set these credentials up at your highest hierarchy (System or Subsystem). 
If you have different credentials for different EINCs or branches, etc. you can set up each set of credentials with the specific company or branch. This is when you would set the account level to company or branch or user. Then, under Ownership, you would choose the correct entity, branch, or user.

When editing/removing credentials that are located above your current hierarchy level, you will be presented with the following message:

The above message has been added to provide a visual aid in the determination of editing credentials.
Providers
Each provider will have different required information that needs to be entered in the credentials section:
- Asurint
- Crimcheck
- First Advantage
- AccuSourceHR (SourceDirect)
- Universal
Asurint
- Select the + in the upper right under external services > background checks
- Choose Asurint
- Enter the following information
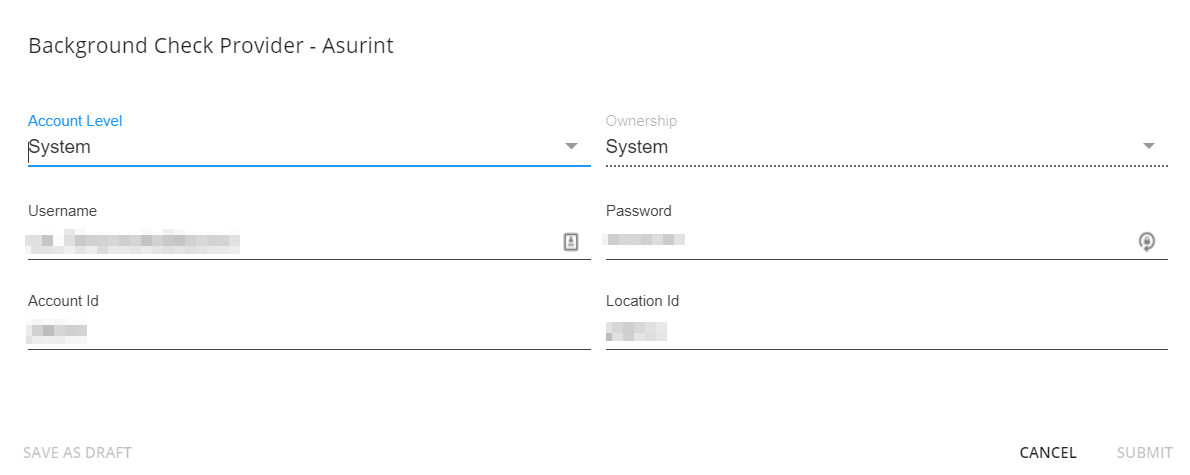
- Account Level: what hierarchy should this be available at? (See hierarchy note above)
- (Optional) Ownership: If you are not setting this to system, select the name of the entity, branch, or user who will use this account information from the drop down
- Username & Password: Provided by Asurint
- Account Id: Provided by Asurint
- Location Id: Additional Identifier provided by Asurint
- Select Submit
- Once you have saved your credentials, a Notification URL will generate under the credential information. You can use the copy to clipboard option to copy and provide this URL to Asurint in order to receive status updates:
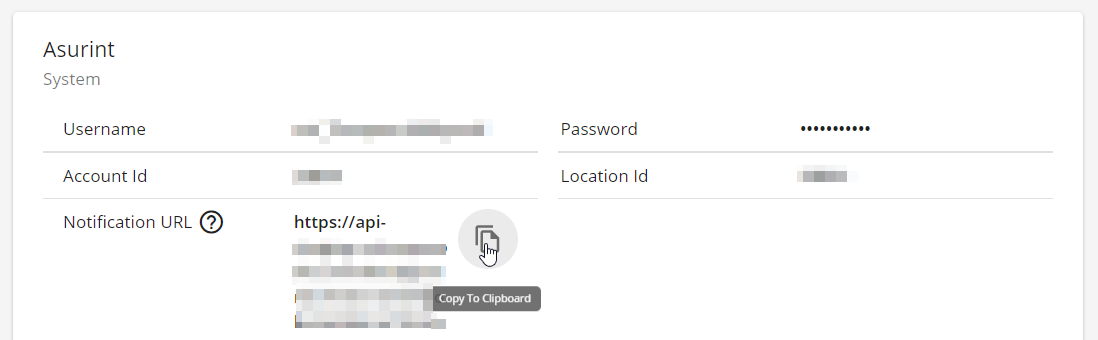


*Note* Asurint requires each service rep using background checks to have their email on file under Beyond Menu > System Settings > Service Representatives. Check out Beyond - Managing Your Service Representatives for more information.
- Select the + in the upper right under external services > background checks
- Choose Crimcheck
- Enter the following information:
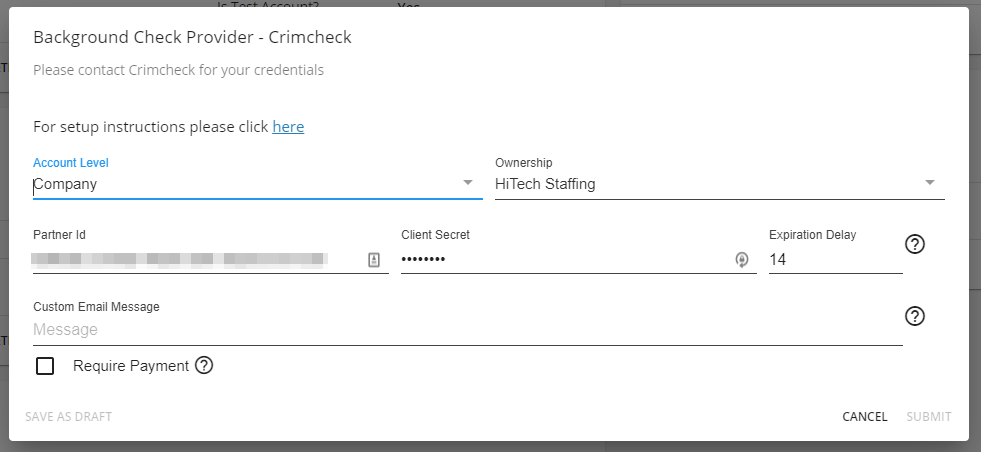
- Account Level: what hierarchy should this be available at? (See hierarchy note above)
- (Optional) Ownership: If you are not setting this to system, select the name of the entity, branch, or user who will use this account information from the drop down
- Partner Id: Provided by Crimcheck
- Client Secret: Provided by Crimcheck
- Expiration Delay: Enter a number of days before the request expires. If no date is entered, background check requests will expire after 2 weeks.
- (Optional) Custom Email Message: You can enter an additional note that will be sent to applicants when requesting a background check. We recommend leaving this field blank if you are not planning on emailing the applicant additional information through Crimcheck
- (Optional) Require Payment Checkbox: Only check this box if you want an applicant to pay for the background check requested instead of your company
- Select Submit

Crimcheck also requires user credentials to be set up. See below for more information.
*Note* If you are currently using our Enterprise First Advantage Integration, you may require some account updates with First Advantage. Contact your First Advantage Account Manager for more information.
- Select the + in the upper right under external services > background checks
- Choose First Advantage
- Enter the following information:
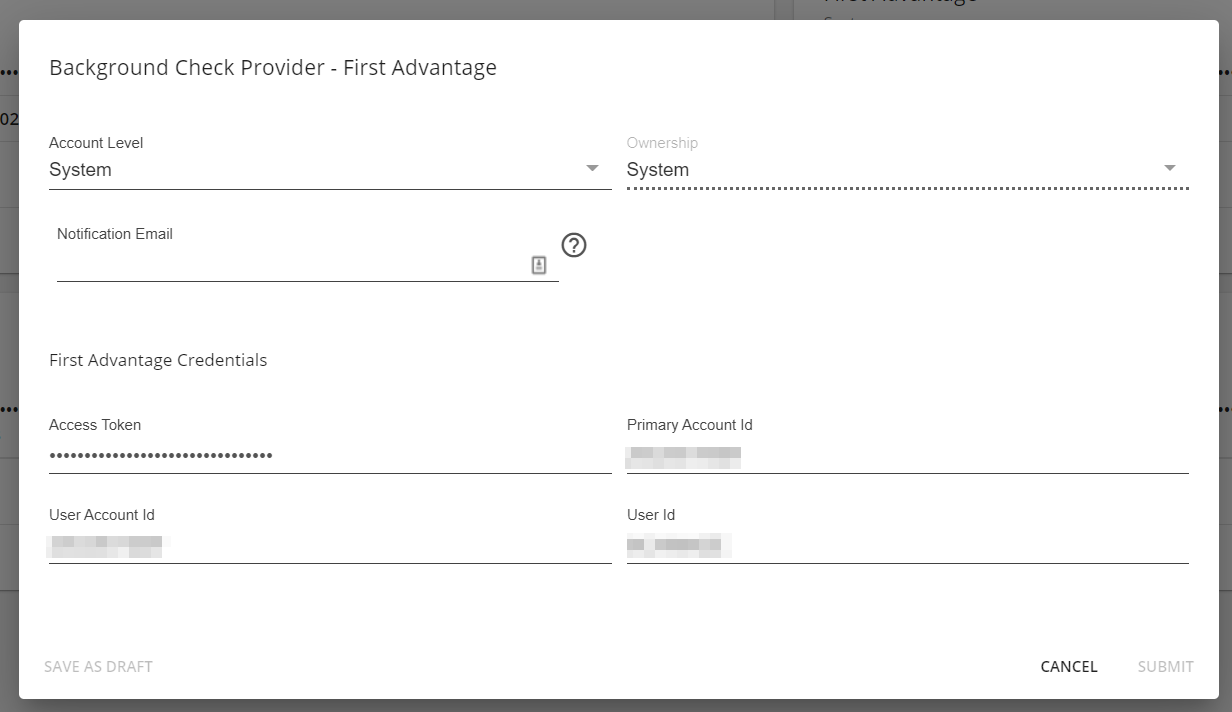
- Account Level: what hierarchy should this be available at? (See hierarchy note above)
- (Optional) Ownership: If you are not setting this to system, select the name of the entity, branch, or user who will use this account information from the drop down
- Notification Email: This email will override the email settings you have with First Advantage that background check statuses are sent to
- Access Token: Token Provided by First Advantage
- Primary Account Id: Provided by First Advantage
- User Account Id: Provided by First Advantage
- User Id: Provided by First Advantage
- Select Submit

- Select the + in the upper right under external services > background checks
- Choose AccuSourceHR (SourceDirect)
- Enter the following information

- Account Level: what hierarchy should this be available at? (See hierarchy note above)
- Ownership: If you are not setting this to system, select the name of the entity, branch, or user who will use this account information from the drop down
- Client ID: Provided by AccuSourceHR (Source Direct)
- Client Secret: Provided by AccuSourceHR (Source Direct)
- Select Submit

*Note* Once submitted, a Notification URL will be generated that will be set up within AccuSourceHR (SourceDirect) by TempWorks Software and AccuSourceHR (SourceDirect).
- Select the + in the upper right under external services > background checks
- Choose Universal
- Enter the following information
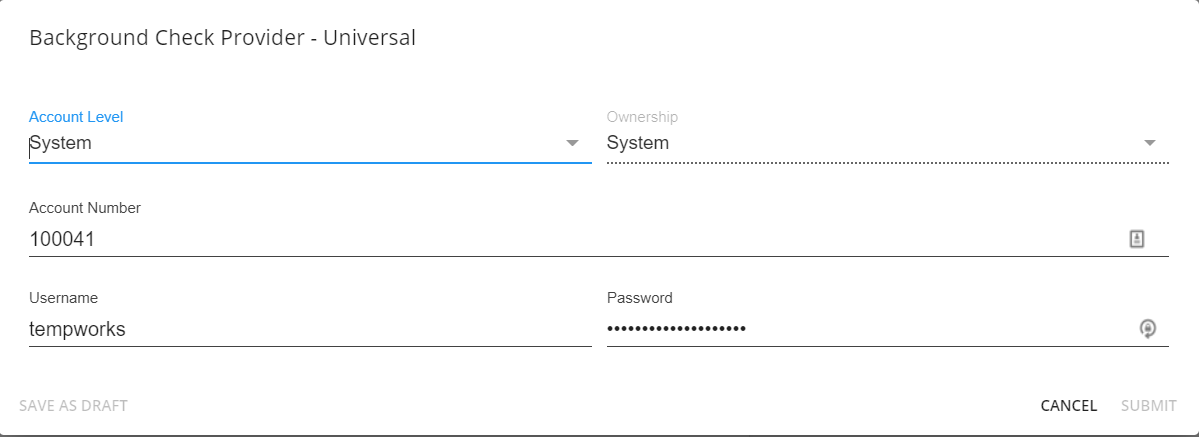
- Account Level: what hierarchy should this be available at? (See hierarchy note above)
- (Optional) Ownership: If you are not setting this to system, select the name of the entity, branch, or user who will use this account information from the drop down
- Username & Password: Provided by Universal
- Select Submit
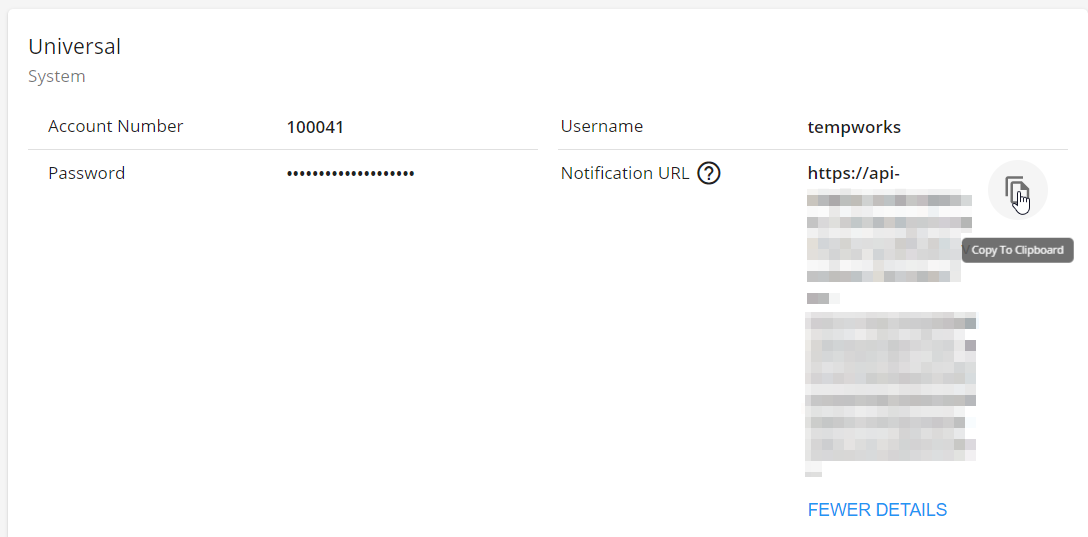
- Once you have saved your credentials, a Notification URL will generate under the credential information. You can use the copy to clipboard option to copy and provide this URL to Universal in order to receive status updates:


*Note* Once a password/access token/client secret has been saved for a background check provider within Beyond, it will not be able to be viewed/retrieved.
If one of these has been forgotten, you will need to either replace it within the setup card of the background check provider, or you will need to remove the credentials and re-add them.
Setting Up User Permissions
Once you have set up your provider credentials, you will need to make sure the users you want running background checks have the correct permissions. In order to do this, you will need to have access to the Security Groups section of system settings. We recommend setting this information up at system or subsystem level to make it easier to include the users you are looking for.
There are 2 permissions that you can grant related to Background Checks:
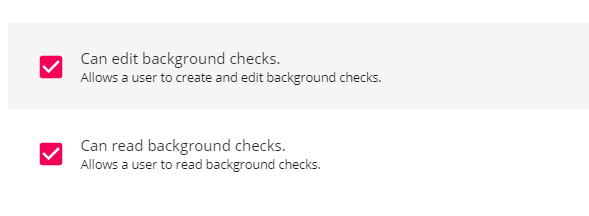
- Can Edit Background Checks - allows users to create and edit background check requests
- Can Read Background Checks - allows users to review and search for background check requests and their current status
To Find Security Group Permissions:
- Navigate to
 menu in the upper left
 - Select Security Groups
- Select Permission
- Either:
- Add users to any group that already has this permission(s) OR
- Create a new group with the permission(s) checked and add users to it (remember that users can only be part of one permissions group and will inherit all the permissions that you check.
 menu in the upper left
For more information, check out Beyond - Managing Security Groups.
Crimcheck User Setup
In order for the Crimcheck integration to function properly, along with the addition of the System Settings, an API Key must be submitted within the User Settings of Beyond.
*Note* Every user that will be utilizing the Crimcheck integration will need to have API Key generated and entered within the User Settings of Beyond.
To retrieve the API Key:
- Navigate to https://clients.efetch.com/account/integrations and log in
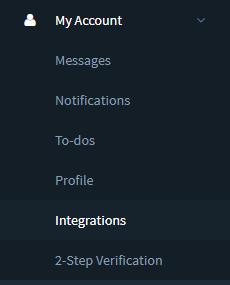
- Expand the My Account dropdown on the left hand side and select Integrations:
- Find TempWorks within the list of integrations and select Generate API Key:
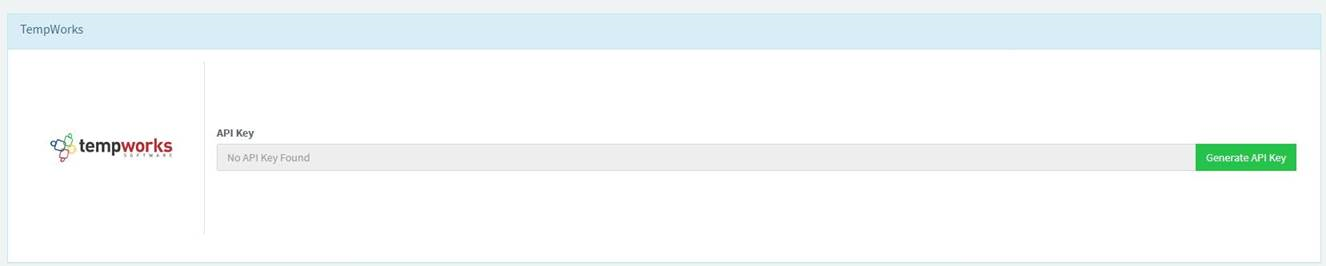
- Copy the API Key that is shown within the field:


To finish setup:
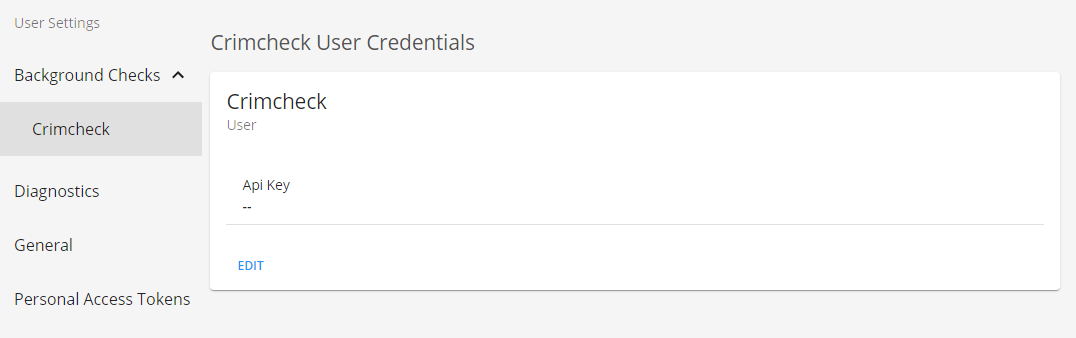
- Within Beyond, navigate to menu in the upper left
- Select User Settings
- Select Background Checks < Crimcheck
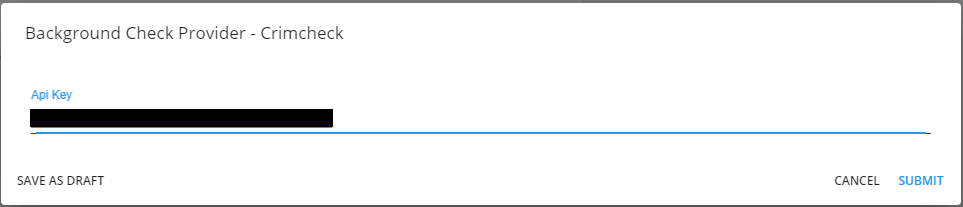
- Select Edit
- Paste the API Key that had been previously copied
- Select Submit


*Note* Upon submitting the API Key, an automated test will run to ensure the API Key is valid.
- If the API Key is accepted, the credentials will save as expected.
- If the API Key is not accepted, the following will show:

