Using Tasks in Beyond
Whether you are a salesperson or a staffing specialist, throughout the workday you will be presented with plenty of to-do items to track. With Beyond we have a simple, elegant tool to manage those tasks.
In this article, we will guide you through working with tasks and how Beyond tasks differ from tasks found within Enterprise.
*Note* Tasks within Beyond are completely separate from Enterprise and thus will not be shared between both platforms.
This article covers the following:
- Task Security and Hierarchy
- The Tasks Card
- Adding Tasks
- The Task Wizard
- The Tasks Page
- Picking Up Unassigned Tasks
- Completing a Task
Task Security and Hierarchy
Public Tasks
- Public tasks can be viewed on a given record or on Beyond’s Tasks page by:
- A service rep that is assigned to the task.
- Members of a team assigned to the task.
- Any other user viewing the record the task is linked to.
- Any other user viewing Beyond’s Tasks page.
Private Tasks
- The "Can view another user's private tasks" permission can be added to security groups that require it.
- This permission is required for any user that is notassigned to the task as a service rep or is not a member of an assigned team.
- This permission is not required for a service rep that is assigned to the task and/or members of a team that is assigned to the task.
*Note* For more information on permissions, please see the article titled Beyond - Managing Security Groups.
Task Hierarchy
- When a task is linked to a specific record at the time of creation, it inherits the hierarchy associated with that record.
- When a task is not linked to a specific record, it inherits the hierarchy of its creator.
The Tasks Card
The "Tasks" card can be found on the Beyond home screen. This card represents your current visible workload. There are five different tabs to view within the card:
- Pinned: Tasks that have been set aside for visibility regardless of when they are due.
- Today: Tasks that have a due date that matches the current calendar date.
- Overdue: Tasks that have a due date that is past the current calendar date.
- Tomorrow: Tasks that have a due date of tomorrow.
- Week: Tasks that have a due date that is within the current calendar date and seven days in the future.
- Upcoming: Tasks that have a due date that is greater than 7 days in the future.

The number in the corner beside each tab will display the number of tasks due for each section.
Selecting a task will reveal details about the task, including the date its due, the assigned rep, any linked records, and tags that belong to the task.
*Note* Tasks have a maximum of 255 characters and can be as detailed as you like.
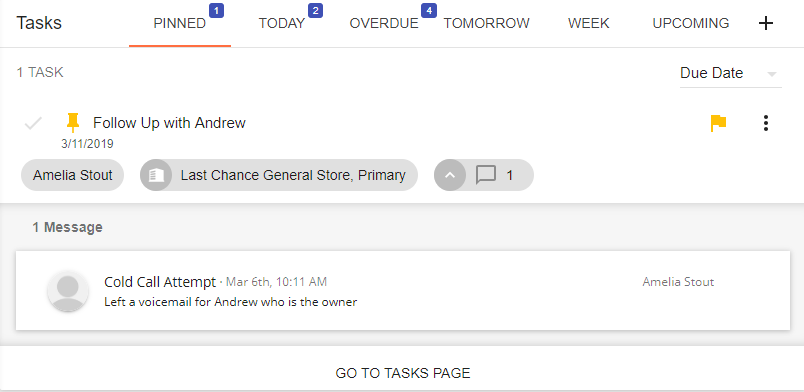
*Trainer Tip* Try right clicking on a linked record, this will allow you to see the "Quick View" bar.
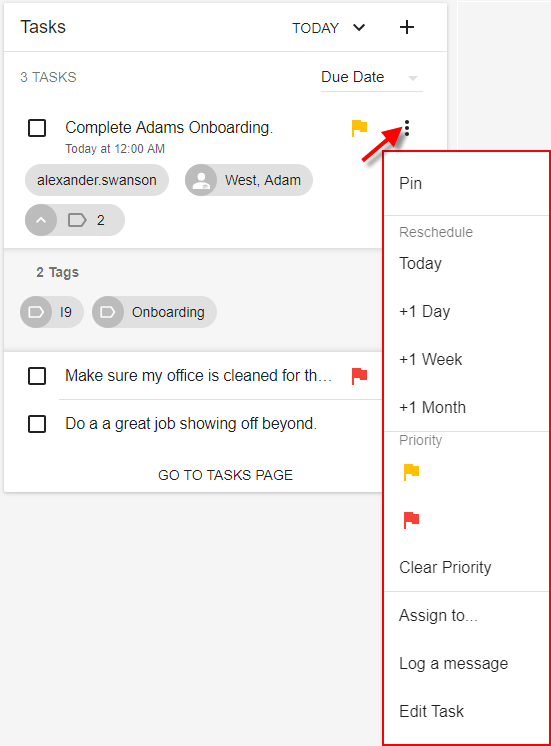
By selecting the "more options" button, tasks can be pinned, rescheduled, flagged with priority, reassigned, have messages logged on, and edited:
Adding Tasks
Tasks can be created via the following methods...
- Selecting the "+" button on the "Tasks" card:

- Interacting with the "Tasks" button on the left of the screen:

- Interacting with the "Tasks" charm on a record:

- While logging a message on a record:

*Note* All tasks created from a message are "Public" by default. If needed, you can change the task to "Private" after creating the message.
The "Add/Edit" Task Wizard
Once a task is added, a wizard will display allowing you to add details to your task. The only required field for a task is a subject line. This will be the main display of what the task is: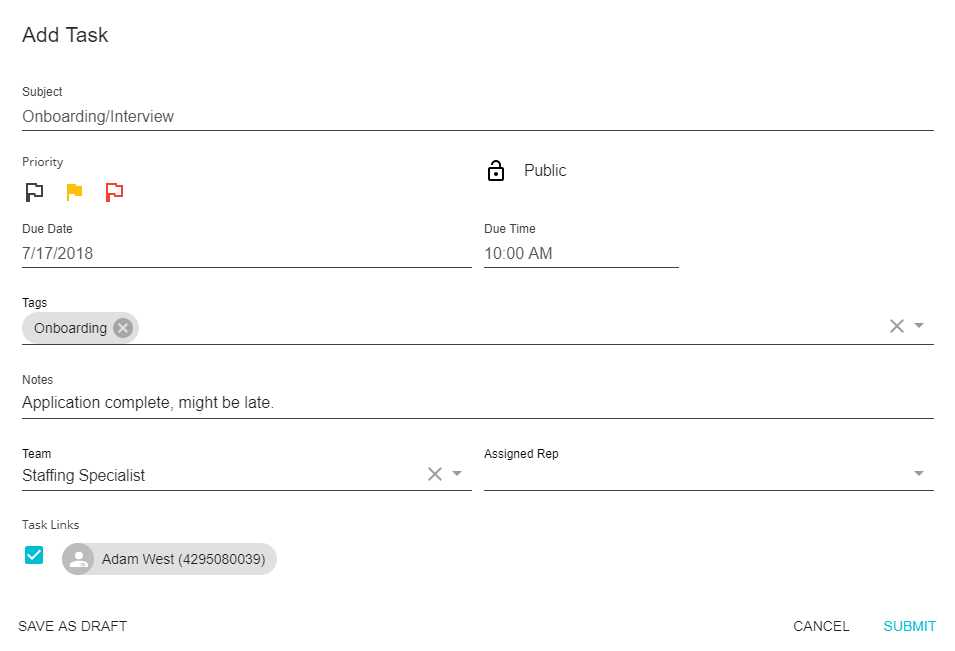
Helpful fields on the Add/Edit Task Wizard include:
- Priority: A flag determining the importance of the task.
- Public vs Private: This will determine whether the task can be viewed solely by the creator or if it can be viewed by other service reps.

- Due Date and Time: These fields, while not required, will determine which tab the task will be displayed under on the "Tasks" card.

- Tags: Tags allow create and manage your tasks by creating/ or searching for key words. When typing in a tag if it has been used before by another service rep, it will display as an option. If the Tag does not exist an option to create a new tag will appear.

- Team: Tasks can be assigned to not only an individual but also to a group of individuals who are associated by a team name. This is used primarily when working with unassigned tasks as a way to distribute those tasks.
*Note* For more information about teams, please see the article titled Beyond - Creating & Managing Service Rep Teams.
- Assigned Rep: The rep assigned to complete the task. This field may be empty only if the task has a team assigned to it.

- Task Links: The records associated with this task.

The Tasks Page
The "Tasks" page is an area that allows users to search for and manage tasks.
To open the "Tasks" page. select the "Tasks" menu on the left of your screen and select "Go to Tasks Page":

The page itself is divided into two overarching sections:
- The Searching Area
- Displayed Tasks

*Trainer tip* A toggle exists that will allow you to view tasks in the display area that are either incomplete or completed:
The searching area can be used to find/isolate tasks. There are three base categories of tasks:
- Mine: Tasks that are assigned to you.
- Unassigned: Tasks that are assigned to no one but do belong to a team you belong to.
- All Tasks: These are all tasks that you have access to.
*Note* You will only ever be able to view tasks that belong to a team you are part of, however, you can belong to more than one team.
In the display area, tasks can be viewed in a similar way to how they are viewed on the "Tasks" card on the "Home" page.
Picking Up Unassigned Tasks
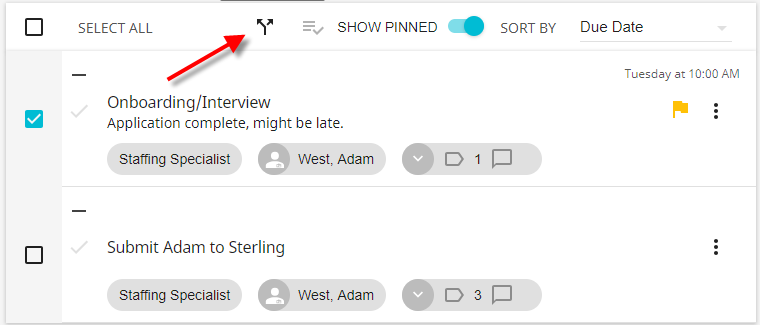
Within the "Tasks", select to view unassigned tasks in the searching area, then select the task you wish to assign on the left:
*Note* More than one task may be reassigned at any one time.


Once the tasks have been selected, select the "reassign" action to open the "Reassign Tasks" wizard:
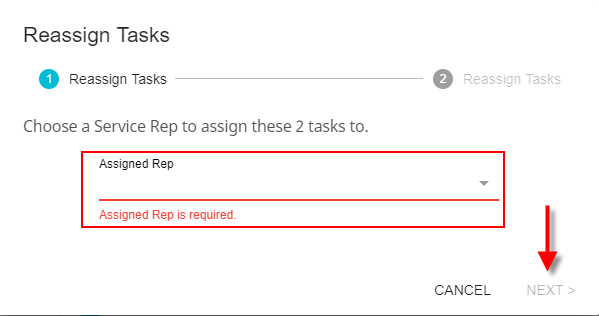
Within the "Reassign Tasks" window, select which service representative to assign the task(s) to and select "Next":
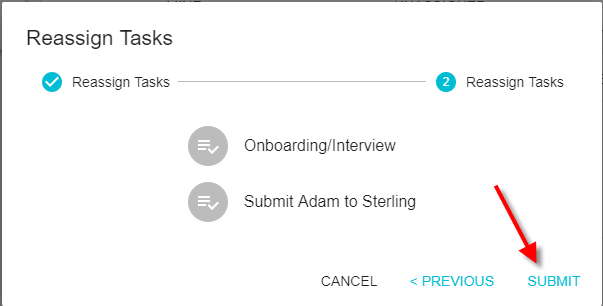
Review your selections and select "Submit" once finished:
Completing a Task
To complete a task, select the check box next to the task on the "Tasks" card or in the "Tasks" menu:

Completed tasks will display and may be unchecked to mark it as "incomplete".
