What is a Temp Order?
The Order record contains information regarding all job openings (requisitions, openings, requests) placed by customers'. Order records hold valuable information including shift times, start dates, financial details, worksite details etc. A temp order is for temporary workers that might be assigned at the job site. These orders can be set up for any amount of time.
There are multiple ways to create a temporary order, this article will explore three different options and discuss how to manage your orders once they are created.
Looking for a video overview? Check out Orders Part 1: The Basics
How to Create a New Order
There are many ways to create a new order. Here are a few options:
Option 1: Utilize the hot key combination of Alt+3
- This option is very quick if you enjoy keyboard shortcuts
- For a full list of keyboard shortcuts, check out Keyboard Shortcuts.
Option 2: Hover over the order bar in your navigation tree and select the + icon:
- This option is easy to use no matter what screen you are on
- If you are on a customer record, the customer will automatically populate so you don't have to select it
Option 3: From a customer record, select "New Order" from the actions menu (![]() icon) located in the upper left to create an order for the customer record that is currently open.
icon) located in the upper left to create an order for the customer record that is currently open.

- This is a great way to ensure that you are creating an order for the correct customer/department
Any of the three options utilized will open the "new order" window:

- If necessary, select the customer
- Be careful that you select the correct department for those larger accounts you have
- Select the order type of "Temp" or "Temp to Full-Time"
- You might have other order types customized in your system, talk with your admin or manager
- Select Finish and you will be brought to the newly created order
Filling Out Order Information
The details page is where users will enter important job information including the job title, start date, bill and pay rates, contact roles (such as the Supervisor or hiring Manager) and more:

Customer Information:
The customer information section displays the (1.) customer ID, (2.) worker comp code, (3.) work site and (4.) directions. 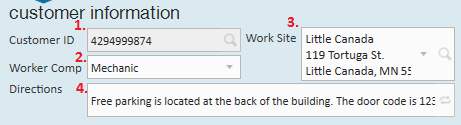
The work site information is pulling in based on the default worksite setup within the related customer/department record and can be modified by selecting different worksites from the drop-down.
*Note* It is incredibly important that customer worksites are set up correctly as Enterprise uses worksite information to determine how taxes are applied to an employee's paycheck.
Financial Details:

- Multiplier Codes: Within the financial details section, users can either manually enter the pay and bill rate information or utilize any (1.) multiplier codes (i.e. mark up) listed to have the bill rates automatically calculated against the pay rate entered.
- Pay Periods: Defines the payroll schedule that employees' are on. The pay period that is selected will be used to accurately calculate taxes during payroll processing. The pay period that defaults into the order is driven by the pay period that was set on the related customer record.
- GP Percent: The gross profit percent that displays is what has been calculated for the order. Enterprise will include SUTA, FUTA, worker comp, FICA and med when calculating for GP percent
- Desired GM% (gross margin): Will automatically post-fill from the misc. page of the customer record if that information has already been added and saved.
- OT Factor: If overtime should be paid at a rate other than time and a half, you can use the OT factor. The factor entered will multiply against the pay rate to calculate the overtime rates.
Job Information:
The job information section is where the number of required employees, job title, description, start date, estimated end date and shift times are entered. Depending on what users have setup within the customer record specific fields will already have populated when the order is created.

Don't forget to save when you are done entering all the information!