What is an Adjustment?
Within Beyond we have the ability to set up reoccurring adjustments to an employee's pay. These are adjustments that would affect that individual's income, regardless of the customer that they are working for. Adjustment types would need to be setup directly on an employee's record.
Some examples of adjustments on the employee record include and are not limited to:
- Garnishments
- Child Support
- Levy's
- Loans
- Secondary Direct Deposits
- Benefits
Setting up an Employee Adjustment
To setup an adjustment on an employees record, first navigate to that employee's record. From here, select the 'Pay Setup' tab and then select the 'Adjustments' sub-tab.

From this tab, current adjustments that are set on the employee's record will be displayed. Additional adjustments can be added by selecting the "+ Add Adjustment" button.

This will open the adjustment wizard. There are three steps to this wizard:
Step 1: Adjustment General Setup
During the 'General' step, users select the adjustment which will be from a list of pre-built adjustments from within your system.

- Employer - The employer records where this adjustment should be applied to.
- Adjustment - The type of adjustment (ex. child support, levy, garnishment). This list is populated by adjustments that have already been created for your system.
- Description - This is a field that can help users further define an adjustment.
- Sequence/Priority - When working with employee records that have more than one adjustment, sequence can be used to determine in what order the adjustments are applied when calculating rules for what should be withheld.
- Authority - This is the authority that any funds withheld should be directed to. In the case where there is no outside authority, this field should be left empty.
- Case Number- when applicable, a case number can be provided for the adjustment.
If you select the additional information drop down, there will be additional fields you can enter:
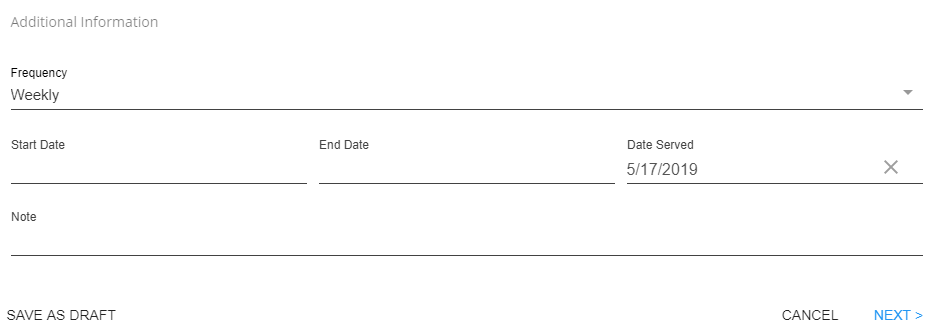
- Frequency - This should be set to match the pay schedule of your employee.
- Start Date - This field can be used to establish the date the adjustment should begin being taken out. If this field is empty, it will begin coming out immediately.
- End Date - This field can be used to establish the date the adjustment should stop being taken out. If this field is empty, it will continue to take out until deactivated.
- Date Served - This is the date the document was served to your company.
- Note - Any additional notes regarding the adjustment.
Select Next in the bottom right to continue.
Step 2: Setting up Adjustment Rules
During this step the rules of the adjustment will be set up. This will include how much should be taken out as well as any limitations that should be set based on the adjustments.
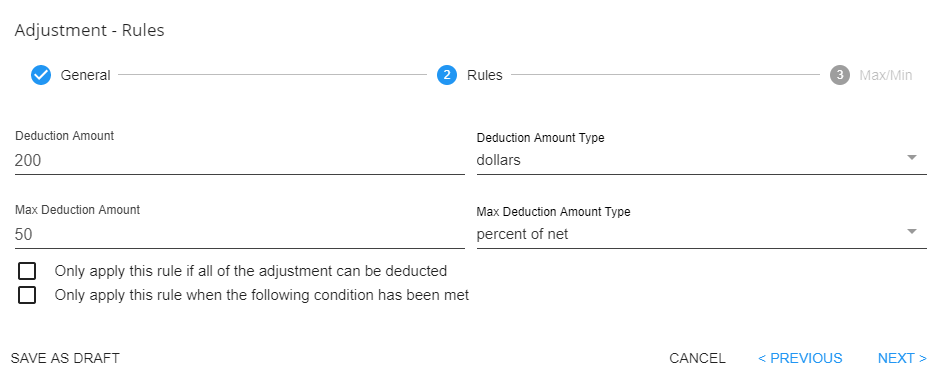
- Deduction Amount - The amount to be taken for the adjustment.
- Deduction Amount Type - Depending on the type of adjustment, options may include: dollars, percent of gross, and percent of net. The amount type should always reflect the deduction amount.
- Max Deduction - The maximum amount to be taken out for the adjustment.
- Max Deduction Amount Type - Depending on the type of adjustment, options may include: dollars, percent of gross, and percent of net. The max amount type should always reflect the max deduction. The max deduction amount type should always be the opposite of the deduction amount type. For example, if the deduction amount type is in dollars than the max deduction should be % and visa versa.
Adjustment Rules
There are 2 additional rules that can effect how/when adjustments are calculated.
First Rule: an all or nothing rule that will prevent the adjustment from being taken out if the whole of the adjustment cant come out.

Second Rule: the conditional rule that allows for the adjustment to be setup when a specific condition is met. Select a pay type, a condition, and an amount.

Step 3: Setting up Max/Min Options
In the final step, additional limits can be set for the adjustment.
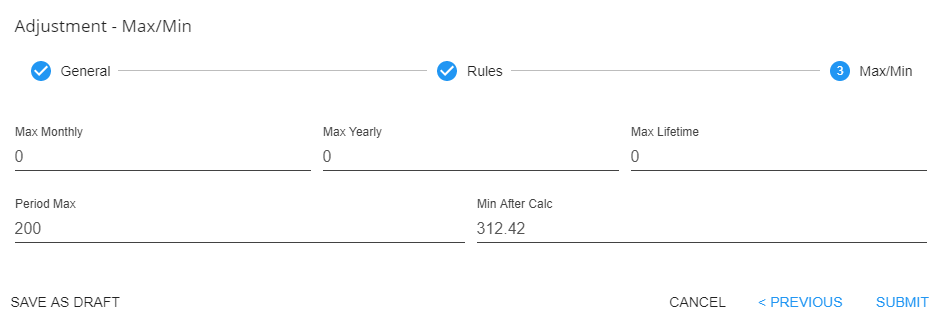
- Max Monthly - Once the total value of this field is collected for the month, this adjustment will no longer collect for the employee in the given month.
- Max Yearly - Once the total value of this field is collected for the year (until Dec. 31st), this adjustment will no longer collect for the employee in the given year.
- Max Lifetime - Once the total value of this field is collected, the adjustment will be deactivated.
- Period Max - Once the total value of this field is collected within a pay period is collected, this adjustment will no longer collect for the employee in the given period.
- Min after Calc - This is the minimum amount that must be left for the employee after the adjustment is collected.