Users have the ability to import GL journal entry information into QuickBooks by utilizing Transaction Pro Importer. Follow the below steps to properly import your GL information.
This Article Covers:
- Before Exporting to QuickBooks
- Exporting Your Information from Enterprise
- Importing to Quickbooks via Transaction Pro Importer
Before Exporting to QuickBooks
Before You Export information from Enterprise and import it into QuickBooks, please consider the following information.
Back Up Your QuickBooks
If this is your first time exporting your GL journal entry information, we highly recommend first creating a back up (or several backups) of your QuickBooks company file to use it as a test before updating your current account. It may take several tests to get your GL mapping exactly the way you want it.
Once you have been able to successfully import into the backup file, then repeat the setup steps you had to take on your backup file on your production file. Since one Journal Entry file from TempWorks can hold multiple Journal Entries, using the backup file will save you from having delete out partially imported files from your productions system.
Set Up Your QuickBooks Requirements
QuickBooks requires users to specify a customer name every time the AR account is hit. Therefore, in QuickBooks, create a customer named "TempWorks Customer." This will be the generic customer record in QuickBooks that we will post all of the AR journal entries to.
QuickBooks also requires users to specify a vendor name every time the sales tax payable account is hit. Therefore, in QuickBooks, create a vendor named "TempWorks Sales Tax." This will be the generic vendor record in QuickBooks that we will post all of the sales tax amounts to.
Map Your GL Account(s)
Before you can export to QuickBooks, you will want to map your account information correctly. Check out GL Journal Entry Export Setup Guide for the instructions on how to map your account information in Enterprise. You will want to update your mapping anytime you add or update an account or utilize new adjustments, worker comp codes, or other items that would effect your GL.
Exporting Your Information from Enterprise
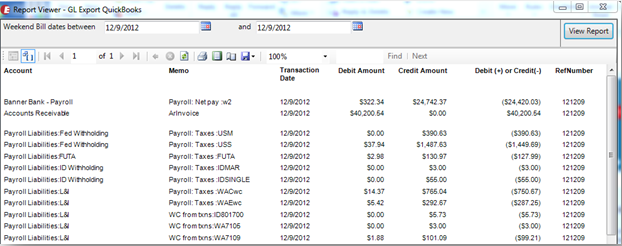
In order to export your information from Enterprise, you will need to run your GL Journal Entry Export Report. If you have worked with TempWorks to create a custom report, make sure to select that report.
- Run your GL export report for the given time period you wish to export (usually for the last week closed)
- This report will only allow you to export information for weeks that have already been closed in TempWorks
- To learn more on how to run the report, check out GL Journal Entry Export Report
- Always make sure your report shows a $0 different at the bottom to ensure everything is correct between the credit and debit columns

- Choose the export option in the report view and choose to save as Excel
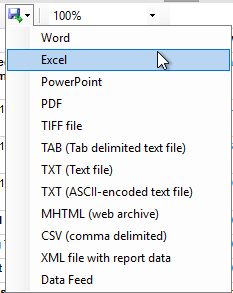
- Save this file to your local computer or shared drive to import into QuickBooks


*Note* If there were any new pay codes, adjustments, or taxes processed since the last time you ran the export, you will see a message at the top of the report letting you know what those items were and what account they have been mapped to by default. If they are not mapped to the account you want them to go into the administration area, click on the GLs account map option.
For more information check out GL Journal Entry Export Setup Guide
Import to QuickBooks via Transaction Pro Importer
Now that you have exported the necessary information from Enterprise, you will need to utilize Transaction Pro Importer to import the excel file into QuickBooks. If you have not already downloaded Transaction Pro Importer, you will need to do so now.
For more information on Transaction Pro check out:
When downloading Transaction Pro for the first time, you may need to install multiple files, register your account, and link your QuickBooks account to Transaction Pro. See Transaction Pro's Support Site for more information.
To Import Into QuickBooks:
The following steps outline the general import process for Journal Entry files using Transaction Pro Importer.
Remember that in this case you are entering a Journal Entry file from Enterprise to import into your QuickBooks. Please keep in mind that Transaction Pro is not a product made by TempWorks, so for support and updated product information please contact Transaction Pro.
Desktop Instructions:
- Open Transaction Pro
- Click on the Browse button and select the excel file you exported from Enterprise
- Select the Import Type of Journal Entry
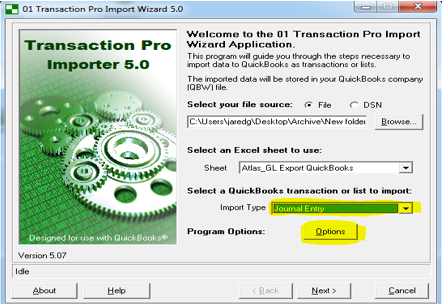
- Under Options, we recommend selecting "Do not add new accounts to QuickBooks" and "Generate Transaction Log"
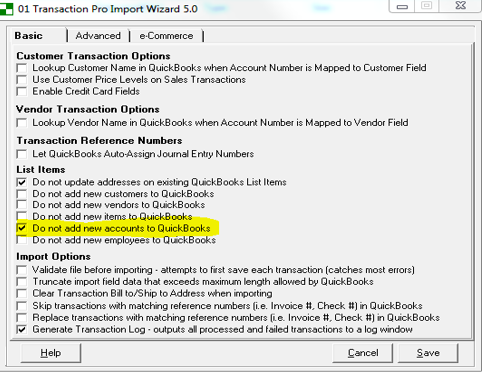
- This will ensure that Transaction Pro Importer is not creating the TempWorks default system accounts.
- Move to the advanced tab, under journal entries verify that the “Specify a single column for Debit/Credit instead of separate columns” option is checked.
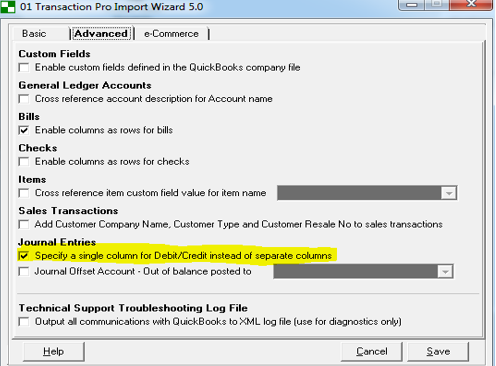
- Once you are done reviewing, click Save.
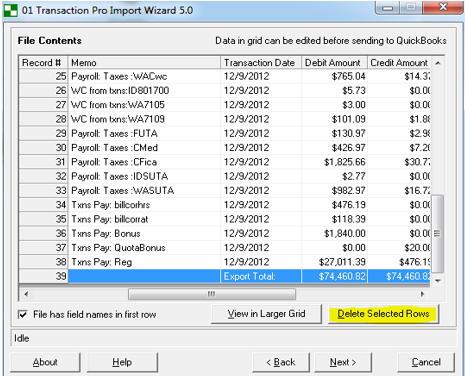
- On the next screen verify that all data is coming through correctly
- Ensure that all numeric fields are being shown as numeric fields
- If there are any discrepancies, open the spreadsheet and convert those fields from text to numeric value, then re-upload in Transaction Pro Importer
- Select the very last row in the grid (which has your totals in it from the report) and click the "delete selected rows" button to remove this line from the grid. Once removed, select next.
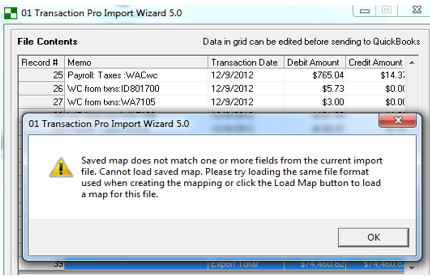
- If this is the first time running the import the following warning will appear, select ok.
- The following screen is where you will map columns from the GL Export report to fields in QuickBooks. The latest version of the GL Export report has the same column names as the QuickBooks fields allowing for easy matching from report column names to QuickBooks fields names. Selecting "field match" will automatically setup the mappings for you. Once the mapping is completed, select next.
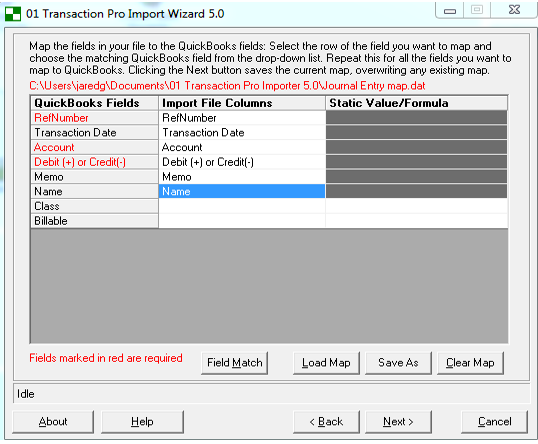


*Note* Older versions of the GL export may have different column names. Follow the list to match old columns and map accordingly:
- Reference Number = RefNumber
- Weekend Bill =Transaction Date
- External Account ID = Account
- Amount =Debit (+) or Credit (-)
- Source = Memo
- Name=Name
The following message will populate, select yes:

Within the import file fields screen you will preview the data from the spreadsheet now mapped into the necessary QuickBooks fields. This will display what is going to be imported to QuickBooks. Once your review is complete, select next. 
The following screen is the final screen before importing into QuickBooks. Item type as well as account must be selected. This is only used when you are importing items into QuickBooks (which we are not doing here), however Transaction Pro Importer still requires you select these. Once you have set these up, select finish.

A message will prompt you asking if you wish to begin the import process, select OK.18. If there are any errors during the import process the journal entry log will display the errors. Save these errors (transaction pro will save them to an Excel spreadsheet).

*Note* Errors that cannot be resolved internally may be sent to TempWorks support center. For any questions on Transaction Pro Importer, follow the link to preview helpful online articles that walk you through the import to journal entry process: