What is Considered an ACA Adjustment?
When we talk about ACA related Adjustments, we are talking about your benefit adjustments for employee and employer contributions. Before you can apply and adjustments to an employee's pay setup to be deducted from their checks, you must first set up the general adjustment settings in System Settings.
*Note* For more information on the ACA process, please see the article titled ACA Overview.
*Note* Users that belong to a Security Group that contains the "can-administrate" permission will be able to access the System Settings.
For more information on Security Groups, please see the article titled Beyond - Managing Security Groups.
We recommend having your benefit information in front of you as you fill out these adjustments to ensure they are accurate.
This article includes:
- Setting up Employer Paid Benefit Adjustment
- Setting Up Employee Paid Benefit Adjustment
- Spouse or Dependent Adjustments
- Employee/Employer Split Recommendations
- ACA Adjustments & Your GL
Setting up Employer Paid Benefit Adjustment
When we talk about "Employer Paid Benefit Adjustments", we are referring to documenting the amount the employer is responsible for paying for any employee's benefits. We need to set up a specific adjustment type to code this information correctly so that it can be set up on the employee but not taken out of the employee's check.
*Note* Always check with your tax advisor and benefit provider to make sure the information is entered correctly for the adjustment.
*Note* We recommend navigating to System Level or your highest hierarchy level when adding adjustments in Beyond. You can always select a lower hierarchy in the hierarchy drop down if you do not want to have this adjustment available to the entire system.
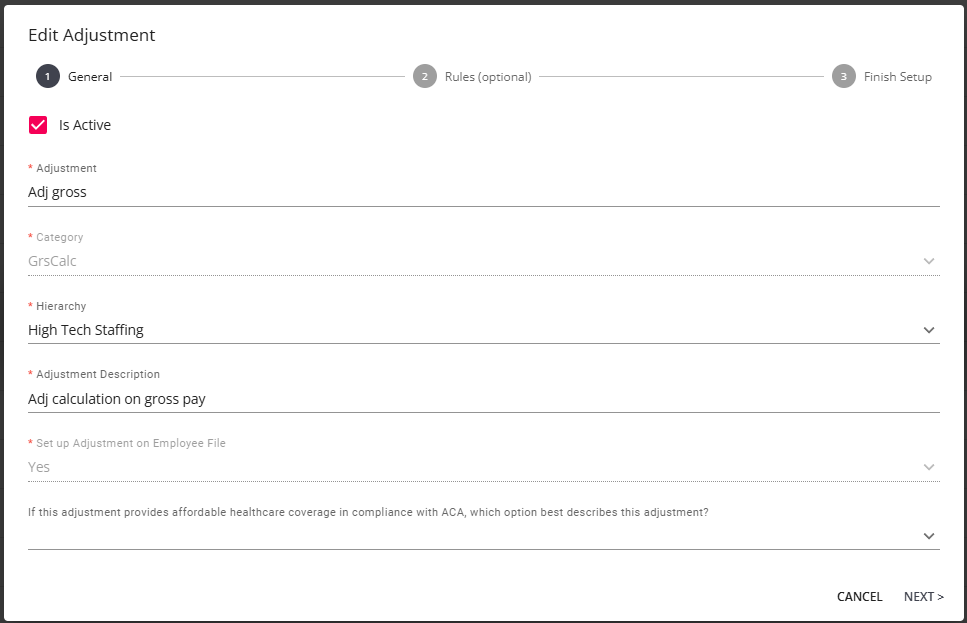
- Navigate to B Menu > System Settings > Pay Setup > Adjustments and select "+ Create Adjustment":

- Enter the following:
- Is Active: Checked
- Adjustment: We highly recommend having the adjustment name include Employer or ER to indicate this is the amount the employer is paying (for this example, we will use ACA ER).
- Category: Select the Category of "Benefit" since this is for an employee benefit.
- Hierarchy: Select the appropriate hierarchy level for the adjustment:
- If this adjustment needs to be available to the whole system - select System or SubSystem level.
- If you only want this adjustment available to one branch or one EINC make sure to select the branch or entity this should be applicable to.
- Adjustment Description: Optionally, enter a description to help your team know when this adjustment should be used.
- Set up Adjustment on Employee File: Yes
- If this adjustment provides affordable healthcare coverage in compliance with ACA, which option best describes this adjustment: Select "Employee Premium - Employer Portion" as we are setting up the Employer adjustment first.

- Once the information has been entered and confirmed, select "Next".
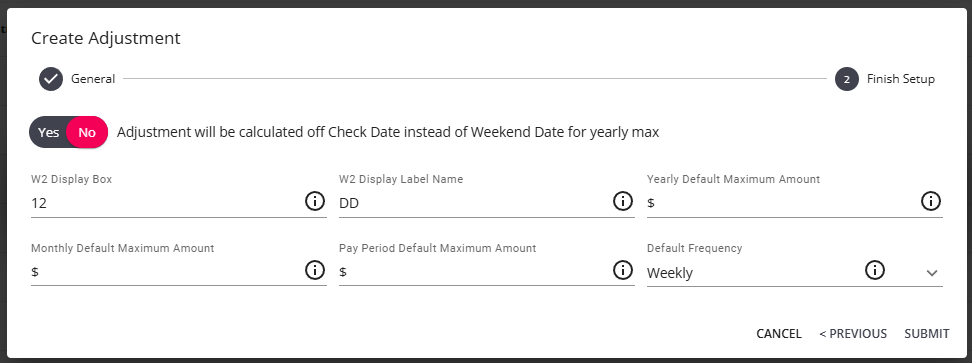
- Within the "Finish Setup" step of the Create Adjustment wizard, enter/select the following:
- Adjustment will be calculated off Check Date instead of Weekend Date for yearly max: If you have a yearly max, determine if you want yearly amounts to be calculated based on check date or weekend date.
- W2 Display Box: If, for example, you are creating a healthcare insurance adjustment you would in all likelihood want the benefit and amounts listed in box 12.
- W2 Display Label Name: Should be labeled appropriately based on the adjustment type.
- Yearly Default Maximum Amount: If a default annual maximum is entered here, it will automatically populate into the "Max Yearly" field within the adjustment details on the employee record. Otherwise, leave blank.
- Monthly Default Maximum Amount: If a default monthly maximum amount is entered here, it will automatically populate into the " Max Monthly" field within the adjustment details of the employee record. Otherwise, leave blank.
- Pay Period Default Maximum Amount: If a default pay period maximum amount is entered here, it will automatically populate into the "Period Max" field within the adjustment details of the employee record. Otherwise, leave blank.
- Default Frequency: This frequency should match how frequently your employee's are paid (usually weekly)

- Once the information has been entered and confirmed, select "Submit" to create the adjustment.
Setting up Employee Paid Benefit Adjustment
When we talk about an "Employee Paid Benefit Adjustments" we are referring to the adjustment that will be set up on the employee's record to cover the employee's portion of benefit costs which will be paid out each pay period for that employee. This does not include dependents or family members.
*Note* Always check with your tax advisor and benefit provider to make sure the information is entered correctly for the adjustment.
*Note* We recommend doing this option after you have set up the Employer Paid Adjustment (outlined above).
- Navigate to B Menu > System Settings > Pay Setup > Adjustments and select "+ Create Adjustment":

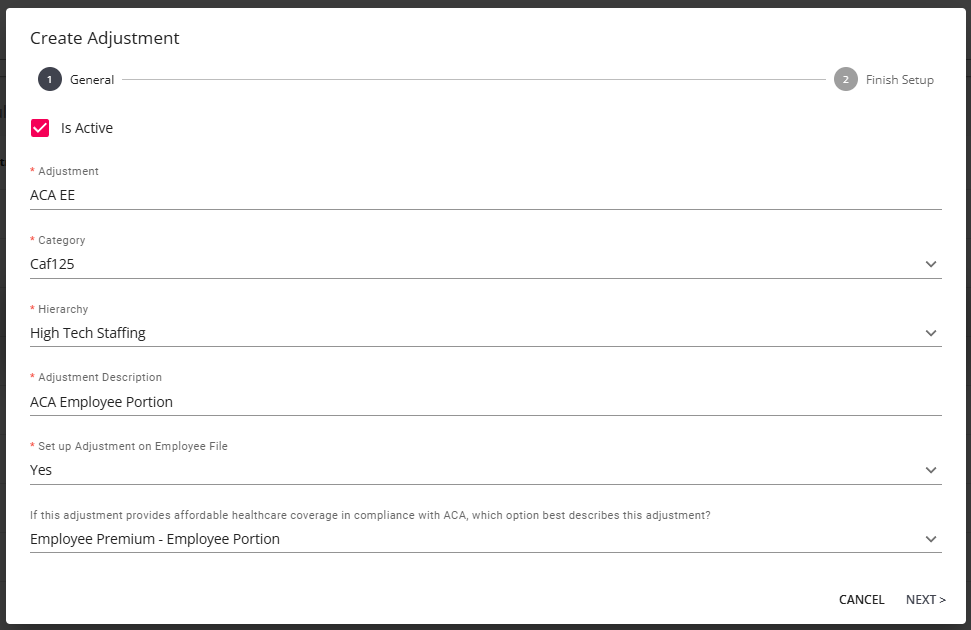
- Enter the following:
- Is Active: Checked
- Adjustment: We highly recommend having the adjustment name include Employee or EE to indicate this is the amount the employer is paying (for this example, we will use ACA EE).
- Category: Select the appropriate adjustment category for this benefit
- Keep in mind Billable/Adjust Net/Adjust Gross categories in the drop down.
- Hierarchy: Select the appropriate hierarchy level for the adjustment.
- If this adjustment needs to be available to the whole system - select System or SubSystem level.
- If you only want this adjustment available to one branch or one EINC make sure to select the branch or entity this should be applicable to.
- Adjustment Description: Optionally, enter a description to help your team know when this adjustment should be used.
- Set up Adjustment on Employee File: Yes
- If this adjustment provides affordable healthcare coverage in compliance with ACA, which option best describes this adjustment: Select "Employee Premium - Employee Portion" as we are setting up the Employee adjustment.

- Once the information has been entered and confirmed, select "Next".
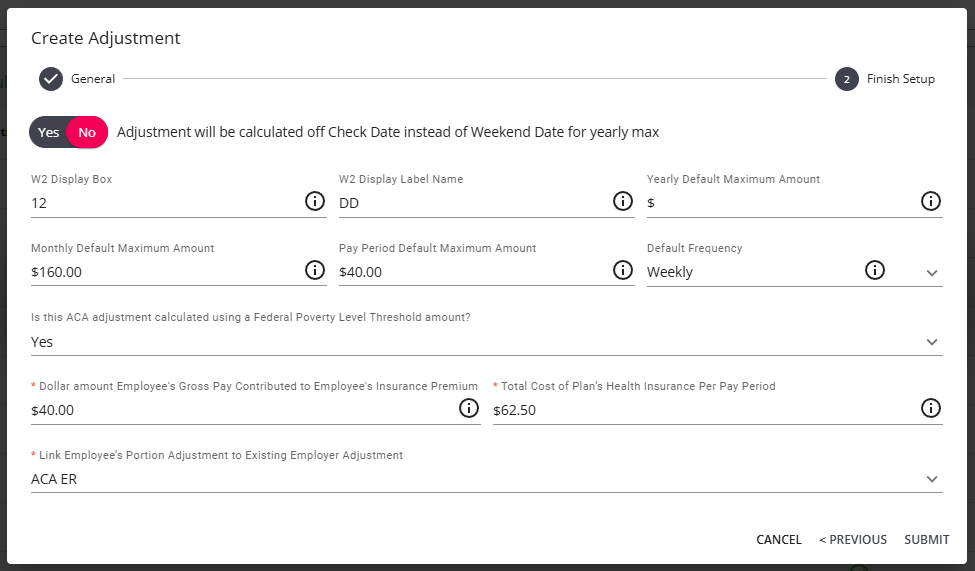
- Within the "Finish Setup" step of the Create Adjustment wizard, enter/select the following:
- Adjustment will be calculated off Check Date instead of Weekend Date for yearly max: If you have a yearly max, determine if you want yearly amounts to be calculated based on check date or weekend date.
- W2 Display Box: If, for example, you are creating a healthcare insurance adjustment you would in all likelihood want the benefit and amounts listed in box 12.
- W2 Display Label Name: Should be labeled appropriately based on the adjustment type.
- Yearly Default Maximum Amount: If a default annual maximum is entered here, it will automatically populate into the "Max Yearly" field within the adjustment details on the employee record. Otherwise, leave blank.
- Monthly Default Maximum Amount: If a default monthly maximum amount is entered here, it will automatically populate into the " Max Monthly" field within the adjustment details of the employee record. Otherwise, leave blank.
- Pay Period Default Maximum Amount: If a default pay period maximum amount is entered here, it will automatically populate into the "Period Max" field within the adjustment details of the employee record. Otherwise, leave blank.
- Default Frequency: This frequency should match how frequently your employee's are paid (usually weekly)
- Is this ACA adjustment calculated using a Federal Poverty Level Threshold amount: Yes.
- Dollar amount Employee's Gross Pay Contributed to Employee's Insurance Premium: Enter the dollar amount of the employee's gross pay for the insurance premium.
- Total Cost of Plan's Health Insurance Per Pay Period: Enter the total cost of the plan's health insurance per pay period (including employer costs).
- Link Employee's Portion Adjustment to Existing Employer Adjustment: Select the employer portion adjustment related to this adjustment.
- Keep in mind that each employer adjustment can only be linked to one employee portion adjustment.
- Employer portions only need to be linked when the employer may cover some the employee's expenses when the total health insurance plan amount exceeds the % the employee can pay.

- Once the information has been entered and confirmed, select "Submit" to create the adjustment.
Spouse or Dependent Adjustments
Additional adjustments can be created for insurance offered to dependents or spouses. In these cases, there may or may not be an employer paid portion.
Follow the same steps as above but this time filling out the adjustment for the additional insurance options.
You will want to select the "Family Member Premium - Employee Paid" option under the question "If this adjustment provides affordable healthcare coverage in compliance with ACA, which option best describes this adjustment?":
*Note* Make sure you do not affiliate these adjustments with an employer paid adjustment if there is no employer paid portion.
Employee/Employer Split Recommendations
If you are having employees and employer costs split, you will want to set up the employee adjustment slightly differently.
Employee Adjustment Differences
Let's say you have a flat amount of $35 that the employee pays normally. What happens when that is over the max % of their total pay that you can take out for benefits? (ex. 9.5%) In this case, you can set up your employee adjustment with a max percentage and max amount:

When the percentage of gross pay is less than $35 the difference will be added to the employer adjustment.
You can still enter the max amounts for the employer (ex. $35 per pay period) but more may be taken out when the employee does not make enough.
ACA Adjustments & Your GL
If you are utilizing a general ledger feed to feed payroll details to your accounting software, you may need to update it now that you have added additional adjustments.
*Note* Please see the article titled Enterprise - GL Journal Entry Export Setup Guide for more details.


