
What is TimeIntel by TempWorks?
TimeIntel by TempWorks, or TI, allows you to use just about any tablet or phone device as a time clock for your employees to punch in and out from. This process uses the TI application for punching and our WebCenter platform for reviewing and approving time.

*Note* The TimeIntel by TempWorks application requires Beyond access to function. Please contact your TempWorks Account Manager for more information.
The TimeIntel by TempWorks application is a licensed product. If you would like to utilize this application, please reach out to your TempWorks Account Manager.
Setting Up the Time Clock Device
In order to use the TimeIntel by TempWorks application, you will need to have one or more devices dedicated to being your touch screen time clocks where employees can punch in and out from.
This section outlines the following steps:
- Find a Device that Works for You
- Configure Custom Color Theme and In-App Logo
- Enable the WebCenter Configuration
- Install the App
- Create and Apply the Activation Code
- Localization Options
Find a Device That Works For You
System Requirements
Software:
- iOS - Latest two major versions.
- Android - Latest two major versions.
Hardware:
- Apple - Latest two device generations.
- Android:
- RAM: 3 or 4GB minimum.
- CPU: Minimum dual core processor running at 1.2GHz.
Additional Recommendations:
- It is recommended that a wired (Ethernet) network connection is used when utilizing the TimeIntel by TempWorks application on a connected device. An Ethernet Adapter may be required for your device. The following are example Ethernet Adapters depending on the type of device you have:
- For Apple devices with an Apple Lightning port: Belkin Ethernet + Power Adapter with Lightning Connector
- For Apple devices with a USB-C port: Belkin USB-C to Gigabit Ethernet Adapter
- For Apple devices with a USB-A port: Apple USB Ethernet Adapter
- For Android devices with a USB-C port: Anker USB C to Ethernet Adapter
- For Android devices with a USB-A port: Amazon Basics Ethernet Adapter
- Consider mounting your device to the wall so it doesn't walk off or become hard to find (and using features like Apple's or Google's Find My Device options)
- Keep your screen brightness high enough for easy worker visibility
- Turn off any snooze or auto-lock feature
- Utilize features like Apple's Guided Access or Android's Pinning Option to prevent the device being used for non-time clock purposes
- If you are utilizing a lot of devices, consider a Mobile Device Management software to manage updates and lock down devices remotely.
- Consider the thermal limitations of the devices being used as time clocks. You may need to utilize a weatherproof enclosure for the device depending on the environment it is going to be located within.
Configure Custom Color Theme and In-App Logo
During the initial setup of the application, TempWorks will assist in branding the application to suit your company's needs, including custom color theming along with the inclusion of an in-app logo.
Enable the WebCenter Config
Because the approval process involves WebCenter, you will need to turn on the configuration to allow punches to save in WebCenter.
- In WebCenter Admin, navigate to Config > TimeClock
- Find the Rule labeled: "Enable On-Site Time Clock App Punching"
- Create a New Rule
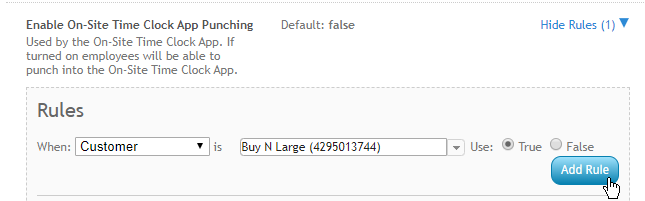
- Select Customer or Department
- Enter Customer/Department Name
- Select True
- Select "Add Rule" Button
*Note* For additional configuration options in WebCenter, please see the article titled TimeIntel by TempWorks Configuration Options.
Install the Application
To find the app, search for "TimeIntel" in one the following options:
- The App Store for iOS
- The Google Play store for Android
Once you have downloaded the app on the chosen compatible device, you will be prompted for an Activation Code and/or QR Code:

Create and Apply the Activation Code
An activation code links the TimeIntel by TempWorks application with the specific customer, etc. that you want to use it with. Before you can create an activation code, you must already have the customer and worksite this time clock will be stationed at, set up in the system.
*Note* In order to create an activation code, you will need to have the "Can Administrate" permission in Beyond.
Work with your administrator or TempWorks Support Team if you do not have access to System Settings.
*Note* If you utilize custom Security Groups with Advanced Permissions, you will need to add the Access to the "On-Site Time Clock Customer Activation Codes" page and form within Settings > System Settings to the Security Groups that require the functionality:

For more information on created custom Security Groups with Advanced Permissions, please see the following article titled "Beyond - Creating Security Groups with Advanced Permissions".
- Navigate to B Menu > System Settings
- Select "On-Site Time Clock Customer Activation Codes"
- Select the
 on the right and select "New On-Site Time Clock Invite Code" to create a new activation code:
- Create the code you want to use
- Must be at least 10 characters long and unique (not the same as any other Time Clock code):

- Must be at least 10 characters long and unique (not the same as any other Time Clock code):
- Select the Customer you want this invite code to apply for
- Keep in mind you must select the correct department for the customer:

- Keep in mind you must select the correct department for the customer:
- Optionally, select the associated worksite this Time Clock will be used for:

- Select "Submit" to save your invite code
 on the right and select "New On-Site Time Clock Invite Code" to create a new activation code:


Activation codes will remain active until you select the "Revoke Code" option by navigating to the  icon to the right of the activation code, and selecting "Revoke Code":

Retrieve the activation code or QR Code in Beyond to be used in the setup of the TimeIntel by TempWorks application:
- The activation code can be copied to the clipboard by selecting the
 icon to the right of the activation code, and selecting "Copy to Clipboard":
- The invite code QR code can be shown by selecting the
 icon to the right of the invite code:

 icon to the right of the activation code, and selecting "Copy to Clipboard":
 icon to the right of the invite code:

Enter the code or scan the QR in the app to complete the enabling of the TimeIntel by TempWorks application:

Once the activation code has been accepted, employees will be able to login with their respective pin/QR Code:

Localization Options
With localization settings, the TimeIntel by TempWorks application will be translated into your preferred language of English or Spanish.
While the TimeIntel by TempWorks application will default to the language of your device (English or Spanish), users can also choose their preferred language setting directly within the application by selecting the appropriate flag within the login screen:

*Note* The TimeIntel by TempWorks application will default to the language of the device (English or Spanish). Please follow the instructions outlined within the following articles to update the language settings on the device:
Setting Up the Worksite & Order
In order for the TimeIntel by TempWorks application to know which assignments can be used, you must configure your worksites and orders.
Worksite
- In Beyond, navigate to the customer record the on-site punching will be enabled for.
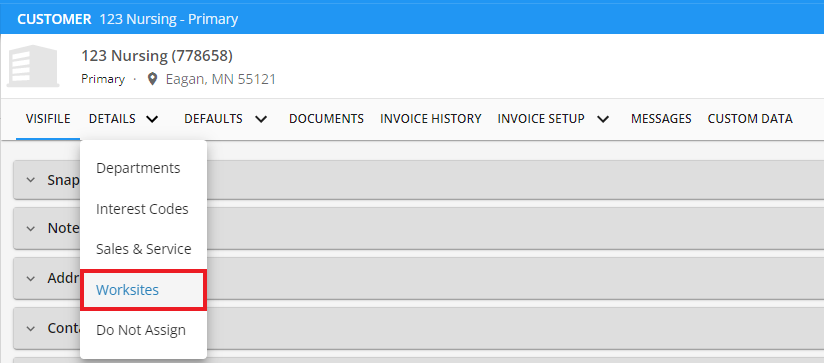
- Navigate to Details > Worksites and either select an existing worksite or create a new one (for this example, we will be editing an existing worksite):
- Within the "Worksite Details" card, select the "Edit" option at the right to open the "Worksite Details" window:
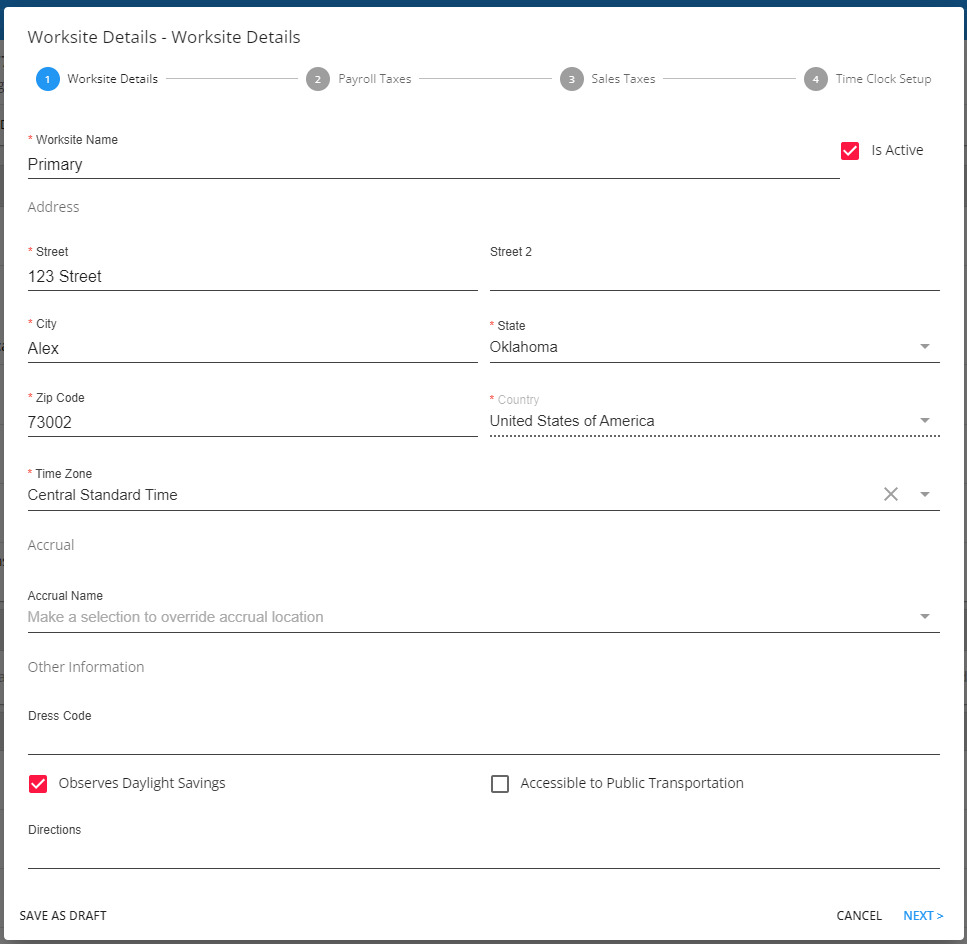
- *Note* If this is a new worksite, you will need to add the new worksite to the list. (see the article titled Beyond - Creating Customer Worksites for more information)
- Select the correct time zone for the clock under worksite details to ensure the clock displays the correct time:
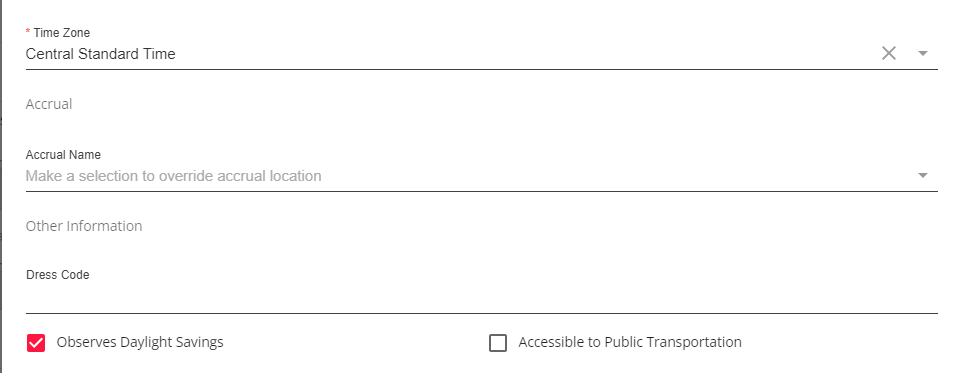
- *Note* The Observes Daylight Savings box is checked by default. If the area that the TimeClock is in does NOT observe DST (i.e. Arizona and Hawaii), uncheck this box.
- *Note* Selecting a Zip Code should automatically populate the "Time Zone" field with the time zone related to the zip code entered. Please verify the time zone that is populated before continuing through the setup process.
- Select "Next" and continue to progress through the steps until reaching the "Time Clock Setup" step.
- Once at the "Time Clock Setup" step, choose "Yes" from the "Activate Time Clock for this Worksite" dropdown. Additionally, you can apply this to all existing job orders that are under the worksite being created/edited by selecting the "Apply to all existing job orders" box:
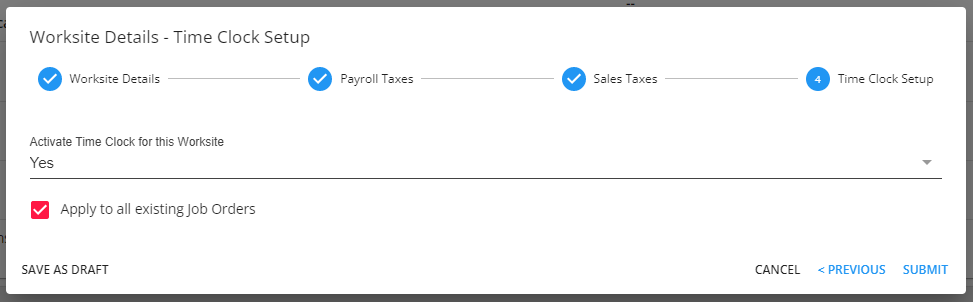
- Select "Submit" to finish the setup of the worksite.
Order
We recommend reviewing the following information on the order details tab:
- Worksite
- Shift and/or start and end times (can be used for different configurations that stop or warn early or late punches)
- Days of the week worked
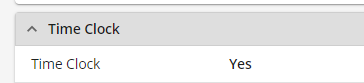
- Check the Time Clock box on the Time Clock card:
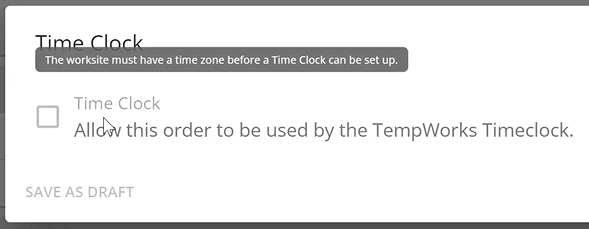
*Note* If the worksite does not have a time zone listed and you attempt to update the "Time Clock" field within the "Time Clock" card on the job order record associated with that worksite, you will see that the "Time Clock" checkbox cannot be selected along with the following tooltip:
Setting Up the Time Clock Approver
You must have a user that will review, edit and approve the punches made within the TimeIntel by TempWorks application. Typically, this is a supervisor or manager from your customer's site or an on-site representative.
Adding the Supervisor to the Order
- If you have not already, create a contact record for the customer that you will have approving time
- Navigate to the order you want this supervisor to approve time for
- Under the Contact Roles card, select the "+":
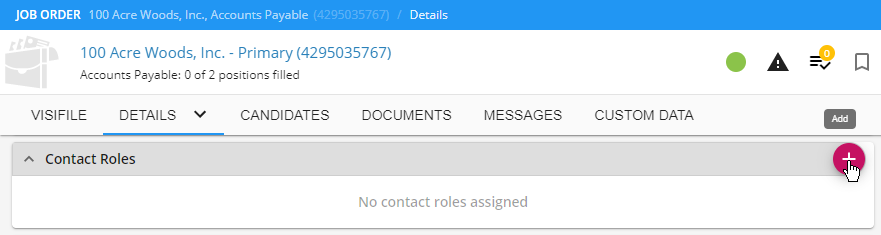
- Select the "Contact"
- Select the "Supervisor" Role:
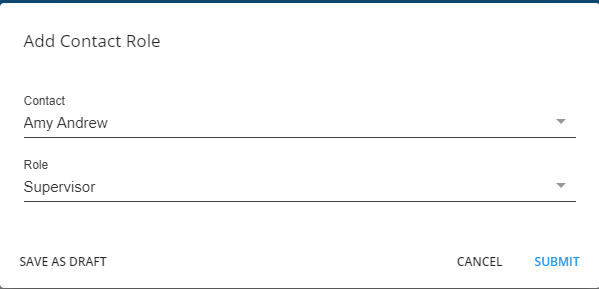
- Select "Submit"
Creating a Web User Account
If your contact does not already have a web user account to log in, they will need one in order to review/edit/approve time clock punches in WebCenter.
The contact will need to have a WebCenter role that includes Time Clock ex. "Customer Supervisor w/Time Clock." If you are not sure which role to give, talk with your admin.
Setting Up the Employee
In order for an employee to clock in and out on the Time Clock app, they must first be set up in your system.
Assignment Information
The employee must have an active assignment (status = open, start day is today or in the past, & end date is in the future) for an order that is set up for Time Clock.

Clock-In Credentials
In addition to having an active assignment, the employee must have generated the necessary credentials to clock in/out
Clock In/Out Credential Options:
- Pin: 6 digit code generated when employee logs into the TimeIntel by TempWorks application or manually generated in Beyond
- QR Code: QR Codes can be generated via Beyond where they can be printed out and used on ID cards, etc.
Generating a Pin or QR Code
TimeIntel by TempWorks Pins & QR Codes for employees are automatically generated when they are assigned to a customer/order that is set up for the TimeIntel by TempWorks application as long as the employee already has a web user account.
The Pin they have setup here will be used for punching in/out will work for any assignment they have using the TimeIntel by TempWorks application.
You can find the Pin/QR Code by:
- Navigate to Employee Record in Beyond
- Select the Web User Charm in the upper right or beneath the employee's name
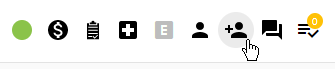
- View Account Details
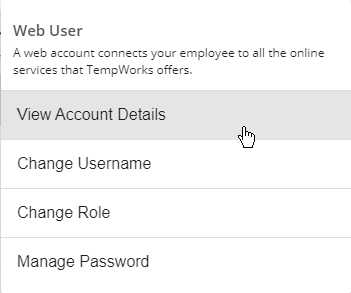
- Time Clock Authentication card towards the bottom of the page

- PIN will be listed as a 6 character letter or number combination
- Use the
 to copy the code
 - Use the
 to view/print out a QR code version
 to copy the code
  to view/print out a QR code version
*Note* Consider printing out QR codes to make stickers that can be placed on ID cards or PVC blank cards. Then your employees won't have to remember a code if they have their ID card.